Introduction
Hello! I’m Rachel Brindle. I maintain this digital garden (or knowledge repository) here. Amongst other things, I’m a pilot, I’m building my own (electric) airplane, I’m a software engineer by trade, and I help maintain the Quick & Nimble testing frameworks for iOS.
This is inspired by Nikita’s knowledge repository.
The basic idea is, as I come across information - or otherwise generate my own - I write it down in here. This is meant to provide a single, searchable database for things I know. So that I don’t have to keep searching how I did something previously. Additionally, this serves to help reinforce things I’ve learned, both by forcing myself to write down things I learn, as well as write it in a way that should help my future self not have to spend so long figuring out how I did a thing.
No content on this site is generated using AI. I hate that I have to put that now.
Using this Site
Pages are organized on the sidebar to the left. It’s sorted alphabetically, and most top-level sections have nested subsections. Sections with the chevron next to them can be expanded to show additional subsections. You can also search for things by clicking or tapping on the search icon in the top left.
There is an rss feed to track updated articles here. You can also paste any article’s URL into your rss reader and it should discover the feed.
This uses mdbook as the underlying technology. Additionally, I have written a number of custom plugins (or post-processors, as mdbook calls them) to aid in writing this. They are described in meta/tooling.
Recently updated
The 10 most recently updated articles are:
- Dependency Injection (2024-03-06)
- Slow-Cooked Pinto Beans (2023-11-17)
- Composite Homebuilt Aircraft (2023-09-23)
- Vim (2023-09-21)
- Testing (2023-08-12)
- Async/Await (2023-08-12)
- Testing Async/Await Code (2023-08-12)
- To Don’t (2023-08-12)
- Antarctica (2022-12-17)
- Flying (2022-11-06)
Last updated: 2024-03-05 16:12:53 -0800
Antarctica
The seventh continent, at the bottom of the world.
Antarctica is the highest, driest, and most desolate place on Earth.
Jon Johanson’s RV-4 Flight to McMurdo
In 2003, Australian Jon Johanson had the great idea to fly his modified RV-4 down to McMurdo. He even overflew the south pole station, before turning back and landing at McMurdo. There he was stranded for a bit as McMurdo didn’t want to supply him with fuel. He eventually had fuel donated to him and he was able to fly out.
Writeup on Jon Johanson’s flight at SouthPoleStation.com
US Antarctic Program
The USAP manages the US-run stations and research vessels, such as McMurdo and the south pole station.
- USAP.
Working in Antarctica
Again, this is only relevant for US-based persons such as myself. You can work directly through the USAP in either a management position (not likely to deploy), or a scientist position (more likely to deploy). Additionally, the USAP contracts with several companies for support staff.
I find the idea of working in Antarctica intriguing, but I would not be willing to make the sacrifice required to do so. It would definitely be an adventure, but being cut off from the rest of the world for 6 months sounds like a bit too much.
South Pole Station
Highly interesting Wendover Productions video on Living at the South Pole.
Last updated: 2022-12-16 23:15:35 -0800
Antiracism
Resources, twitter threads and the like that have opened my eyes about the extent to which racism is a thing, and what to do about it.
Last updated: 2020-12-22 17:22:26 -0800
Astronomy
I love everything related to space, both human exploration of space, and the observation of objects in space.
Resources
Resources for learning astronomy.
Richard Pogge’s/OSU’s Astronomy podcasts
Richard Pogge is a professor at OSU. He recorded the lectures for a few of his “astronomy for non-astronomy majors” classes and posted them online as podcasts. They’re absolutely enrapturing to listen to. One of the things I love about these is that he also covers a lot of the history behind astronomy, in addition to what we currently know.
- AST 161, from Fall 2007, is an introduction to solar system astronomy. This is absolutely fascinating as in addition to things like the planets and the sun, he also talks about how humans developed astronomy, and how astronomy has influenced all sort of our culture. In addition to some of the modern things we’re learning, as we’ve sent spacecraft to objects in the solar system.
- AST 162, from Winter 2006, is an introduction to stars, galaxies, and cosmology. It covers a bit more of the science behind stars, as well as a lot of the modern history behind how we gained that knowledge, and how we know it’s correct.
- AST 141>, from Fall 2009, is an introduction to astrobiology. I haven’t listened to this one yet, but I’m very much looking forward to listening to it.
Last updated: 2021-04-12 12:26:52 -0700
Astrophotography
Taking pictures of the sky!
See Cafuego’s page on software for osx.
See also the Mac Observatory site.
I use the following software:
- AstroDSLR for capturing from my DSLR.
- Nebulosity for stacking images.
Theory and Books
The standard recommended reading is The Deep-sky Imaging Primer.
- A bunch of other useful links for beginners. Though, the whole cloudy nights forum is super useful.
- Other useful threads for beginning imaging on cloudy nights
- Jerry Lodriguss’s astrophotography techniques
Finding a site
Find a local dark sky site. In LA, I like Joshua Tree National Park. However, being able to easily access far-away dark sky sites is one of my primary reasons for learning to fly.
Equipment
You can get away at a bare minimum with just a camera and a tripod. My equipment checklist is:
- Camera
- 50 mm lens, because wide field shots are fun.
- Telescope1
- Telescope camera mount
- (barlow lens, T-ring, etc.)
- Bahtinov mask.
- Telescope camera mount
- Equatorial Mount
- Motors for said mount
- Batteries for the motors
- Computer (Strictly speaking, this isn’t necessary - my camera can be set to take a series of photos at once)
- USB-A to Mini-USB-A (to talk to camera).
- RED flashlight - white will ruin your night sight. You also want low-lumen, for the same reason.
- Water
- Coffee
- Snacks
- Camping chair
- Sleeping pad/bag (even if you plan to stay up all night, bring these).
- Pillow
- Paper and Pen.
- A book or something else to do while the computer does all the work.
Be sure to set the computer to “night shift” mode2 before it’s dark, as red as possible.
Go there, set up camp. Preferably be set up before dark.
Jerry’s list of beginner equipment for astrophotography, which is a potential source for expansion.
Actually Taking Photos
Regardless of how you use it, be sure to write down what you’re taking a photo of when you do it. Even if you know what the constellation/body you’re photographing is anyway.
Also, for stacking3 reasons, the more photos you take, the better it is, but it does have diminishing returns4.
Using a computer
Use AstroDSLR from computer to control the camera. Keep the camera in bulb mode to allow the software to control exposure time. Otherwise follow these instructions.
Make a different folder for each different set of photos you take.
Drift measurement with AstroDSLR
Copied from their website:
For polar alignment by the drift method or for the validation of the guiding you can use drift measurement helper panel.
The scale of the graph is adjusted automatically. Blue curve represents drift in X and red curve in Y direction. Blue value in lower left corner is drift per image in X direction and red value in lower right corner is drift per image in Y direction.
To use the panel for polar alignment, rotate camera (to align RA/Dec axes along X/Y directions), start preview in endless loop, select accordingly bright star and use drift method.
Please note, that the graph is cleared every time you select the star in the preview image.
Without a computer
Put the camera in manual mode, and have it set to average.
Star Trails
Sometimes you’re going for that really cool effect, othertimes you’re not.
Here’s an article from Jerry Lodriguss on how to deal with star trails.
PostProcessing
Nebulosity doesn’t read the color information from your raw files. Convert them to jpeg, because that’s still better than grayscale images.
for i in *.cr2; do sips -s format jpeg "$i" --out "${i%.*}.jpg"; done
From Nebulosity, open batch -> align and combine images. Select “Translation + Rotation + Scale”, click “OK”, and select the images to stack. Now, select the same star in each photograph as it prompts you. You’re going to go through the sets 3 times (so that it can correct for translation/rotation/scale). Now, do some manual editing, and save the end result.
Post to instagram5 or whatever. Use it as your new desktop background.
Much better advice on how to select one. Though, usually, the best one is the one you already own.
or use f.lux to remove as much blue from your screen as possible.
It’s essentially an inverse square relation - to get 5x better quality, you need to take 25x more images.
flume seems to be a decent OSX client for instagram. The pro version is worth it.
Last updated: 2020-01-10 11:49:17 -0800
Gallery
Sorted by date
Last updated: 2019-07-13 16:35:48 -0700
2019-07-12 Joshua Tree
Went out to Joshua Tree National Park to try out a new scope! I’m very pleased with the results.
Jupiter
One of the first things I photographed!
This combined from 200 separate images. Two sets of 100. The first to get details of Jupiter’s clouds (ISO 100, 1/200th second exposure, I could have shortened the exposure length even more to get better details). The second to get details of the 4 Galilean moons (ISO 100, 1/10th second exposure). I then stacked each set of 100 into their own image, and replaced the overexposed Jupiter in the picture with the moons with the much better image of Jupiter’s clouds. I think it worked out pretty well.

Andromeda Galaxy
I had to wait until about 1:30 AM for Andromeda to be sufficiently high in the sky to clear some ground obstructions (rocks)
This is composed of 100 images stacked together. 10 second exposure, ISO 2000 or so. (Any longer exposure time introduced noticeable star trails, as my mount wasn’t perfectly aligned).

Pleiades
This was the last picture I took - my camera’s battery died after taking the first of what would have been 100 images. This was taken at approximately 3 AM.
10 second exposure, forget the ISO speed.

Last updated: 2019-07-14 10:21:26 -0700
2019-08-31 Joshua Tree
First weekend following a new moon, let’s get some photos of the stars!
Unlike last time, I made sure to have both camera batteries fully charged. At some point, though, I need to figure out a way to power the things from either my car or possibly an ebike battery.
Orion Nebula
This was surprisingly easy to capture. This was done with a series of 100 images, ISO 3200, and a 15 second exposure. Stacked (more-or-less automatically), then processed in post to bring out that extra oomph. Cropped from the original to bring more attention to the nebula itself. This nebula is really bright.

California Nebula
The California Nebula (NGC 1499) is an emission nebula in the constellation Perseus.
This was quite difficult to capture. Because it’s so red, you can’t visually see the California Nebula. I could barely make it out on the highest ISO setting my camera can do (25600, wow) at a 20 second exposure. Couldn’t do any longer without introducing star trails. I’d love to revisit this once I have autoguiding figured out - or at least with a much better aligned telescope.
Postprocessed to bring out the red. as much as I could.

Last updated: 2019-09-08 20:29:20 -0700
Image Stacking
Image stacking is the process of combining multiple images of the same thing into a single image. This is done for multiple reasons - to increase dynamic range, to reduce the effects of noise, etc.
Theory
Keith Wiley has a really good article on the theory behind image stacking.
Last updated: 2019-06-05 14:54:06 -0700
Astro-Tech AT102ED Telescope
It’s a nice, relatively cheap refracting telescope.
Making the Bahtinov Mask
The outer diameter of the leading element is 122mm.
I have a bahtinov mask available here, it was generated from this svg, which itself was generated from this page. The relevant specs for that is it’s 102mm diameter lens, and it’s 714mm focal length.
This is also available on thingiverse
Focusing
With a Canon EOS 6D on a T-ring (1.25 inch), this focuses at just past 41mm.
With a Canon EOS 6D on a 2-inch T-Ring, this focuses at about 82.5mm.
Last updated: 2020-12-22 16:44:36 -0800
Celestron CG-4 Equatorial Mount
My notes on how to use this mount.
Setup is relatively simple, but much more involved than altazimuth mounts we might be used to.
Balancing
First, we balance in the right ascension, then in declination.
RA balancing is necessary for accurate tracking when using motor. It also eliminates undue stress on the mount.
DEC balancing is necessary to prevent sudden motions when the DEC clamp is released.
Right Ascension
- Release the RA clamp (the lower clutch), and position the telescope off to one side of the mount. The counterweight bar should be horizontal on the opposite side of the mount.
- Release your hold on the telescope - gradually - to see which way the telescope roles (to one direction or the other)
- Move the counterweight as necessary to balance the telescope (remains stationary when the RA clamp is released).
- Tighten locking screw to hold counterweights in place.
Declination
- Release the RA clamp and position the telescope off to one side of the mount - basically, same start as when balancing in RA.
- Lock the RA clamp to hold the telescope in place.
- Release the DEC clamp, and rotate the telescope until the telescope is parallel to the ground
- Gently release hold on the telescope to see which way it rotates. As with before, don’t let go entirely.
- Move the telescope on the mounting bracket in either direction until the telescope doesn’t move, as tested in part 4.
- Tighten the mounting bracket screws.
Polar Alignment
Now we get to the part of what makes equatorial mounts actually different than altazimuth mounts. This is necessary to track the stars correctly.
The goal is to place the telescope’s axis of rotation parallel to the Earth’s axis of rotation. This is done by moving the telescope vertically (altitude) and horizontally (azimuth), not in RA or DEC.
Note that the mount can really only be adjusted between 20 and 60 degrees.
There are a few ways to do this.
Latitude scale
This is the easiest way to align a telescope. It also can be done in daylight, because it only requires that you know which way is (true) north, and your latitude (degrees above the equator). This is also the least accurate, but it gets close enough for short exposure astrophotography.
- Make sure the polar axis of the mount is pointing due north.
- Level the tripod (there’s a bubble level built into the mount for this purpose)
- Adjust the mount in altitude until the latitude indicator points to your latitude.
Pointing at Polaris
This is conceptually simple. Polaris is less than a degree away from the celestial north pole, so you use Polaris as a stand-in for the celestial north pole. It’s about as accurate as the latitude scale method.
- Make sure the polar axis is pointing north.
- Loosen the DEC clutch nob and move the telescope so that the tube is parallel to the polar axis. When this is done, the declination setting circle will read +90 degrees. If the declination setting circle is not aligned, move the telescope so that the tube is parallel to the polar axis.
- Adjust the mount in altitude and/or azimuth until Polaris is in the field of view of the finder.
- Center Polaris using those same altitude/azimuth controls. Do not move the telescope in RA or DEC.
Declination Drift
This takes the longest amount of time, but produces the best results. In this, you’re looking at two stars to see how much they drift in declination over time, which tells you how out of alignment you are from the polar axis. Because this takes a while, you should first get a rough alignment (using either latitude scale or pointing roughly at a polar axis).
The idea here is to choose two bright stars - one near the eastern horizon and one due south near the meridian. Both should be near the celestial equator (0 declination).
For the southern star, choose one within half a degree of the meridian, and 5 degrees of the celestial equator. If the star drifts north, the polar axis is too far east. If it drifts south, the polar axis is too far west.
Once that star no longer drifts, we move on the the eastern star. This should be 20 degrees above the horizon and within 5 degrees of the celestial equator. If it drifts south, the polar axis is too low. If it drifts north, the polar axis is too low. Adjust the latitude scale to fix this.
Modifications
Modifying Motor Controller for Autoguiding
See this guide from Shoestring Astronomy.
Last updated: 2019-09-14 20:55:42 -0700
Bae
My bae is pretty great. As of this writing, she has a Masters in computer science, and is working on a PhD in robotics and electrical engineering. I have 3/4 of an undergrad computer science degree.
Talk Practices
She sometimes gives talks, and she likes to practice for me. Sometimes I take notes on them. I rarely actually understand what she’s talking about. But she’s cute nonetheless.
2019-07-17 Observability in Control Theory
She practiced a talk on control theory in front of me. These are my notes. The talk content might be wrong - she’s still learning about this.
E.G. Drone on top of a car, measuring the car.
It has a method to track the target (car). The way it does it is to measure the state of the target.
x(t+1) = A * x(t)
A is a transition matrix - it maps the target from the current state to the next (next state = current state * transition matrix)
Drone can measure the target’s “process” - it can estimate the next state of the target because it has the transition matrix encoded in it.
Let’s say drone also has some radar/camera sensors (other sensors).
Now, y(t) = C * x(t) - y is the drone’s measurement of x(t). C maps the current state to what the drone is observing.
This format is how we’d model dynamical system. Usually there’d be other terms for noise (B - process noise, D - measurement noise).
Given this system, the system is observable if given y(0), y(1), ..., y(l) if we can backtrack to a state x(0)
How to get from the measurements to the original state (get from y(0), y(1), ... to x(0)). So, we know from x(1) = A * x(0), and we know that x(2) = A * x(1)=A^2 * x(0). Therefore, x(l) = A^l * x(0)`
Similarly, y(0) = C * x(0) and y(1) = C * x(1) = C * A * x(0), and so forth: y(l) = C*A^l*x(0). This can then be rewritten as a system of linear equations, like so:
| y | observability matrix |
|---|---|
y(0) | C |
y(1) | CA |
y(2) | CA^2 |
| … | … |
y(l) | CA^l |
Can then be solved for x(0) if we have A and C. So, we could write this out if we have matrices A and C, but it’s a long matrix, so it’d be difficult to compute.
How do we know that this is observible if it’s computationally hard to get to a unique x(0)
So, this can be written as:
y\_bar = O * x(0) (O = observability matrix). If the rank(O) == n (rank = number of columns, n = number of states that target can be in), then the system is observable.
Doesn’t tell you how observable it is, or how much information you need in order to get to x(0) - it could be observable, but it might be infeasible to observe.
Measuring Observability
So, measuring observability:
Observability gramiam - different kind of matrix that is used to tell how observable a system is.
for all t from 0 to l, the normal of y(t) squared = energy of y = the observability gramiam. The higher, the more observable.
= sum from 0 to l of transposed(C * A ^ t * x(0)) * (C * A ^ t * x(0)) = G.
If we take determinant of G, and is high, then we have high energy in y, and it’s highly observable.
want to maximize the minimum eigenvalues of G, in order to have high observability.
These are all ways to say how observable a system is.
Usefulness
Why do this?
You can use this information to calculate how well a kalman filter works by calculating the observability gramiam.
You can determine how well you designed your system.
Last updated: 2021-11-27 22:07:29 -0800
Bicycling
Bicycling is the best form of ground transportation.
No, but seriously, here’s why bicycling is the best.
- Low cost of entry, and very low recurring costs. (You can get a decent hybrid for a few hundred dollars. Maintenance can be done by anyone, but even if you have a bike shop exclusively do your maintenance, it’s less than $100/year to maintain.)
- Keeps you fit & healthy. Yes, maintaining weight is entirely about your diet, but cycling helps you stay fit & healthy regardless of weight.
- Relatively speedy. Most people can easily maintain 10 mph on flat ground, with a little training you can easily double that.
- Incredibly nimble. Bikes take up very little space, and have very low mass making them easy to maneuver around obstacles.
- Extremely versatile. You can carry just about anything with a bike. Larger items require more planning, but you can certainly carry full sheets of plywood with a bicycle trailer.
- In a lot of urban environments, bicycling is the fastest mode of personal transport. You can filter through car traffic, don’t have to look for parking, and can take shortcuts. Even in the Venice, CA area, bicycling is faster than driving a car to destinations less 3 to 5 miles away.
Subpages
Links
Last updated: 2022-08-14 18:29:20 -0700
BBSXX Electric Bike Motor
One of the most popular electric bicycle conversion motors, the Bafang bbs02 is a 750 watt mid-drive motor and the Bafang bbsHD is a 1000 watt mid-drive motor. They are similar in design and are commonly referred to interchangeably as a BBSXX.
Installing
Notes while installing one of my bbs02 units
What you need:
- Pedal removal wrench
- A bafang install tool
- crank arm puller tool
- Long wrench. You can never have too much leverage.
- Grease
- Medium-grade thread locker
- A set of 1-10mm hex bolt drivers/wrenches
- Paper Towels
Steps:
- Remove the old bottom bracket
- Remove the pedals
- Remove the crank arms (you will want as long a wrench as possible for doing this)
- Remove the old bottom bracket (Again, a long wrench is a lifesaver, just for the extra torque you can apply on this)
- Remember to remove the non-drive side part first (loosens counter-clockwise - left turn)
- Remember that the drive-side part is reversed (loosens clockwise - right turn)
- Install the motor
- grease the inside of the bottom bracket shell (on the bike frame)
- Insert the motor into the bottom bracket shell.
- Install the lock ring mechanism. Use one of the “bafang install tools” you can find easily by googling. This is also one of the places you want to at least be close to the appropriate torque rating.
- At this point, the drive unit should be securely installed and shouldn’t move at all as you try to push down on it.
- Install the chain ring
- Install the cranks
- Install the pedals onto the crank arms
- Install the extra cabling.
Uninstalling
Notes I took while uninstalling one of my bbs02 units to move it to a different bike.
What you need:
-
Pedal removal wrench. The longer the wrench, the better (more torque!)
-
Grease
-
Medium-grade thread locker
-
Spline tool
-
Spanner wrench
-
Crank arm puller
-
A set of 1-10mm hex bolt drivers/wrenches.
-
Paper Towels
-
Remove the pedals (Using the pedal wrench)
-
Once the pedals are removed, remove the crank arms. Clean off the existing grease and set aside.
-
Remove the chainring. This uses 4mm hex bolts.
-
Remove the lock ring mechanism. This is the top splined nut, y-shaped thing, the lock-ring, and the washer underneath the lock-ring. Remove the nut using a spline tool, use a 5mm bolt driver to remove the bolts on the 5-shaped nut, and use a spanner to remove the lock-ring. The washer will come off. Set aside all of these close to each other.
-
At this point, the drive unit will slide out of the bottom bracket of the bicycle. Be sure to unplug all the cables that are connected to it first, of course.
-
Remove the cables remaining on the bicycle.
Last updated: 2022-08-14 18:29:20 -0700
Ebikes
Electric Bicycles, or ebikes, manage to have all of the benefits of a standard bicycle (very cheap to buy and own, nimble, versatile, oftentimes faster than driving), and they reduce or eliminate the effort required to actually get around. I am a huge fan and proponent of electric bicycles (and really, EVs of all kinds. Bring on the electric revolution).
Motors
There are basically 2 ways to mount the motors in an ebike nowadays: Hub, and Mid-Drive.
Hub motors are motors directly embedded into one of the wheels of the bike. Mid-drive motors are mounted such that they use the bike’s drivetrain to deliver power.
Hub Motors
Hub motors work by embedding the motor into the wheel. Which makes installing a hub motor onto an existing bike super easy - all you need to do is replace the wheel, mount the other electronics, and go.
In general, hub motors are thinner than mid-drives. They do, after all, have to fit inside of a bicycle wheel. And even fat tire bikes have relatively thin wheels. This generally means that they’ll have a larger diameter than a mid-drive motor of the same power rating, which gives them a larger surface area and improves heat dissipation.
Hub motors are also unsprung weight. On a bike without suspension, this doesn’t really mean anything, but on a bike with suspension, it reduces the effectiveness of the suspension, which both reduces traction on bumpy roads and makes the ride itself bumpier.
Hub motors, being independent of the system drive train, also offer redundancy. In the event that the drive train fails, then you can get home using only the motors.
All motors have specific most efficient and max rpms that they operate. Which for hub motors directly translates into a most efficient and max speeds. These are based on the voltage of your system, as well as the specific motor, and the diameter of your wheel. Larger diameter wheels will have higher max speeds, but lower torque. Mid-drives, which use the gearing of your bike, also have max speeds, which are based off whichever gear your bike is in.
Direct Drive
Direct drive motors are as simple as you can get, and they work very well. They are motors that directly drive the wheel, with no clutch used. Generally, direct drive motors have no internal gear reduction. Meaning that the RPM of the wheel is the RPM of the motor. There are motors with internal gearing without clutches, such as Grin Tech’s GMAC motor, which are usually lumped in with direct drive motors when talking about certain topics like regenerative braking. You will almost never find a direct drive motor that has a clutch.
Direct drives don’t have a clutch. The motor is always engaged. This is what enables regenerative breaking, but it also means that you can’t just turn off the motor and pedal - the motor will actively sap your power even if the entire system is off. You can configure certain systems to electronically freewheel, which does use extra power (on the order of a few watts), but this still results in less system losses than if you simply allowed the motor to drain your power.
Direct drives offer regenerative braking. Which allows you to slow down by using the motor as a generator, converting your kinetic energy back into electricity (and ultimately chemical energy as it recharges your battery). Depending on the kind of environment you’ll be riding on, regenerative braking can typically recover (or extend your range by) 3% to 15%. Hillier terrain will allow you to extend your range the most. Additionally, more urban environments (where you’ll be stopping more often) also allows you to recover more energy as you’ll be stopping more often. However, more important than extending your range is that regenerative braking will vastly reduce wear on your physical brakes. Additionally, your motor controller needs to support regen in order for regenerative braking to work. Otherwise there’s really no point installing a direct drive motor.
Direct drives also can be operated at a much higher power level than geared hub or mid-drive. Without having to worry about damaging any internal gearing, or damaging the bicycle’s drivetrain, it’s not rare to see direct drive motors that can output 2 to 4 KW of power. (Which does not apply to geared hub motors that lack a clutch).
Direct drive motors are near-silent. There’s no gearing to cause additional noise. The only noises are road noise, wind noise, and whining of the electronics.
The main downsides to direct drive motors are that they are inefficient for low speed/high torque uses. The 1-1 ratio of the motor to the wheel means that for bicycle wheels, direct drive motors don’t really run at efficient RPMs until you’re going greater than 15 mph or so. This is especially exacerbated for hills, or when pulling cargo, where you’re naturally going to put more load on the motor at lower speeds. Running a direct drive motor under such high-load conditions can lead to overheating. This isn’t as much of an issue for motors with geared hubs that lack clutches, which can handle higher torque loads.
To my knowledge, it’s very hard to find a factory ebike that ships with a direct drive motor. These are generally used in DIY installs, or from high-end boutique manufacturers.
Geared Hub
A geared hub motor is a motor with internal planetary gears that allow the motor to spin at a much faster rate than a traditional direct drive motors. Additionally, nearly all geared hub motors have clutches that allow them to freewheel. Which means you can turn off the electrics and pedal the bike like a very heavy acoustic (non-electric) bike.
Geared hubs are most of the hub motors on the market. Because of the gearing, they provide much more torque than direct drives, and can thus be much smaller than direct drives. They are generally a bit louder than direct drives, but newer ones are coming out that use quieter gear reduction which somewhat mitigates that issue. Generally, if you come across a hub motor kit on the market, it’s using a geared hub motor.
Geared hub motors are usually, but not always, slightly lower power than direct drives. Higher power geared hub motors can have heat dissipation issues. Plus at higher power levels, you’ll want to run a direct drive motor for the extra speed.
Because geared hub motors are so common, they’re typically used in most entry-level ebike conversions. Additionally, a lot of entry-level factory ebikes use geared hub motors.
Mid Drive Motors
In general, Mid drive motors work by driving the rear wheel via the bike’s drivetrain. Modern ebikes do this by essentially mounting the motor in or around the bottom bracket. This places the weight of the motor in a really good position, balance wise. It also reduces the total unsprung weight of the bike, which improves traction. Because mid-drives can take advantage of the bike’s gearing, you can get both high torque, and a decently fast top speed. Meaning they can climb well and perform well on flat ground.
The downsides of mid-drives are that they increase wear on the bike’s drive train. They also can’t be run at super high power levels. Above 2000 watts, there’s a real risk of snapping your bicycle chain. Even at more regular power levels like 500 watts, they still increase wear simply because the average human will put out something like 100 watts continuously. You can’t really do regen on a mid-drive, so you’ll be able to climb hills faster, but you won’t regain any of that energy on the way down. They also tend to be louder because most mid-drives have some kind of internal gearing in addition to using the bike’s gearing. Finally, if your bike uses external gearing (aka a derailleur, most bikes use these) instead of internal gearing, then you need to not run power through the drive while shifting. This is done either by using a specific “gearsensor” to detect when a gear change, which the controller will use to briefly cut power to the motor during that. Alternatively, you can make a habit to cut power when you change gears.
Still, for most people a mid-drive motor is a really good entry to ebiking. Especially if you’re going to get a factory-built ebike. Most factory-built ebikes are specced for the European market, which has a limit of 250 watts on the motor, and a mid-drive really helps when the motor will only output 250 watts of power.
Which motor style is better?
It depends.
First, let’s examine this from a hub motor vs. mid-drive motor. Mid-drives excel at climbing hills and going from a stop. Making them a no-brainer for something like mountain biking. They also work really well for other high-torque applications, like riding through sand or snow.
My first few ebikes used mid-drive motors, and the only thing I really want from hub motors is the ability to use regenerative braking.
Hub motors are excel at riding on flat terrain, or climbing relatively gentle inclines. Additionally, because of the potential for regenerative braking, hub motors are better for downhill and urban environments. Additionally, because they’re separate from the bike’s drivetrain, you get a bit of redundancy if either fails. With mid-drives, you can obviously still pedal if the electrics fail. But if the drivetrain fails, at best you’re left with a really awkward scooter. Thankfully, this isn’t an issue in practice so long as you take care of the drivetrain (regularly clean and lubricate the chain, replacing it as needed, etc.) and don’t run too much power through it.
Again, it depends on your use case. My first few ebikes used mid-drive motors, which allowed me to relatively easily convert these existing bikes without much fuss. My only complaint with these are with the specific kits I used, otherwise I’m quite happy with these.
Solar?
Powering an ebike using solar power is actually doable and sometimes worthwhile. It’s not cost-efficient in terms of being the sole source of electricity. Ebikes are efficient enough, and energy is cheap enough that you will spend maybe $1.00 in electricity for the entire life of the bicycle. However, for long-range applications, it is cheaper to buy and set up solar panels + a charge controller than it is to buy a second (or larger) battery.
The way you use solar with an ebike is to use the panels to charge the ebike battery. It doesn’t make sense to ditch the battery and use the panels to directly run the motor. The power output from the panels is too low and variable to be worth doing.
The most obvious reason to use solar power is for long, off-grid bicycle tours. Solar also works well for other types of off-grid charging. For example, you might ride an ebike to work, and leave it outside to fully charge back up while you work. Which, again, won’t save you anywhere near enough money to be worth tracking, but if you were going to leave the bike outside anyway, then it might as well charge while it’s there. This also saves you time from needing to keep a charger at work, or from having to bring your battery to your desk to charge there.
One idea I’m planning to explore with solar is the idea of putting on a solar roof, which would provide partial shade for me on rides, while also slightly charging the battery. Here the primary reason to do this is to provide shade, with a side-benefit of slightly extending the range of the ebike. I’ll update this once I do so.
My Experience
I currently have 2 ebikes, each of which is powered by a BBS02 mid-drive motor. One of which is on a Yuba Mundo longtail cargo bike, and the other is on a standard hybrid bike. I think that the BBS02 and BBSHD mid-drive motors are excellent kits for creating a really good ebike with minimal fuss. My main issue with these kits is that Bafang (the manufacturer) decided to only use cadence-based pedal-assist for these, not torque-sensing. Additionally, I’d love to use regenerative braking, so I’m actively looking at changing one of my bikes to use a hub-motor system so I can try out regenerative braking.
Links
Legality
I’m a person on the internet. This is not legal advice. This might even be entirely wrong or outdated. Or you might live outside of the US (or in one of the states that bans ebikes). Don’t be an ass, use your brain.
In the US, ebikes are limited to 750 watts when operated in public spaces. Locally, there may be additional limitations or even bans. In private spaces, there’s basically no limits.
A bunch of states are adopting different classes of ebikes, based off what California introduces. These are:
- Class 1: Ebikes limited to 20 mph, pedal-assist only.
- Class 2: Ebikes limited to 20 mph, throttle allowed.
- Class 3: Ebikes limited to 28 mph, pedal-assist only. Can’t ride on “Class 1 bicycle paths”. Must be at least 16 to ride.
You can still pedal an ebike past the given limit, but after 28 mph, a class 3 ebike should cut off the motor.
In practice, ebikes are basically ignored by cops. They likely aren’t educated on these laws, and even if they are, it’s really hard to prove that you were actually doing anything wrong. The takeaway here is to try not to do anything to bring extra attention to you. Which, unfortunately, might not be possible.
Cool, that’s done.
Last updated: 2022-08-14 18:29:20 -0700
Books
I should leave reviews on goodreads, but I don’t.
Some definition on genre:
I vastly prefer to read sci-fi and/or fantasy. Of that, I really enjoy hard sci-fi, but that’s not a requirement.
Here’s a list of books and other readings I enjoy:
Books
Sorted by Author
Andy Weir
- The Martian is a hard sci-fi book about someone left behind on one of the first missions to Mars, and his struggles to get back home.
- Artemis is a heist novel set in the first city on the moon. Like The Martian, it’s also hard sci-fi.
Fletcher DeLancey
My partner turned me on to her. Her Chronicles of Alsea series is pretty great, though at times it reads like the fan fiction it grew out of. They’re still highly entertaining and worth reading.
Scott Meyer
I really enjoy his Magic 2.0 series, though it does have a significant drop-off in quality. The first two books are amazing, the third is pretty good, but not as good as the previous two. But the reviews for the fourth one have kept me from continuing.
Tamora Pierce
When I was 11 or 12, her Circle of Magic books caught my eye at a Barnes and Noble. My parents bought the entire quartet for me. Somewhat recently, I began to re-read these, and remembered everything I enjoyed about them, plus additional things that my older perspective was able to pick up on. This time around, I also read her Circle Opens quartet, which is also good. Highly recommend these feminist books for any fans of fantasy.
Tolkien
I remember reading The Hobbit the summer before fifth grade. The only scene from it that I remember, and even barely, is Bilbo getting the ring. I really ought to re-read it again sometime.
Also around that time, I wanted to read Lord of the Rings. But I just couldn’t get into it. It wasn’t until after I turned 30 that I actually got around to reading the books.
Other Readings
- HFY is a subreddit where people share stories sci-fi/fantasy stories where humans are the badasses. Usually by picking one particular trait of humans and overexagerrating it to give them an advantage over other species.
Last updated: 2022-10-29 09:20:58 -0700
FanFiction
I said I’d link all sorts of crap.
Organized by fandom
Legend of Korra
Almost always Korrasami stuff, because of course.
Smut
Of course I’m going there. NSFW.
Shera and the Princesses of Power
Catradora!
Smut
NSFW.
Greek Mythology
Found some Medusa F/F.
From this reddit thread
- Short story in the thread itself
- Love is Blind: Medusa rescues a blind peasant girl
- Living Art a blind artist is sacrificed to Medusa as a living statue.
- In Another Age: Medusa runs into a blind girl and falls in love
Last updated: 2020-05-16 23:19:11 -0700
HFY
Short for Humanity, Fuck Yeah. These are sci-fi/fantasy stories about how humans are different than other species.
Some of my favorite examples are:
SciFi
- The Deathworlders is one of the original/foundational HFY stories. Humans are still pre-contact, yet there have been some that are illegally kidnapped/in space, and as it turns out, there they only ones to have evolved from a “deathworld” - a high-gravity planet with very competitive life.
- Contact Procedures. Humans are relatively advanced when an FTL gate is installed in their system. They are introduced to a corrupt government, figure out that said government is corrupt, gives them the finger and fights them. It’s one of the best-written stories in the subreddit.
- Intergalactic Challenge Games. Aliens host an Olympics-inspired event, this is the first event with humans, and humans troll the shit out of them. 5 part story.
- On the Shoulders of Giants is a look at human rocket development (as of mid-2018 or so, pre BFR -> Starship/Super Heavy rename) from the perspective of them being museum pieces.
- The Cult of Janus - Humans set up a religion to seed spies and soldiers expecting some galactic war. To keep it’s cover, the religion takes care of the community. Centuries later, another religion tries to start a holy war, and the Church of Janus responds.
- Humanity’s Debt. Doctors, fuck yeah.
Fantasy/Sci-Fi mix
- The Magineer is about a futuristic engineer w/ AI implants who gets dumped in an MMORG setting where magic is, at it’s most basic level, a programming language. Super interesting.
- Finishing The Fight is a halo/neverwinter nights fanfic. It’s written pre-Halo 4, which honestly is a plus in my book.
Last updated: 2021-04-12 12:26:52 -0700
Flying
Notes on Flying and Aviation.
Everything from writeups of notable flights, notes on airports and some of the noise abatement procedures around them, to a bunch of theory and how to actually operate an airplane.
Basically, more information gets added to this subsection as I study for an additional rating or license. Currently, I’m an instrument-rated private pilot. I have no plans to go for a commercial license. I might do a multi-engine rating at some point. I would also like a seaplane rating as well.
Links
Last updated: 2022-11-06 10:49:35 -0800
Aviation Decision Making
ADM, or Aviation Decision Making, are all of the decisions made surrounding flying - from whether or not to even go flying in the first place, to discontinuing flight or completing flight as planned.
This is taken from the PHAK, either verbatim, or adapted.
Steps for good decision-making:
- Identify personal attitudes hazardous to safe flight
- Learning behavior modification techniques
- Learning how to recognize and cope with stress
- Developing risk assessment skills
- Using all resources
- Evaluating the effectiveness of one’s ADM skills.
Risk Management
- Accept no unnecessary risk.
Duh, flying has risk, but maybe don’t fly VFR in low visibility conditions? Or at least, do so with a CFI who has experience in those conditions, from whom you can learn. - Make risk decisions at the appropriate level.
PIC owns all the risk. Don’t let passengers bully you into violating 1, and don’t let ATC do so either. It’s always appropriate to tell ATC “unable” to a command. - Accept risk when benefits outweigh costs.
Don’t stack risks. Don’t fly an unfamiliar plane in MVFR conditions. - Integrate risk management into planning at all levels.
Not just in preflight planning, but at all stages of the flight. Maybe the weather goes to shit en-route. In which case, reconsider whether the increased risk is worth it, or maybe you can go somewhere else - or even just return back to where you came from.
Hazard and Risk
Hazard is a condition, event or circumstance (whether real or perceived) that a pilot encounters. Risk is the pilot’s assessment of the hazard. Note that different pilot’s can come up with different risks for the same hazard.
Hazardous Attitudes
Studies have identified 5 hazardous attitudes that can prevent making sound decisions:
| Attitude | Phrase | Antidote | Notes |
|---|---|---|---|
| Anti-authority | Don’t tell me | Follow the rules, they’re usually right | Aviation regulations are often written in blood, their’s a very good reason to follow them. |
| Impulsivity | Do it quickly | Not so fast. Think first. | Like with everything in modern life, thinking before you act is always the correct thing to do. Actually doing that, though, is much harder. |
| Invulnerability | It won’t happen to me | It could happen to me | Power loss on takeoff is a thing that only happens to other people right? Wrong. It could totally happen, and be prepared in case that does happen |
| Macho | I can do it | Taking chances is foolish | Don’t take unnecessary risks. Don’t do things to prove to yourself/others that you can. You’re already a cool person by being able to fly, you don’t have to prove anything. |
| Resignation | What’s the use? | I’m not helpless. I can make a difference | This is, to me, probably the most deadly of the 5 attitudes. Getting into an emergency situation via the other 4 is bad, but then deciding that there’s nothing you can do - especially when there often is something you can do - is what will kill you. Less dramatically, letting someone bully you into going along with unreasonable requests can also kill you. You are PIC, you are in charge. Act like it. |
Risk Assessment Matrix
Also copied, more or less, is a matrix on deciding how bad a particular risk is. With likelihood on one axis, and severity on the other.
Likelihood is expected chance that event will occur:
- Probable: Will occur several times
- Occasional: Will probably occur sometime (expected at least once)
- Remote: Unexpected to occur, but possible
- Improbably: Very unlikely to occur.
Severity is expected consequences of the event happening:
- Catastrophic: Loss of life or property
- Critical: Severe injury/major damage (expensive to repair, insurance might declare plane totaled)
- Marginal: Minor injury/minor damage (only a few AMUs of damage)
- Negligible: Less than minor injury/damage
| Severity | ||||
|---|---|---|---|---|
| Likelihood | Catastrophic | Critical | Marginal | Negligible |
| Probable | High | High | Serious | Medium |
| Occassional | High | Serious | Medium | Low |
| Remote | Serious | Medium | Medium | Low |
| Improbable | Medium | Medium | Medium | Low |
Mitigating Risk
The way to mitigate risk is one of either:
- Cancel the flight
- Delay the flight
- Bring someone more experienced who can help you address the risk
Roughly in order of likelihood.
One suggested way to eliminate the “must go home” pressure is to always bring an overnight kit with you, so that if you do get stuck somewhere you’re at least fine for the night.
Remember, the general rule for choosing to fly GA to a place is:
Time to spare, go by air.
Last updated: 2019-09-11 14:16:51 -0700
AeroMedical
Medical Concerns with flying.
Hypoxia
Hypoxia is an insufficient supply of oxygen to the cells. Hypoxia is incredibly dangerous as it causes the brain and other vital organs to become impaired. Additionally, the symptoms of hypoxia vary based on the person, and can be hard to detect. I personally have felt ill and lightheaded as a result of hypoxia, but the next time I experience hypoxia might have different symptoms.
There are 4 types of hypoxia noted in the PHAK:
- Hypoxic hypoxia: Too little oxygen as a whole for the body. It’s a concern as you increase in altitude, there’s less air overall, which can result in too little oxygen.
- Hypemic Hypoxia: There’s sufficient oxygen in the air, but not enough in the blood. Most commonly caused by CO poisoning. Can also be caused by recent (within the past several weeks) blood donation and exacerbated by flying at altitude.
- Stagnant Hypoxia: The blood can take up the oxygen, but it is unable to be transported to the organs. Can be caused by heart problems, excessive acceleration, a constricted blood vessel, or cold temperatures.
- Histotoxic Hypoxia: The oxygen is able to be transported via the blood to the organs, but the organs are unable to use it. Usually caused by alcohol or drugs. “drinking one ounce of alcohol can equate to an additional 2,000 feet of physiological altitude” - PHAK.
Hyperventilation
Excessive rate and depth of respiration. Causes an excessive amount of CO2 to be removed from the body. Similar symptoms to hypoxia. Breathing into a paper bag or talking aloud helps recovery.
Last updated: 2021-05-29 09:20:33 -0700
ATC
Air Traffic Control. The system of people and equipment designed to help keep you safe in the air.
Per FAR 91.125, light gun signals that ATC can send you in the event of lost comms are:
| Color/Type | On Ground | In Flight |
|---|---|---|
| Green, Steady | Cleared for takeoff | Cleared to land |
| Green, Flashing | Cleared to taxi | Return for landing |
| Red, Steady | Stop | Give way to other aircraft and continue circling |
| Red, Flashing | Taxi clear of runway in use | Airport unsafe - do not land |
| White, Flashing | Return to starting point on airport | N/A |
| Red & Green, alternating | Exercise Extreme Caution | Exercise Extreme Caution |
Last updated: 2021-11-11 17:50:50 -0800
Big Bear City Airport, L35
Information for flying in to LA’s local mountainous airport.
Noise Abatement
(Not required, but please follow these)
Available on whispertrack.
Curfew: 10 pm to 7 am local time.
Recommends minimizing “unnecessary engine idling and runups”, especially at night.
Procedures
- Preferred Runway: 26
- Pattern Altitude: 8000
- Intersection Takeoffs not recommended
Last updated: 2019-11-04 16:42:24 -0800
Buying a plane
There’s all sorts of guides from people on how to do this. Here’s my process.
Deciding on a kind of plane to buy
- Figure out your “mission” (what will encompass the 90% of flights you plan to do?)
- For me, most of my planned flights are cross country flights. In particular, I have a desire to make a 410 nm trip as much as I can (as opposed to flying commercially, which will still be a portion of the trips). I’d prefer this trip to take less than 3 hours each time I do it. Putting that in numbers, I want something with at least 500 nm range (not including reserves) that can fly at least 140 kts true.
- For multiple reasons, I want something equipped for IFR.
- Nice to haves:
- Control stick. I just prefer it to a yoke.
- Glass panel.
- Low wing. They’re just cooler.
- Faster is better, of course.
- Unnecessary:
- I don’t need to carry passengers. There’s no need for me to own something that has 4 seats. I’ll be perfectly fine with a 2 seater. I could also be fine with a single seater, but that makes getting a checkout much more annoying.
- Off airport operations, while dope, are not for me.
So, with that in mind, I essentially am skipping all the trainers, because they simply don’t have all the range (nor are they fast enough to make this flight in less than 3 and a half hours).
With all this, I’m probably going to either get something experimental, a Grumman Tiger, or a Mooney.
Deciding on which particular plane to buy
My questions, on how to go from staring at listings on barnstormers to owning a plane.
- How do I decide whether to reach out to the seller?
- How heavily should I favor more local planes to less local?
- Very.
- How do I find an A&P to do the prebuy?
- Like, how do I even find one?
- How do I make sure they’re trustworthy/do a good job?
- How much will a prebuy run me? I expect around 3-5k, probably.
- From what I’ve read, a prebuy essentially turns in to an annual.
- How do I find a CFI to give me a checkout in the plane?
- If I don’t have the cash up front, how do I get a loan for it?
- Yeah, in this economy, I’d much prefer to have as a few outstanding loans as possible.
- Anything else I should know on the buying front?
- Once I actually buy it, how do I find a place to store it?
- Is getting a hangar worth it in SMO? (Probably not, tie down is fine, though)
- How do I get insurance/who should I get insurance from?
- AOPA’s recommendation.
So much I don’t know.
Last updated: 2020-04-21 10:59:32 -0700
Checklists
Checklists for airplanes I fly.
Last updated: 2019-06-22 22:38:48 -0700
Emergency
- [] Airspeed - best glide
- [] Best Field - keep looking for a better place to land.
- [] Checklist
- [] Declare
- [] Squawk 7700
- [] Mayday (121.5 or current freq)
- [] Engine - Shutdown
- [] Flaps - As required
- [] Get Ready (for crash)
- [] Seatbelts - Tighten
- [] Sunglasses, headset - Remove
- [] Passenger - Secure
- [] Master switch - Off
Last updated: 2019-07-06 11:39:54 -0700
Preflight checklists
Mnemonics and other things to consider, often before you even get to the airport
IMSAFE
Mnemonic to go over before you even go to the airport. Covers how you are doing.
- Illness: Are you sick or feel like you’re becoming sick.
- Medication: Taking anything not allowed, or otherwise out of the ordinary?
- Stress: Are you stressed/worried about other things? Want to be in a good headspace.
- Alcohol: >8 hours bottle to throttle in the US.
- Fatigue: Had enough sleep? Had enough to eat?
- Emotion: How are you feeling? Are you mentally well enough to fly?
For me, “am I able to make the bike ride to SMO?” is usually enough to answer all of these.
PAVE
Helps you perceive hazards and assess risks.
- P: Pilot
Am I ready for this flight? - in terms of experience, recency, currency, physical and emotional connections. See IMSAFE for answers to the latter 2. - A: Aircraft
- Is this the right aircraft for the flight?
- Am I familiar with and current in the aircraft?
- Is this aircraft properly equipped for the flight? (Instruments, lights, navigation and communication equipment)
- Can this aircraft use the runways available for the trip w/ margin for safety & weather?
- Can this aircraft carry the planned load?
- Can it operate at the intended altitudes?
- Does it have sufficient fuel capacity for each leg?
- Does it actually have the necessary fuel in it?
- V: Environment
- Weather
- Terrain
- Airports
- Airspace
- Nighttime
- E: External Pressures
Other things influencing the flight.- Someone waiting at the airport for the arrival of the flight
- passenger the pilot doesn’t want to disappoint (See: hazardous attitudes)
- desire to impress someone (see: hazardous attitudes)
- desire to demonstrate pilot qualifications (see: hazardous attitudes)
- desire to satisfy a personal goal (“get-there-itis”)
- the pilot’s general goal-completion orientation
- Emotional pressure/pride that you might not be as good as you thought you were.
Last updated: 2019-09-11 09:21:09 -0700
Composite Homebuilt Aircraft
Some of the more interesting and efficient designs in the general aviation space.
- Marc Zeitlin is one of the most knowledgeable persons on composite aircraft.
- Rutan Factory Aircraft Designs on CD
- Cyanoacry’s imgur thread on getting his damaged verieze repaired
Last updated: 2023-09-27 19:21:50 -0700
Using an E6B Mechanical Flight Computer
Literally something you only need to do during primary training, to prove you CAN use an e6b. Sigh.
Density Altitude
For engine performance!
As you know, density altitude is pressure altitude adjusted for non-standard temperature. Standard temperature is 59° F, or 15° C at sea level.
Pressure altitude is true altitude adjusted for non-standard pressure. Standard pressure is 29.92 in. hg.
Pressure altitude is a really simple formula: pressure_altitude = (standard_pressure - pressure_setting) * 1000 + true_altitude
And while we can easily correct for non-standard temperature (the formula is: density_altitude = pressure_altitude + (120 * (outside_air_temperature - isa_standard_temperature))), it’s not as simple to do it manually, and an e6b is easy enough to use here.
Estimating isa standard temperature is ((true_altitude / 500) - 15) * -1
In the image below, the pressure altitude is 4500 feet, the true altitude is 4500 feet, and the outside air temperature is estimated to be 28° C. For the sake of the calculation, we bump that to 30° C. As you can see, the e6b then tells us that the density altitude is just over 7000 feet. Which we can double-check after a bit enough:
pressure_altitude = 4500 + (120 * (28 - (((4500 / 1000) - 15) * -1)))
 = 4500 + (120 * (28 - ((9 - 15) * -1)))
 = 4500 + (120 * (28 - (-6 * -1)))
 = 4500 + (120 * (28 - 6))
 = 4500 + (120 * 22)
 = 4500 + 2640
 = 7140
Which is about what the e6b tells us it us.

True Airspeed
True airspeed is effectively calibrated airspeed corrected for the density altitude.
So, in this case let’s re-use the earlier density altitude of ~7100 feet.
Calibrated airspeed then corresponds to the inner ring, and true airspeed the outer ring. That is, if your calibrated airspeed is 150 kts, then the true airspeed is ~167 kts.

Remember to correct for decimal placement.
Ground Speed
For a given true airspeed and heading, you can easily calculate your ground speed.
For this example, let’s say you are heading 270 at 125 knots, with the wind at 300 at 15 knots.
Set the center “dot” on the rear of the circle to some value - I pick 100 because it’s a nice round number. Set the circle (true index) to the wind direction (so… 300). Now, mark (IN PENCIL) the wind speed relative to the value you chose (place a mark where it says 115). Like so:

Now rotate so that the corrected heading is under the true index, and slide up so that the true airspeed is under the center dot. Like so:

Now we can read the ground speed (in this case, ~139 knots), and wind correction angle (~3 degrees, to the right - or fly heading 273).
When done, wipe the pencil lead off.
Time to travel distance
Now that we have a ground speed for this leg, we can calculate the time it takes to travel a given distance.
For this example, let’s say we have a ground speed of 100 kts, and the leg is going to be 13 nm.
Before we use the e6b, let’s do some quick mental math to estimate an acceptable range: 13 nm / 100 kts is just over 1/10 hour. Converting to minutes, it’s just over 6 minutes, but only just - this leg should take between 7 and 9 minutes.
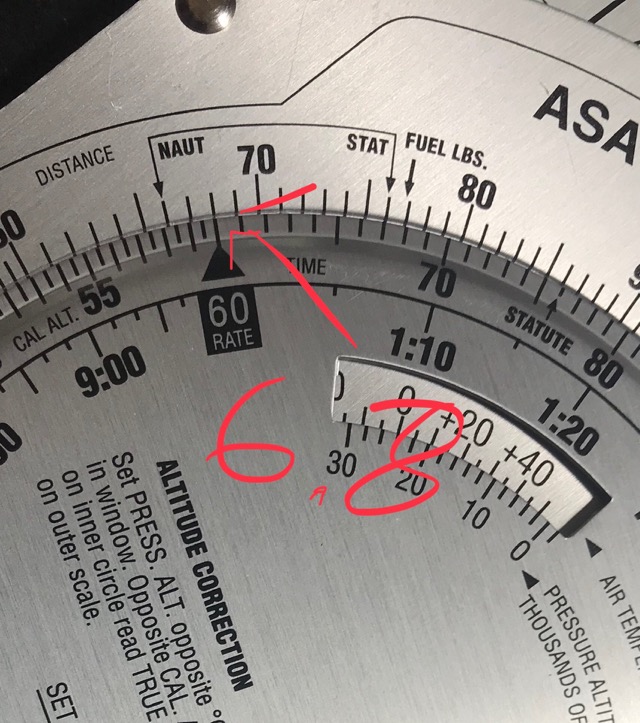
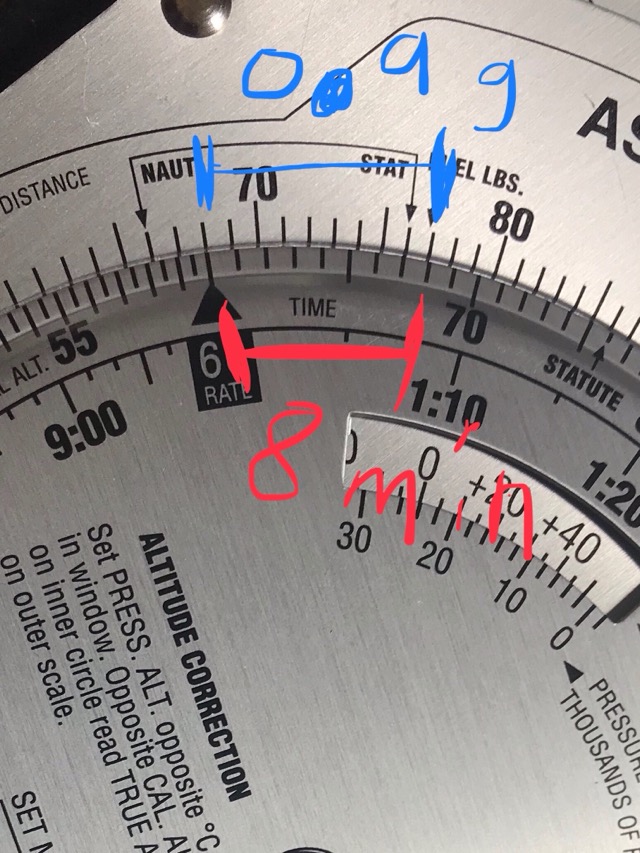
First thing we do to calculate this on an e6b is to align the “60 RATE” box on the inner circle with the approximate speed you’re going. In this case, it should be aligned with the “10” at the top.

Next, we count the distance from the “10” marker - 13 ticks from the marker, and compare that with the corresponding value on the “time” scale. This gives us our estimated time. In this case, it’s just under 8 minutes. As expected.

Of course, since we have the time (and a calculator handy) to do this, the actual estimated time is:
distance = speed * time
time = distance / speed
time = 13 nm / 100 kts
time = 0.13 hrs
time = 7.8 minutes
As expected.
Fuel usage
Now that we have time to travel a given distance, we can use the known rate of fuel consumption to calculate fuel usage.
For this, let’s assume fuel usage rate of 6.8 gph at cruise - a somewhat efficient Cessna. I’ll also use a time from the previous calculation.
We’ll mentally move the decimal point to the right one, to place the “rate” indicator at 68 on the calculator.
Now, on that same minutes time scale we used earlier, we count 8 minutes - or the amount of time we plan to travel that leg.
The gph usage then corresponds to the other side of that 8 minute marker - in this case, 9 ticks above the 68 tick. Keep in mind to move the decimal point back to the left, so that we use 0.9 gallons as our expect fuel usage.
Note that we could go the other way - if we had 10 gallons available, then we could move 100 ticks clockwise to get the number of minutes we can travel at that rate. (In this case, just under 2.5 hours). You can also compare to the inner “time scale” to get the value in hours instead of minutes.
Last updated: 2019-07-29 22:19:01 -0700
Flight Systems
Gyroscopic Systems
Instruments: heading indicator, attitude indicator, turn indicator.
Works off two principles: Rigidity in space and precession.
Rigidity in space means using angular momentum to maintain internal orientation regardless of what the aircraft does.
Heading indicator & attitude indicator both rely on the rigidity in space principle.
Heading indicator only measures change in heading, and steam gauge ones don’t correct for the earth’s rotation (meaning that it’ll precess noticeably over time as the earth rotates under the gyroscope). Must be calibrated against the magnetic compass in straight & level flight (or on the ground).
Attitude shows bank & pitch information. Should show correct attitude within 5 minutes of starting engine. Some may have a tumble limit (gimble lock). May have small acceleration errors (accelerate: slight pitch up, decelerate: pitch down) and roll-out errors (following a 180° turn, it’ll show a slight turn to the opposite direction).
Turn indicators work on precession. Turn coordinator show rate of turn & rate of roll. Turn & slip indicators show rate of turn only.
Pitot-Static System
Instruments: Altimeter, Vertical Speed Indicator (VSI), Airspeed Indicator.
Switching to an alternate static port (which is usually located in the cabin, so that it doesn’t freeze over) will cause a momentary increase of all 3 of these instruments. This is because, in an unpressurized cabin, there’s a lower air pressure than there is outside.
Altimeter
Aneroid barometer (barometer that does not use a liquid) that shows height above a given pressure level. Basically, there’s a stack of sealed metal (aneroid) wafers that expand/contract based on the atmosphere as given by the static port. These wafers are mechanically linked between to the steam gauge which displays this. “Sensitive” altimeters (most aircraft altimeters) have an altimeter setting knob that essentially moves the dial to correct for the current altimeter setting.
Uses just the static port.
Standard lapse rate: 1000 feet per inch of mercury. (which means that increasing the altimeter setting by 0.01 (from 29.92 to 29.93) increases the indicated altitude by 10 feet. Similarly, decreasing will reduce the indicated altitude by 10 feet.)
In the US, when operating below 18,000 MSL, regularly set the altimeter to a station within 100 nautical miles. Above 18,000 MSL, set it to 29.92 inches of mercury. This is to allow for better aircraft separation.
“High to low - watch out below!” - Going from a high pressure area to a low pressure area will cause your altimeter to indicate a higher-than-actual altitude.
Same error when flying from warm air to cool air.
Types of Altitudes
| Name | Description |
|---|---|
| Indicated | Uncorrected altitude indicated on the dial when set to local pressure setting |
| Pressure | Attitude above the 29.92 inches of mercury datum plane. This is the setting used when flying above 18,000 MSL. |
| Density | Pressure altitude corrected for nonstandard temperature. Used for performance calculations. “The altitude the airplane behaves like it’s at” |
| True | Actual altitude above mean sea level (MSL) |
| Absolute | Height above ground |
Vertical Speed Indicator
Basically, but-not-actually, uses R=D/T to give you rate of climb. Also gives rate trend. There is a noticeable lag in normal VSIs. Instantaneous VSIs (IVSI) interpolate standard VSI data with accelerometers to remove most of the lag.
Uses just the static port.
Works via a diaphragm inside the instrument connected directly to the static source. Outside of that is a an area that receives the same static pressure, but at a much lower rate than inside the diaphragm (this is where the lag comes from). As diaphragm expands/contracts, a mechanical linkage (in a steam gauge) moves the pointer needle to display rate of climb.
Airspeed Indicator
Uses both static port and ram air. Essentially, indicated airspeed = ram pressure - static pressure.
A diaphragm in the instrument receives ram pressure from the pitot tube. The area outside the diaphragm is sealed and connected to the static port. A mechanical linkage converts the expansion and contraction of the diaphragm to airspeed shown on the display dial.
Types of Airspeeds
| Name | Description |
|---|---|
| Indicated airspeed (IAS) | As indicated by the airspeed indicator |
| Calibrated airspeed (CAS) | IAS corrected for instrument & position errors |
| Equivalent airspeed (EAS) | CAS corrected for compressibility error |
| True airspeed (TAS) | EAS correct for nonstandard temperature and pressure. Actual speed through the air. Used for performance calculations |
| Mach number | Ratio of TAS to the local speed of sound |
| Ground speed | TAS corrected for wind. Actual speed over the ground |
Errors
Static Port blocked
E.g. when it’s frozen over.
- Airspeed Indicator will only indicate correctly at the altitude the blockage occurred at.
- If you’re at a higher altitude, airspeed will be lower than actual.
- Lower altitude -> higher-than-actual airspeed
- Altimeter freezes at thee blockage altitude.
- VSI drops to zero.
- After verifying a blockage in the static port, you should use an alternate static source or break the VSI window (in which case, expect reverse VSI information).
Pitot Tube blocked
Only affects the airspeed indicator.
- Ram air inlet clogged, but drain hole open: Airspeed drops to zero.
- Both clogged: Airspeed indicator will act as an altimeter (higher altitude corresponds to higher indicated speed)
- Turn on the pitot heat to melt ice that may be the cause of the blockage.
Last updated: 2021-11-27 22:07:29 -0800
Flight Writeups
Writeups for flights I thought were significant. Sometimes with ATC logs and other tracks.
Last updated: 2019-08-06 10:59:21 -0700
2019-06-21
This flight was super fun. The plan was to take off from SMO, fly out out to Malibu, do some stalls along the way, and then do ground reference maneuvers over and around Point Dume. Afterwards, the plan was to head back do a little bit of pattern work around SMO.
Here’s the flight track for the entire flight
Stalls
Shortly after takeoff, we went along the coast and did first some power off stalls, and then some power on stalls. My instructor and I briefly went over recovering from a stall (lower the angle of attack by pitching down and applying full power), before doing some clearing turns and entering those stalls. With the exception of the first (in which my instructor had a slip of the tongue and told me to reduce power - should’ve been reduce AoA - and I listened to him instead of saying “nah, you got it wrong”), these were all fairly decent. I still need to work my recovery - I pitch down too much - but he was really happy with them.
Additionally, in one of the power-off stalls, instead of step-by-step going from 30° flaps to 20° flags, then 10° and finally no flaps, I went cleanly to from 30° to no flaps, because I was distracted during that stall. Obviously, this is something I need to improve upon. Yay flight sims.
Ground Reference Maneuvers
I did really well on these. Even if you don’t take into account the fact that this is my first time doing GRM in a low-wing airplane.
Also, the wind wasn’t blowing all that much, which really helped with this.
Turns Around A Point
For this, we reduced our altitude to ~1200 AGL and tried to circle Point Dume. The first few attempts, my altitude control was way off - instead of maintaining altitude ± 50 ft, I varied by as much as 100 ft - I came quite close to breaking the at least 1000 ft above congested areas regulation. Additionally, I felt that I wasn’t able to correctly maintaining the desired radius for the circle - from my perspective, it felt more like an oval than a circle. However, after 2 or 3 tries at this, I finally set up an approach I liked, and while I still didn’t quite like the approach, the GPS track as recorded by foreflight shows almost a perfect circle around Point Dume. We made another circle around Point Dume before we went on to some S-Turns.
Obviously the low wing makes GRM harder - especially turns around a point, but another thing was the differing height of the surrounding terrain that probably also messed with my reference points. Either case, I should practice these in a flight sim.
S-Turns
We did S-Turns along Zuma Beach.
I nailed these. The first turn wasn’t my best - I wasn’t setting up to be perpendicular to the beach when we were crossing it - but after that, I was on the money with these. Again, rustiness that quickly went away.
These also are much easier to do on a low wing airplane than turns around a point are.
Return to SMO
We had planned to do some more stalls on the way back, but there was quite a bit of other traffic around us, so we elected not to. Instead, we went directly to SMO.
For this, I’m going to link to this recording from live ATC. For reference, the recording starts at 4:37:50 PM PDT (23:37:50 UTC). Hereafter, I’m only going to refer to timestamps on the recording (which are directly in the mp3 file as mp3 chapters.
For context, there were at least 3 aircraft returning to land from maneuvers at approximately the same time. Plus another in the pattern, in addition to other kinds of traffic. ATC was busy. My radio work isn’t perfect - as you can hear, I repeat more of the instructions than I absolutely need to, I talk more-or-less in complete sentences - more than I need to, and I didn’t repeat the runway number when we were given clearance to land.
Obviously, with the amount of traffic involved, we didn’t do pattern work. Though we did go around, that was more due to a mistake on both our and ATC’s end (ATC gave the instruction to turn base when we were way too high and way too close to the field to safely make the landing - we should have immediately responded with “unable” and continued with our downwind) - See timestamp 04:20. Because we were too high, the instructor took controls for the first and only time in the flight. He put the plane in full flaps, and attempted to slip it to the field. However, he quickly realized that the plane was way too high to make it, and we went around. He hands it back to me at approximately 05:40.
Another thing of note, after the downwind, we’re asked to make a right 360 for spacing. On the foreflight track, it turned out that I made an almost perfect circle, around an intersection.
The rest of the flight is uneventful, with a few funny moments on the comms.
Conclusion
Overall, I’m quite happy with the flight, and I’m very proud with how it turned out. Things to work on, though are:
- Stalls: Get better at recovering, practice lowering flaps when you only have an electronic indicator of where the flaps are, not a mechanical.
- Turns around a point: Practice them in a flight sim, especially in a low-wing airplane. I was sitting on the wing - unless I’m at a 45° bank, I won’t see the actual point I’m supposed to be orbiting. Recognize that and where you should expect the point just leading the edge to precess as you orbit.
- S-Turns: Practice them, be perpendicular to the line as you are crossing it. That is also the only instance you should be at 0° bank.
- Pattern Work: Actually, I’m pretty decent at it. Still need to practice landings, though.
- Radio Work: I’m pretty good at radio work too. Could be more terse, but I’m very happy with my radio work.
Last updated: 2021-11-11 18:46:23 -0800
2019-06-28 Pre-Solo Stage Check
This was a little bit of a wake-up call to me. As embarrassing it is to admit, I have 70 hours and still haven’t soloed. But, finally the stars are aligning correctly, and I’m ready to solo (I’m actually about ready for a checkride - my flight instruction has been weird). Only thing remaining was a check with another instructor to make sure I’m not a danger to myself and others.
I don’t remember the entire details of the flight (didn’t get around to writing this up until a few days after the flight), but these are what stand out to me:
- When I transitioned to the sportcruiser, I made sure to redevelop a sight-picture needed to land safely, but I didn’t redevelop the sight-picture for other phases of flight - Vy, Vx, etc. Which led me to constantly readjust my pitch as a hunt for the correct airspeed.
- For airplanes with control sticks, it’s much easier to control the plane when your hand is not at the top of the stick. Despite being where the trim & PTT buttons are, keep your hand lower on the stick except when using the radio or trimming the plane.
- Apply trim when changing phases of flight.
- Apparently, the Rotax 912 ULS likes to cruise at 5200 RPM, for cooling reasons.
- When approaching a target altitude, lower the nose first, then reduce power.
- For stalls, recovering is not so much as “push down”, as “let off the pressure”. Obviously, this assumes that you were trimmed for cruise flight, not for a stall.
- My emergency procedures need work, massively.
- This instructor made it painfully clear - to the point where I had trouble sleeping - that I needed to work on my emergency procedures. I feel this reflects negatively on the instructor, as there are ways to get this point across without causing me to lose sleep or otherwise feel like I’m a terrible pilot.
- On my next flight with my regular instructor, this was all we did. 1.5 hobbs doing engine-out work. I now feel much better about this.
Overall, I did pass that stage check, but, obviously, I felt pretty terrible coming out of it.
Last updated: 2019-07-06 11:39:54 -0700
2019-07-26 First Solo
This has been a long time coming. According to my logbook, I have 73 logged pre-solo hours. That’s almost absurdly high. But, I did it. So… whatever.
ATC Logs here, which starts at 0122:28Z on 2019-07-27.
Pre-Takeoff
Before I soloed, my instructor and I did a couple laps in the pattern. Then we came back to the FBO, he got out, and I was going to go do at least 3 laps in the pattern.
I started off by instilling great confidence in him by starting the start engine checklist from the wrong point. Essentially, I skipped turning on the electrical system and went straight towards turning on the engine. I realized my error when the engine didn’t start after I turned the key to engage the starter. I did get it started after I had followed the checklist from the right starting point1. Once I got it started, copied the weather, etc. I advised ground that I was a student solo pilot and was ready to taxi. At the runup area, I snapped a photo of the empty right seat, before proceeding to do the runup. Something I noticed is that I needed to have the canopy partially open to visually verify that the rudder pedals controlled the rudder as expected - normally we have the canopy partially open anyway for cooling reasons. I left it closed because with only one human in there, it didn’t heat up nearly as quickly. There was no issues with the rest of the runup, informed ground that I was done and was allowed to taxi to the runway.
First Lap
This was fairly uneventful, despite being a monumental achievement for me. As everyone notes, the first thing I noticed was how much better the plane performs - even when you know the plane should perform differently without the extra weight, it’s still surprisingly to experience the difference having ~150 pounds less weight makes. I nailed the landing, and taxied back to the start of the runway for the next lap. As I was taxiing, I noticed my instructor in the observation area, who was waving to me and celebrating my success. Which made me feel super proud and happy for my achievement.
Second Lap
When my instructor gave me the plan for my first solo, he said that we’d first do 3 laps in the pattern, with 1 go around, then he’d get out and have me do 3 laps in the pattern. I either misinterpreted what he said, or I misremembered. I recalled 3 laps and a go around as what I should do with my solo. Because of that, before I even took off, I had decided to do a go around for this lap. The upwind and crosswind portions of the flight went well, but I probably was too high when I turned base, and I definitely wasn’t properly set up to land when I was on final - to the point where if I wanted to hit the numbers, I would have had to dump flaps and slipped in to maybe make the landing. In retrospect, I’m unsure if I had actually screwed up the approach, or if I had subconsciously screwed it up, because I knew I’d be going around anyway.
Third Lap
As I was entering the upwind portion of this lap, I was advised by ATC to extend the upwind, make right traffic, and turn at the shoreline. For spacing reasons. Weird flex, but ok. Just after I entered the crosswind portion I was asked to extend my downwind and that they’ll call my base. I repeated this instruction, but I was also confused - I had just entered crosswind, did they misspeak and instead want me to extend crosswind? I called up tower and asked for clarification. I think this is when they remembered that I’m a student. They assured me that yes, they meant downwind, and after I turn downwind to extend until they call my base. This ended up being the longest downwind phase of my life. I recall thinking that this would be an excellent time to take a photo of the empty right seat - which I didn’t do because I was busy flying2. I did play with trim and had it flying straight and level for a bit while I monitored traffic. Eventually I passed abeam of traffic on final, and shortly thereafter I got clearance for the option. I turned base and landed without much incident. The landing wasn’t particularly great - I started to level off earlier than I needed to, caught that but didn’t correct enough and ended up floating down the runway. I pulled off and contacted ground, then went back to for the fourth and last pattern.
When I landed and was taxiing back to start my fourth lap, I was able to watch my instructor dance because he was so proud and happy of how I handled that.
Fourth Lap
The fourth lap was also uneventful (just how I like them). The only thing of note is that this was easily the worst landing I had done that evening. I wanted to do another lap just to “redeem” myself and show that I can actually land by myself. I basically did the same mistake - I leveled off too early and ended up floating down the runway.
Summary
I went into this being very apprehensive about this. I came out thinking both “that was a monumental achievement” and “that wasn’t so bad, let’s do that again”. I’m very proud of myself, as I should be. When I was going into this apprehensive - not “oh crap, I’m going to kill myself”, but the idea of having no one to catch any mistake I might make was daunting - even with as many hours as I have, where I know I’m going to do fine.
I skipped the correct starting point because I was apparently thinking that the start engine checklist should be under it’s own header. Might create my own solo checklist that excludes some of the things you do when you have passengers in it. I should create my own checklist in general to clarify/simplify things.
That would be hilarious, first time taking the plane for a spin without supervision and I decide to text and fly. Which, funnily enough, is not illegal in VFR flight.
Last updated: 2019-07-27 10:53:19 -0700
2019-08-01 Cross Country: KSBA
We flew from Santa Monica to Santa Barbara, and then back again. Starting up my cross-country1 training again.
Was asked to put together a paper flight plan, which I made the mistake of finishing a few days prior to the flight2. Oops. By luck, the winds happened to have not changed much since I made the initial calculations. But still. I kinda want to write a tool that takes in the GPS coordinates for each section of the flight, fetches the relevant winds aloft data, and outputs a filled-out flight plan for you. Of course, plenty of these exist already, so 🤷🏽♀️.
Ok, so my flight plan happened to be good. Called up flight services and asked for a standard briefing3. Wrote it down, determined that there should be no issues with the flight, we got in and went about our flight.
On the way up, things were mostly fine. It was quite hot, and the cylinder head temperatures were a bit high. To address this, instead of climbing directly for our target altitude (a measly 4500 feet), we leveled off at 3500 feet and ran the engine at 5200 RPM in order to maximize cooling. Once the CHTs were back in the green, we resumed our climb to 4500. This occurred roughly when we were past Malibu.
One thing I learned on the outward leg is that there is restricted airspace around Point Mugu Naval Airbase from the surface to space. I missed this completely on the sectional - to the point where I think that the previous time I flew up to Santa Barbara, I busted that airspace. Essentially, the way around this is to fly east of 101 when close to Point Mugu. Oops.
We continued on, tracking each leg. We were on time with the calculations I did prior to the flight - within 30 seconds of the calculated time.
As we approached Santa Barbara, approach asked us to stay east/north of 101 (inland). Which keeps us out of the approach path of jets for runway 25. When we got closer, tower cleared us for runway 15 Left, and asked us to report a 2 mile right base - continue with 101 off our left wing, and report 2 miles out. We were cleared to land on 15 Left when we were about 4-5 miles out, so we didn’t even have to report the 2 mile right base 4.
Santa Barbara’s 15 Left runway is not wide - at 75 feet, it’s half of Santa Monica’s 21 runway. Primary training warns us that thinner runways mess with your sight-picture - they lead you to think you’re higher up than you thought you were. I knew this, and perhaps overcompensated. I leveled out earlier than I should have, which made this the hardest landing I’ve made in months. Certainly the hardest landing I’ve had with my current instructor. At the very least, I didn’t break anything, and I didn’t hurt either of us.
We spent a while on the ground - mostly so that my instructor could set up the GPS with the flight plan. He wanted me to use a paper flight plan on the way out, but was ok using other methods on the return flight. We copied our flight following clearance, and was told to make straight out over the water - to get out of their airspace as soon as possible. We did that, flew over some oil rigs, and were then cleared to resume our own navigation.
As we were approaching Oxnard (as one of the points to fly over), we were advised of traffic above us and same direction. We caught sight of them, and it appeared we were flying faster than them. Which surprised both of us. We tried to keep them in sight, but at some point they ended up behind us and neither of us could position ourselves to keep them in sight without making a turn. Eventually, we caught them behind and to the left, as well as sufficiently far that we felt safe to climb up to our target altitude.
Afterwards, the flight continued without much incident. We landed at Santa Monica maybe a little bit overtime. For our next cross country, I’m going to book the plane for 4 hours.
Takeaways
- Perform performance/weather calculations as close to departure time as possible. Have general flight plans ready in case weather makes one route more desirable than another.
- Be better at examining airspace and recognizing the less common airspaces. In general, practice reading sectionals and TACs.
- Practice landing at other (specifically, differing widths) runways.
- Always watch for traffic. Be better at spotting traffic. There’s a reason we’re advised for 10º sweeps.
A cross-country flight, according to the FAA, is any flight with a stop at least 50 nautical miles (straight-line distance). The FAA uses the “large amount of land” definition of “country”, not the “nation” definition of “country”.
It’s obvious in hindsight, but, really. For a flight plan to be valid, you need accurate winds aloft/temperature forecast. These forecasts are only valid/useful for a few hours, so obviously you get better data if you delay retrieving that data for as much as possible.
Call 1-800-WX-BRIEF, “Hello, I’d like a standard briefing. I’ll be flying from $START to $END, in $TAIL_NUMBER, at $CRUISE_ALTITUDE.” Mention you’re a student if you want them to make life easy for you.
I’m 100% certain the “report 2 mile right base” instruction was in case we were flying a decently fast plane. However, the sportcruiser cruises at under 100 knots - slower than a Cessna 172. So we ended up being much slower than the expected, which I suspect is why they gave us the landing clearance when we were that far out.
Last updated: 2019-08-06 13:47:44 -0700
2020-02-17 Catalina Checkout
To celebrate having passed my checkride on the previous day, I went on a flight to Catalina with my instructor. I already had this timeslot booked for potential training in the event that I had failed or received a discontinuance on the checkride, so it was easy enough to extend it the two hour timeslot into a 3 hour timeslot.
This is not flight instruction, go talk to your CFI about this.
Briefing
The briefing consisted of two things: how we would handle potential engine outs over the water, and how to actually land at KAVX.
Catalina Island is far enough away from the mainland that we would be flying outside of gliding distance of land. Meaning that we’re required to carry life-vests in the aircraft. We also discussed what we would do if we were to get an engine out on the way to the island. Because there’s more boat traffic near the mainland, we decided that it would be more prudent that, unless we were within gliding distance of the island, it would be more prudent to turn back to the mainland and attempt to land near boat traffic. We briefed exactly what we’d do as we approach the water, including passing in front of a boat in order to increase the chances that we’d get seen and they’d rescue us.
As far as actually landing at KAVX, we briefed what nearly all of the causes of crashes at catalina are - people doing straight in approaches and being lower than they thought they were. KAVX’s runway is bowed at the top, with a 2.1% grade for the first ~2000 feet of runway 22, with the last 1000 feet or so being a downslope. It’s also fairly narrow. Both of these create the illusion that you’re higher than you actually are. In addition to that, KAVX is on top of a mountain - there are cliffs on both ends of the runway. With prevailing winds from the south, the causes a downdraft on short final for runway 22. Thus, if you’re already lower than you should be thanks to those illusions, that downdraft then brings you further down and greatly increases the chances of crashing into the cliffside. So, we briefed a better approach - enter right pattern for 22, being cognizant of your altitude at all times, especially on short final, and also doing soft field takeoffs and landings because the field has quite a bit of potholes.
After the safety briefing, we also briefed what the specific plan was: take special flight rules south, pick up flight following after, once we get past the bravo shelf (roughly when we pass by Palos Verdes), climb to 5500 feet and continue south. Head towards the twin harbors near the west side of the island. Descend to 3500 as we approach the twin harbors, then enter the 45 for the right downwind. Land but be prepared to go around if necessary. Pay for parking. Do at least one lap in the pattern. Go fly around the island, then head back. On the way back, climb to 6500 while we’re still close to land and pick up flight following. As we approach the bravo shelf near Palos Verdes, descend to 4500, then set up to enter the special flight rules north. After that, land back at Santa Monica.
Flight
Preflighted. Got flight following from the ground. Yay towered airports that actually talk with approach. Departed with a right box climb. Tracked the SMO 132 radial at 3500 (per what the TAC says). Transitioned through the LA Special Flight Rules area, gave controls to my instructor so I could get a photo of LAX.
Last updated: 2020-02-24 13:32:51 -0800
Instrument Flying
Operating an aircraft solely by reference to instruments.
-
Altitudes covers IFR altitude names. Also includes the definition of what you must see in order to descend below the DA/MDA.
-
Approaches covers Instrument approaches and related topics.
-
Departures covers Instrument departures and departing under IFR/Picking up IFR in flight.
-
IFR Flight Plans covers contents of an IFR flight plan.
-
Navigation covers IFR navigation methods.
-
Required Equipment covers minimum equipment and maintenance checks for VFR as well as IFR.
Right-Of-Way rules
When in VMC, it’s your responsibility to follow See and Avoid, when in IMC, it’s ATCs responsibility.
Mandatory Reporting Events
MARVELOUS VFR C500
- Missed approach
- Airspeed ± max(10 kts, 5% change) of filed TAS
- Reaching a holding fix (time + altitude)
- VFR on top: changing altitude
- ETA changed ± 2 min (3 min in the North Atlantic). Only in non-radar environments
- Leaving a holding fix/point
- Outer marker (or fix used in lieu of). Only in non-radar environments
- Un-forecasted weather.
- Safety of flight (emergencies and such)
- Vacating an altitude/FL
- Final approach fix. Only in non-radar environments
- Radio/navigation/approach equipment failure
- Compulsory reporting points. Only in non-radar environments
- 500 - unable to climb/descend 500 FPM
Position reporting items
“Center, \$CALLSIGN, reporting \$LOCATION, \$ALTITUDE at \$TIME. On IFR flight plan. Next position \$NEXT_FIX at \$NEXT_FIX_TIME. Afterward \$SUCCEEDING_POINT. \$REMARKS”
- Aircraft ID
- Position
- Time
- Altitude
- Type of flight plan (except when communicating with ARTCC / Approach control)
- ETA and name of next reporting fix
- Name only of the next succeeding point along the route of flight (Point after next reporting fix)
- Any relevant remarks
Airport Lighting
- ALSF-1: Approach Light System with Sequenced Flashing lights (ILS Cat-I configuration)
- SSALF: Simplified Short Approach Light System with Sequenced Flashing Lights
- MALSR: Medium Intensity Approach Light System with Runway Alignment Indicator Lights
- REIL: Runway End Identifier Lights
- MIRL: Medium Intensity Runway Lighting
- PAPI: Precision Approach Path Indicator
The legend for these is found in the Terminal Procedures Publication.
Last updated: 2021-12-29 13:24:04 -0800
Airmen Certification Standards
Notes on the IFR ACSs.
1.A.K
Certificate requirements to get the rating:
Part 61.65.
- Pilot:
- PPL (or concurrent applicant)
- English Proficient
- Ground training (from instructor or home-study course)
- Endorsed & Passed
- Checkride
- Knowledge Test
- Appropriate Training
- Airplane
- 50 hours cross-country time (to airport >= 50 nm away from starting airport. Must land at that airport.)
- At least 10 in an airplane
- 40 hours actual or simulated instrument time
- What is actual IMC? Really, any flight in less than MVFR conditions.
- At least 15 hours with an instructor.
- 3 hours instrument training within the preceding 2 calendar months.
- Cross-country IFR flight
- ≥ 250 nm total distance
- Along airways or GPS direct
- to at least 3 different airports
- An instrument approach at each airport
- Each approach must use different underlying equipment.
- e.g. I did ILS, RNAV, and VOR approaches.
- 50 hours cross-country time (to airport >= 50 nm away from starting airport. Must land at that airport.)
Privileges & Limitations
- Allows flight in Instrument Meteorological under Instrument Flight Rules.
- Must obey IFR rules.
- Can only fly in IMC in class G airspace, or under an Instrument Flight Plan.
- Flight in class A airspace.
- Limitations (91.167 through 91.193)
- Fuel (enough for destination, to all alternates (in order filed), then an additional 45 minutes)
- Flight Plan & ATC limitations
- Takeoff & Landing minimums (part 91: 0/0 takeoff, approach minimums).
- Altitude, Communication, Equipment requirements
- Recency/Experience Limitations:
- To be PIC under IFR:
- 6-HITS:
- 6 instrument approaches
- Holding procedures & tasks
- Intercepting & Tracking Courses (Using electronic navigation systems)
- Simulated or Actual IMC. (Also allows full flight simulator).
- Actual if only within 6 months of being current.
- Simulated w/ safety pilot for after those 6 months.
- If not current, but in this grace period, cannot fly IFR as PIC.
- Safety pilot must have PPL with appropriate category & class.
- Aircraft must provide safety pilot with forward vision & controls (e.g. long-ez is no-go. Throwover yoke on a bonanza is ok).
- Note: No instructor necessary.
- 1 year out-of-currency, must pass an instrument proficiency check (IPC)
- Can also pass an IPC instead of 6-HITS if you want.
- IPC must be done by CFII or appropriate examiner.
- 6-HITS:
- To be PIC while Carrying Passengers:
- IFR: Everything above.
- Otherwise, same as for VFR
- Day: 3 takeoffs & Landings in category & class within past 90 days.
- Night: ^^ But landing must be to a full stop.
- To be PIC under IFR:
1.A.R
Proficiency Vs. Currency
-
Proficiency: should
-
currency: could.
-
Risk of not understanding this:
- Flying beyond skill set Assess’
- Use recency as a guideline
- it in doubt: Apply mitigation
-
Mitigations:
- Fly W/ instructor
- Cancel Flight
- If in air I conditions change! re-route.
Personal minimums
- Risks:
- flight in conditions you do not have skills for
- Assess:
- Mitigate
- cancel/take alternate transport
- Fly with a flight instructor.
- Personal minimums are hard limits, only expand them with the aid of a flight instructor.
- reroute if already in air.
Unfamiliar aircraft/systems
- Risks:
- Way too easy to get behind the airplane
- Confusion/being unable to properly operate aircraft
- plane performs differently them expected /used to, (e.g. too fast for you)
- Mitigate
- Fly with an instructor, or someone who knows the airplane/systems
- Fly a different aircraft you’re more familiar with
1.B.K.
Aviation Weather Sources
- aviationweather.gov
- 1-800-WX-BRIEF
- ForeFlight/Other EFBs (Electronic Flight Bag)
Products And Resources:
- Winds Aloft
- METAR, TAFs, MOSs
- AIRMETs, SIGMETs, Convective SIGMETs
-Charts:
- surface
- Wind charts
- PIREPS (UO: Regular, UUO: Urgent)
- ATC & Flight Services
Weather conditions
Atmospheric conditions:
-
stable: no turbulence, hazy, stable temperature, showery.
-
unstable: turbulence, clear, rain
-
Wind
- crosswind: crabbing
- tailwind.
-
Temperature:
- Too cold -> ice (beware, induction icing can occur up to 70 ℉ if the humidity is high enough.)
- Even Colder -> no ice (Usually below -15 ℃)
- Colder air is denser.
-
Moisture/Rain:
- ice requires visible moisture
- rain reduces visibility
- slick runways increase landing length - beware hydroplaning
-
Clouds:
- Nimbus clouds are storm/rain clouds.
- Cumulonimbus: stay away (these are large, towering clouds)
- Cumulus clouds: Heaped/piled
- Stratus: layered
- Cirrus; ringlets/ fibrous, are at a high level
- Castellanus: “castle-like”
- Lenticular: Lens-shaped, around mountains (they are what happens when a stable air mass is push by the wind up a mountain slope)
- Fracto-: fractal
- Alto-: Middle clouds, 5k to 20k feet.
- Nimbus clouds are storm/rain clouds.
-
Turbulence:
- Caused by unstable air
- look for large change in wind speed & direction between altitudes & areas.
- also mountainous
- Also urban areas - heat rising causing turbulence.
-
Thunderstorms & microbursts
- Microbursts are generally found on the edges of thunderstorms. They are incredibly strong, HIGHLY localized (hence, micro), areas of intense up and down drafts and rain. You do not want to get caught in one.
- Stages
- Cumulus - beginnings with a lifting action
- Mature - When rain hits the ground. Downdrafts.
- Dissipating - expect strong downdrafts
- Dangers
- limited visibility
- Wild shear & turbulence
- strong up/down drafty
- Icing
- hail
- rain
- lightning
- tornadoes
-
Icing
- Oh shit
- Unpredictable performance loss
- Accumulates an smaller surfaces first (pitot tube, elevator)
- Standard lapse rate: -2 °C per 1,000 foot altitude gain.
- Structural Icing:
- Rime - instant freeze, easier to see. Will accumulate on the edges directly facing the wind in flight.
- Has lots of pockets of air. Looks like “pebble ice” (preferred ice in drinks, apparently).
- Clear - runs, then freezes. Hard to see.
- Mixed - Started off as rime ice, started to accumulate clear ice. Very bad.
- requires visible moisture. & correct temp. (approaching freezing, but also above -15°C)
- instrument ice over sensors
- Rime - instant freeze, easier to see. Will accumulate on the edges directly facing the wind in flight.
- Induction: ice reducing air for engine
- Intake: blocking any air intake
- Carb ice: in carb venturi. In ~ -7 through +21 °C
- Generally occurs in high humidity.
- Apply carb heat, open the alt air door (if available) at the first indication of engine roughness.
- Expect the engine to get even more rough as the ice melts off.
-
fog/mist
- No ground ops for me
- yes, legal, but dumb
- Basically, clouds at ground level (within 50 feet of ground)
- Super cool from a pedestrian perspective, scary otherwise
- types:
- Radiation: ground cools on calm dear night
- Advection: Karla/Marine Layer (Warm, moist air blown over land & cooled)
- Ice - very cold, vapor is ice
- Upslope - moist stable air blown up a mountain
- Steam- cool, dry air over warm water
- types:
-
Frost
- ice crystals when temperature & dewpoint are below freezing
- scrape off before flight.
-
Obstructions to visibility
- Not fun to fly in.
- stable air
- Volcanic ash -> SIGMET
- sufficiently smoky -> affects (reduces) engine performance.
- haze makes runways look further away.
-
Flight deck displays
- FIS-B/ADS-B weather on ipad
- show precipitation on MFD
1.B.K. (Risk Management)
- go/no-go decisions:
- SIGMETs in area: instant no-go.
- approaching cumulonimbus clouds
- Microburst in area
- Thunder/lightning
- fog
Last updated: 2021-12-29 18:43:28 -0800
Altitudes
Altitudes you can fly at under IFR.
Cruising Altitudes
Unless otherwise assigned (i.e. this is what you normally file), when the magnetic course (that is, overall direction of flight) is between 0° (due North) and 179°, you should file for odd-thousands (e.g. 3,000 ft, 5,000 ft, 7,000 ft). When the magnetic course is between 180° (due South) and 359°, you should file for even-thousands (e.g. 4,000 ft, 6,000 ft, 8,000 ft).
Above FL290, the spacing is different, and depends on whether you are in RVSM airspace (Reduced Vertical Separation Minima):
| RVSM? | Magnetic Course | Rule | Examples |
|---|---|---|---|
| Non-RVSM | 0° - 179° | 4,000 ft increments starting at FL 290 | FL 290, FL 330, FL 370 |
| Non-RVSM | 180° - 359° | 4,000 ft increments starting at FL 310 | FL 310, FL 350, FL 390 |
| RVSM | 0° - 179° | Odd-ten FL starting at FL 290 | FL 290, FL 310 |
| RVSM | 180° - 359° | Even-ten FL starting at FL 300 | FL 300, FL 320, FL 340 |
Except for takeoff, landing, or otherwise authorized by the FAA, you are not allowed to operate an aircraft under IFR below:
- the minimum altitudes prescribed for the flown segment, or:
- Mountainous areas: 2,000 ft above the highest obstacle within 4 NM of the course to be flown
- Non-mountainous areas: 1,000 ft above the highest obstacle within 4 NM of the course to be flown.
Definitions
Part 91.177, Pilot/Controller Glossary.
- DA or DH: Decision Altitude / Decision Height. The Altitude (MSL) or Height (above runway threshold) on an instrument approach procedure at which the pilot must decide whether to continue the approach or go missed
- MAA: Maximum Authorized Altitude. Annotated “MAA - 17000” (17,000 ft as an example) on IFR charts.
- MCA: Minimum Crossing Altitude. Minimum altitude you must cross a fix at. Depicted as a flag with an X inside of it on the charts.
- MDA or MDH: Minimum Descent Altitude / Minimum Descent Height. The lowest Altitude (MSL) or Height (above runway threshold) to which descent is authorized on a non-precision approach until the pilot sees the visual references required for landing.
- You descend to the MDA/MDH, and maintain that altitude/height until you either reach the missed approach point, or you see the visual references required for landing.
- MEA: Minimum Enroute Altitude. The lowest published altitude between radio fixes which assures acceptable navigation signal coverage and meets obstacle clearance requirements. An MEA gap establishes an area of loss in navigational coverage and is annotated “MEA GAP” on IFR charts.
- The important thing here is adequate navigation signal coverage and meeting obstacle clearance requirements.
- MOCA: Minimum Obstruction Clearance Altitude. Like MEA, but only up to 22 NM from the VOR.
- If both an MEA and MOCA are specified for a particular route segment, you may fly lower than the MEA down to, but not below the MOCA. You must be able to receive the applicable navigation signals. If you’re using VOR for navigation, this only applies when aircraft is within 22 NM of VOR.
- MRA: Minimum Reception Altitude. Minimum altitude to receive navigation signals.
- MTA: Minimum Turning Altitude. Provides vertical and lateral obstacle clearance in turns over certain fixes. Annotated with the MTA X icon and a note describing the restriction.
- MVA: Minimum Vectoring Altitude: Lowest altitude at which an IFR aircraft will be vectored by a radar controller. Unless otherwise authorized for radar approaches, departures, and missed approaches. MVAs may be lower than the minimum altitudes depicted on aeronautical charts, such as MEAs or MOCAs.
- MVAs are not published in any aeronautical chart used by pilots. They’re available only to ATC.
- OROCA: Off Route Obstruction Clearance Altitude. Provides obstruction clearance with a 1,000 foot buffer in non-mountainous terrain areas and 2,000 feet in mountainous areas. Does not provide navigation or communication signal coverage.
Last updated: 2021-05-27 19:41:27 -0700
Approaches
The different type of IFR approaches and related information to flying them.
There are two basic kinds of approaches: Precision and Non-Precision. Precision, as the name implies, provide much more accurate navigation. Specifically, they provide more precise lateral and vertical guidance. Precision approaches prescribe a decision altitude or height where the pilot decides to either continue the approach or go missed. Non-precision, on the other hand, prescribe two things: a minimum descent altitude (or height), and a missed approach point. In a non-precision approach, you descend down to the MDA, then hold at or above that altitude until you either have everything needed to continue the approach, or you reach the missed approach point. If you reach the missed approach point, and are unable to continue the approach, you must execute the missed approach procedure.
Descending below MDA/DA
You can descend below the MDA/DA when all of the following conditions are true:
- The aircraft is continuously in a position from which a descent to a landing on the intended runway can be made at a normal rate of descent using normal maneuvers. i.e. no chop and drop/slipping.
- The flight visibility is not less than the visibility prescribed in the standard instrument approach being used.
- At least one of the following visual references for the intended runway (the runway environment) is distinctly visible and identifiable to the pilot:
- The approach light system, except that the pilot may not descend below 100 feet above the touchdown zone elevation using the approach lights as a reference unless the red terminating bars or the red side row bars are also distinctly visible and identifiable.
- The threshold.
- The threshold markings.
- The threshold lights.
- The runway end identifier lights.
- The visual glideslope indicator.
- The touchdown zone or touchdown zone markings.
- The touchdown zone lights.
- The runway or runway markings.
- The runway lights.
Approach Category
See AIM 5-4-7 (e).
The approach category for the aircraft is defined by the approach speed - VREF. Though, if you decide to fly the approach at a higher speed than VREF, then you must use the minimums specified for the category containing the speed you’re flying at (e.g. if you’re in a plane that with a VREF of 85 kts, but decide to fly the approach at 95 kts, then you must use the minimums defined for Category B).
| Category A | Category B | Category C | Category D | Category E | |
|---|---|---|---|---|---|
| Speed (kts) | 0 to 90 | 91 to 120 | 121 to 140 | 141 to 165 | 165 or greater |
Circling
See AIM 5-4-20.
Circling is a maneuver conducted after an approach, but is not a type of approach itself. Circling is performed whenever the final approach course is not aligned with the runway (within 30°), when landing on a different runway from the approach flown, or when the runway is not specified in the approach (e.g. flying a VOR-A).
Circling may be done if the winds do not favor the runway the chosen approach is for - e.g. if winds favor runway 15, but the approach is for runway 25, then you might fly the approach for runway 25, circle to land runway 15. It can also be done for other reasons - if there is VFR aircraft primarily using a different runway from the one specified for the approach you’re using, for example. Some approaches (commonly, VOR approaches) only specify circling.
Circling Minimums
Published minimums provide at least a 300 foot obstacle clearance when you remain within the appropriate area of protection. Remember to descend to the circling MDA/DA, not the straight-in MDA.
If no circling minimums are published, circling requires ATC authorization and at basic VFR (at least 1000 ft ceiling with visibility 3+ statute miles).
Remain at or above the circling MDA altitude until the aircraft is “continuously in a position from which a descent to a landing on the intended runway can be made using normal maneuvers”. This is typically just inside the 180. Abeam for most circling minimums would have you low on downwind.
Circling Radius
Depending on the approach category (speed you fly at), you have different circling radius - the minimum distance you must remain from the runway while circling to land.
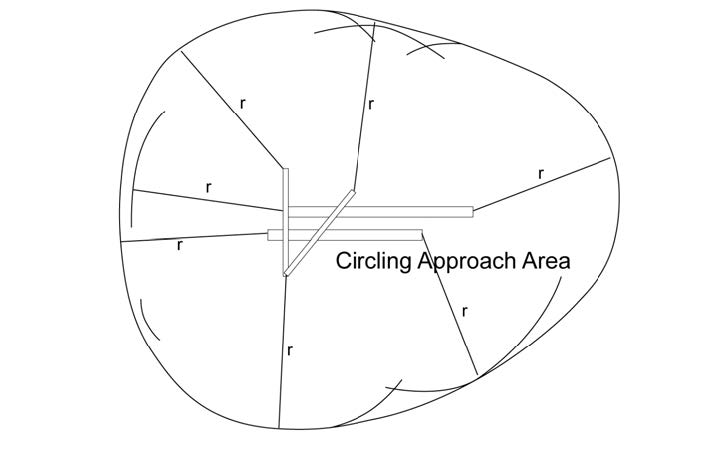 .
.
Standard Circling Radius
Circling approach protected areas developed prior to late 2012 use the radius distances shown below.
| Circling MDA | CAT A | CAT B | CAT C | CAT D | CAT E |
|---|---|---|---|---|---|
| All altitudes | 1.3 NM | 1.5 NM | 1.7 NM | 2.3 NM | 4.5 NM |
Expanded Circling Radius
Per the AIM, Circling approach protected areas developed after late 2012 use the radius distance shown below.
| Circling MDA (feet MSL) | CAT A | CAT B | CAT C | CAT D | CAT E |
|---|---|---|---|---|---|
| 1000 or less | 1.3 NM | 1.7 NM | 2.7 NM | 3.6 NM | 4.5 NM |
| 1001 to 3000 | 1.3 NM | 1.8 NM | 2.8 NM | 3.7 NM | 4.6 NM |
| 3001 to 5000 | 1.3 NM | 1.8 NM | 2.9 NM | 3.8 NM | 4.8 NM |
| 5001 to 7000 | 1.3 NM | 1.9 NM | 3.0 NM | 4.0 NM | 5.0 NM |
| 7001 to 9000 | 1.4 NM | 2.0 NM | 3.2 NM | 4.2 NM | 5.3 NM |
| 9001 and above | 1.4 NM | 2.1 NM | 3.3 NM | 4.4 NM | 5.5 NM |
Missed Approaches
Most instrument approach procedures also have a missed procedure. These are described in the top-left box of the approach plate, and then visually depicted as part of the top-down view.
If you choose to, must, or are instructed to go missed, you follow those instructions. If you were not on the final approach course (that is, if you were circling to land), then you get back on the final approach course as part of going missed.
See this article from AOPA on going missed.
See this article from BoldMethod on going missed below the MDA/DA
PT - Procedure Turn
Depicted as a line with a barb from a course in an approach plate. The barb indicates the direction to turn. Procedure turns are maneuvers enable the following:
- course reversal
- descent from an IAF
- Inbound course interception.
Procedure turns or hold-in-lieu-of-PTs are mandatory whenever they are depicted on the approach plate. However, they are not permitted when:
- “NoPT” is depicted on the plate
- Radar vectors to final
- Conducting a timed approach from a holding fix.
The maximum speed when performing a procedure turn is 200 kts IAS. You must remain within the charted distance (usually 10 NM), and comply with published altitudes for obstacle clearance.
The shape of the maneuver is mandatory if a teardrop or hold-in-lieu-of-PT is published. Otherwise, only the direction.
A teardrop procedure may be be published instead of a procedure turn.
Do not perform a procedure turn when SHARPTT:
- Straight-in approach clearance
- Holding in lieu of a procedure turn
- DME Arc
- Radar vectors to final
- NoPT shown on chart
- Timed approach from a holding fix
- Teardrop course reversal.
ILS - Instrument Landing System
the ILS is composed of two main parts: the localizer and the glide slope. In addition, there are marker beacons at specific locations.
The ILS is described mostly in AIM 1-1-9.
Localizer
The localizer is essentially a more-sensitive VOR that broadcasts a single radial. It’s located inline with the runway, behind the runway. It broadcasts 2 signals - one at 90 Hz, the other at 150 Hz. The intersection of the signals is aligned with the extended runway centerline, and the receiver on the airplane can interpret these to show how off course the airplane is.

The width of it is between 3° and 6° - such that the width at the runway threshold is 700 feet. Usually, it’s a 5° total width (2.5° full deflection on each side, or 4 times more sensitive than a VOR). The coverage range is a 35° on each side of the centerline up to 10 NM. After that, out to 18 NM, with 10° each side of the centerline. It goes out to an altitude of 4500 feet.

Glide Slope
The glide slope provides vertical course guidance. The transmitter is located off to the side of the runway (about 250-650 away from the runway centerline), between 750 and 1,250 feet behind the runway threshold.
Similar to the localizer, the glide slope broadcasts 2 signals, at 90 and 150 Hz, with the intersection of them providing a - usually - 3° glide slope down to the runway.
A glide slope has a width of 1.4° (0.7° on either side), with a range out to 10 NM. As previously stated, it provides a 3° slope, unless otherwise charted.
⚠️ Due to, literally how physics works, there’s a false glide slope significantly above the normal glide slope.

Marker Beacons
Marker beacons provide range information over specific points on the approach. There are 3 that are part of an ILS, named the outer marker, middle marker, and inner marker. There also exists the back course marker, but that’s not part of the ILS approach.
| Marker Type | Location | Color | Signal |
|---|---|---|---|
| Outer Marker | 4-7 NM out. Approximately where the aircraft should intercept the glide slope. | Blue | Dashes “- - -” |
| Middle Marker | ~3500 feet from the runway & 200 feet above the touchdown zone elevation. Where the glide slope meets the decision height. | Amber | “· - · -” |
| Inner Marker | Between the middle marker and the runway threshold. Indicates where the glide slope meets the decision height on a CAT II ILS approach. | White | All dots. “· · · ·” |
| Back Course | The final approach fix on “selected back course approaches”, not a part of the ILS approach. | White | two-dots “·· ··” |
ALS - Approach Light Systems
See AIM 2-1-1.
- Provides basic visible means to transition between instrument-guided flight into a visual approach.
- The ALS extends from the landing threshold into the approach area up to:
- 2,400 to 3,000 feet for precision instrument runways, and
- 1,400 to 1,500 feet for non-precision instrument runways.
- May include sequenced flashing lights, which appear to the pilot as a ball of light traveling towards the runway at 2 times a second.
- The visible parts of the ALS configuration can help the pilot estimate flight visibility.
ILS Minimums
See this chart:
| Category | Visibility | Decision Height |
|---|---|---|
| CAT I | 2,400 feet or 1,800 feet | 200 feet |
| CAT II | 1,200 feet | 100 feet |
| CAT IIIa | > 700 feet | < 100 feet or no decision height |
| CAT IIIb | 150 to 700 feet | < 50 feet or no decision height |
| CAT IIIc | 0 feet | No decision height |
VOR Approaches
VOR approaches are useful for when there’s basically no other approach type available. They are non-precision approaches, which means they provide lateral guidance only.
Per AIM 1-2-3 (c), while you can fly the final approach segment for a VOR approach that does not specify “or GPS” using GPS, you must be monitoring the VOR on another radio. For avionics like the G1000 where you don’t have two deflecting needles, this means that you must switch the HSI from GPS to VLOC for the final approach segment.
For example, on the Corvallis VOR-A approach, you can use the GPS outbound from CVO, all the way through the procedure turn, until you turn onto the CVO R-252 course inbound. Once you turn onto the CVO R-252 inbound course (which this defines as the final approach segment), you then switch over to using the VOR to navigate.
In another example, on the Corvallis VOR RWY-17 approach, you are welcome to use the GPS through the entire DME arc, up until you turn onto the CVO R-177 course inbound.
This same concept applies also to ILS and other ground-based-navigation approaches.
DME Arcs
DME Arcs are arcing paths flown at a certain distance (measured using DME - hence the name), from a VOR. They provide a way to transfer to another radial on the VOR without using GPS or radar vectors. They’re mostly used as parts of approaches, but can be specified elsewhere.
To fly one, first start turning onto the arc when you are groundspeed * 0.01 nm from the arc (e.g. groundspeed == 100 nm/hr, then start turn when you are 1 nm from the arc). Then, follow the “twist 10, turn 10” pneumonic - for every degrees you turn, twist the desired course 10 degrees in the direction of the arc. Repeat until you reach the desired radial.
In the example of the KCVO VOR RWY-17 approach, if you are approach MAGOT from SHEDD, you are approaching the CVO R-031 radial from the south. Once you are 1 nm from that waypoint, you’ll start your turn: Switch the CDI to show the CVO R-031, and twist it 10° left (counterclockwise, in this case), to 031. Once this is done, start the turn. Be sure to also be monitoring your DME to ensure you’re maintaining 16 nm from CVO. When the needle centers, twist give it another 10° counterclockwise twist. Repeat until your next twist would take you past the CVO R-357, at which point you simply set it to R-357. As you approach that radial, start your inbound turn. Be cognizant of the reversal of the VOR (unless your avionics has reverse sensing!) until you get around to resetting your CDI to 177°, which you should do as soon as you are on the final approach course.
Note that as per above, you can also fly this arc using the GPS indicator, as the DME arc is not part of the final approach segment.
RNAV Approaches
LPV means “Localizer Performance with Vertical Guidance”, and it is not a precision approach (it’s an “Approach with Vertical Guidance (APV)”, along with BARO-VNAV, LNAV/VNAV and other types that are not required to meet precision approach standards, but do provide course and glidepath deviation.
Last updated: 2022-02-15 12:28:43 -0800
Departures
Covered in AIM, Chapter 5, Section 2.
Picking up Clearance and Departing
There are 4 ways to enter IFR.
- Pick up IFR clearance on the ground, and depart IFR.
- Pick up IFR clearance on the ground, depart VFR, then switch over to IFR in the air. (But… why?)
- File IFR prior to startup, depart VFR, and pick up clearance in the air. (But… why?)
- Depart VFR, and pick up a pop-up IFR clearance in the air.
In the first 3 cases, you file for IFR at some point on the ground (ideally before the engine is even started up, but you can certainly do that while the engine is running. Which I’ve done if I’m on the second-half of a cross-country trip where I only filed prior to leaving the first time. Knowing what I know now, I would just file twice.)
Regardless, in the first 3 cases, you pick up your clearance, either by calling clearance departure or ground (you will only call ground if you’re departing from an airport that has a ground frequency but doesn’t have a clearance departure frequency). Sometimes, you might pick up your clearance by using your phone to call clearance departure. You pick up your clearance, copy it down with the standard CRAFT, and confirm.
If you’re going to depart IFR, then once you’re ready, you’ll call ATC back, and they’ll either clear you for release (towered field), give you a clearance void time (untowered field), or told to hold for release (either, really only if ATC is busy). If you plan to depart VFR, but switch over to IFR in the air, advise them of this.
If you’re planning to depart VFR, then do so as you would normally. If you pick up a clearance in the air, you’ll advise ATC with “$ATC, $MY_CALL_SIGN, $APPROXIMATE_LOCATION, VFR. IFR flight plan on file to $DESTINATION.” If you want a pop-up, then you’ll check in with “$ATC, $MY_CALL_SIGN, $ALTITUDE, $APPROXIMATE_LOCATION, VFR. Would like to pick up an IFR pop-up clearance to $DESTINATION.” with any other requests in that. (e.g. “would like to pick up an IFR pop-up clearance to Corvallis for 3 approaches”)
Departure Procedures
Departure Procedures are pre-planned IFR routes which provide obstacle clearance from the terminal area to the en-route area. When they exist, they provide a specific way to depart IFR where, so long as you can meet certain criteria, you know you will be clear of any obstacles in your path. Note that if you do fly a DP, it is your responsibility to follow it so that you maintain obstacle clearance.
You can fly a DP without needing to be cleared to do so by ATC, and you are encouraged to do so if departing at night, or in MVFR or IMC conditions.
Unless stated otherwise, the criteria for DPs are:
- Cross departure end of runway at least 35 feet AGL (above elevation of the departure end.
- Climb to 400 AGL before making initial turn. (Part of TERPS - Terminal Instrument Procedures).
- The aircraft is performing nominally, with all engines operating.
- Maintain a climb gradient of 200 feet per nautical mile.
When a procedure uses non-standard minimums, the procedure will have the “Triangle T” (black triangle with a T inside it - looks like a solid Nabla (∇) with a T inscribed) in the notes section of the instrument procedure chart.
You can convert your ground speed (in nm/hr) and climb rate (in ft/min) to climb gradient ft/nm using the following formula:
\(climb_gradient = (ground_speed / 60) * climb_rate\)
So, if your ground speed is 90 knots, and you’re climbing at 500 fpm, then your climb gradient is \(90 / 60 * 500 = 1.5 * 500 = 750 ft/nm\).
There are two subtypes of departure procedures: Obstacle Departure Procedures (ODPs) and Standard Instrument Departures (SIDs).
DPs can be found in the IFR Takeoff Minimums and (Obstacle) Departure Procedures section, Section L, of the Terminal Procedure Publications (TPPs). SIDs and complex ODPs are published graphically and given titles.
All public performance-based navigation (PBN) DPs are normally designated using RNAV 1, RNP 1, or A-RNP. RNAV 1 and RNP 1 means the total system error must not be more than 1 NM for 95% of the total flight time. A-RNP will be charted in the PBN box. You are expected to maintain route centerlines, as depicted by the CDI unless authorized to deviate by ATC or under emergency conditions.
Obstacle Departure Procedures
ODPs are printed either textually or graphically. Some ODPs can be found in the Instrument Procedure Charts for the area, named ones will have a specific plate.
You can fly a DP without needing to be cleared to do so by ATC, and you are encouraged to do so if departing at night, or in MVFR or IMC conditions.
Graphic ODPs (which have “(OBSTACLE)” in the name, e.g. “GEYSR THREE DEPARTURE (OBSTACLE)” or “CROWN ONE DEPARTURE (RNAV) (OBSTACLE)”) and provide a graphical depiction of the DP.
Standard Instrument Departures
SIDs are printed graphically, and perform similarly as ODPs, with the additional benefit of reducing pilot/controller workload (“climb via the SID” is a much faster clearance to give). You must have specific ATC clearance to fly a SID.
Diverse Vector Areas
A Diverse Vector Area (DVA) is an area in which ATC may provide random radar vectors during an uninterrupted climb from the departure runway until above the MVA/MIA, established in accordance with the TERPS criteria for diverse departures. The DVA provides obstacle and terrain avoidance in lieu of taking off from the runway under IFR using an ODP or SID.
Or, essentially, a DVA allows ATC to assign you radar vectors while you climb up to the Minimum Vectoring Altitude (MVA) or Minimum IFR Altitude (MIA).
Visual Climb over Airport
Another departure option for IFR. Where you essentially do a box climb in VMC to the published climb-to altitude. Note that the weather conditions must be VMC up to (or above) the specified visibility/ceiling in the procedure. VCOAs are a kind of a DP, though you must specifically request to fly the VCOA.
Without a DP, or No Instrument Departure Available
Airports that have been surveyed for instrument approaches should also have some kind of IFR departure available. While there might not be a graphical DP available, you should check to see if it’s listed in the Instrument Procedure Charts for the area. For the many airports that don’t have an instrument approach available, then you can depart IFR, but you have to provide your own separation and obstacle clearance. Meaning you need to maintain VFR until you get to the Minimum Vectoring Altitude (MVA) or Minimum IFR Altitude (MIA) where ATC can then provide obstacle clearance.
Last updated: 2021-12-29 13:24:04 -0800
IFR Flight Plans
IFR Flight plans can be filed over the phone, over the radio, or electronically. I almost exclusively file electronically via foreflight, with the rare exception being picking up a TEC route from a towered airport (which is done over the radio), or getting a pop-up.
Fuel Requirements
For IFR, you must have enough fuel to fly to the destination, then to all alternates, and then have 45 minutes of fuel left.
So, if I file for KSAC to KOAK, with an alternate of KSJC, it might take an hour to fly from KSAC to KOAK, then another 20 minutes to go from KOAK to KSJC. Meaning I need to have at least an hour and 20 minutes of fuel. On top of that, I need at least 45 more minutes of fuel - or 2 hours and 5 minutes of fuel.
Destination and Alternates
Under Part 91, per 91.169, IFR flight plans need to include an alternate unless the following is the case:
- The destination airport has a standard instrument approach, as listed in part 97 AND
- The weather, at time of expected arrival and for 1 hour before and 1 hour after, as at least the following:
- 2000 feet ceiling
- 3 statute mile visibility.
- This is the 1-2-3 rule.
- (Use a TAF to verify this)
If any of those are not the case, then you legally must file at least 1 alternate destination. You can file any number of alternates you want, but that does increase the amount of fuel you need to carry.
Alternates
In order to list an airport as an alternate, there are 2 conditions:
- If the alternate has a standard instrument approach, as listed in part 97:
- Weather must meet the alternate minima in the approach (if specified)
- If the airport has a precision approach (i.e. ILS, GLS), then the weather at the time of expected arrival must be at least 600 feet ceiling with 2 statute mile visibility.
- If the airport only has precision approaches (or APV), then the weather at the time of expected arrival must be at least 800 feet ceiling with 2 statute mile visibility.
- If the alternate does not have a standard instrument approach, as listed in part 97:
- You must be able to descend from the MEA, do the approach, and land under basic VFR minimums.
In practice, this means you likely won’t be filing airports that don’t have instrument approaches as alternates.
(Checkride tip: Make sure to list an alternate in the flight plan, be sure to explain why you picked that.)
Last updated: 2021-12-29 11:08:53 -0800
Navigation Systems
Radio navigation systems: DME, NDB, VOR, RNAV, GPS, etc.
See AIM chapter 1 for more reference.
DME - Direct Measuring Equipment
Tuned automatically with a paired VHF station (Localizer or VOR). Works by having the DME unit on the aircraft ping the ground unit. Ground unit will respond to the ping, and the airborne unit will compute & display distance to the ground unit using time-of-flight.
Note that DME will display “slant range” (actual distance) to the receiver, not horizontal distance. However, you can… effectively ignore that and use horizontal distance if you are 1 NM away for every 1000 feet above/below the station. E.G. at 5000 feet above the station, you need to be at least 5 NM to more-or-less use the slant range as a horizontal distance. This results in the degree of error being less than 10° (asin(1000 ft / 1 NM) ~= asin(0.1646) ~= 9.473°)
NDB - Non-Directional Beacon
Operates in the LF to MF range (190-535 kHz). As the name describes, this does not give you the direction to the beacon. Has the following service volumes:
| Type | Service Volume Radius |
|---|---|
| Compass Locator | 15 NM |
| Medium High | 25 NM |
| High | 50 NM (or less, as published by NOTAM or in the chart supplement) |
| High High | 75 NM |
Compass Locator
A type of NDB installed at the outer or middle markers (sometimes both) on some ILS approaches. Low-powered, at least 25 watts & 15 NM range.
VOR - VHF Omnidirectional Range
As the name describes, they’re in the VHF range (108 to 117.95 MHz). These are beacons that include a directional signal, so that a receiver can figure out what radial they’re on and display how far off the radial (up to 10° for most HSIs) the aircraft is.
The VOR MON (minimum operational network) program ensures that as old VORs are decommissioned, a MON airport (equipped with legacy ILS or VOR approach) is available within 100 NM regardless of aircraft position in the continental US.
Service volume depends on the VOR. For all VOR types, from 0 ft AGL up to 1000 ft AGL, it looks like a cone, extending out to the volume specified at 1,000 ft.
| VOR Type | Service Volumes | MON Service Volume |
|---|---|---|
| Terminal | 1,000 ft to 12,000 ft: Radius 25 NM | n/a |
| Low | 1,000 ft to 18,000 ft: Radius 40 NM | 5,000 ft to 18,000 ft: Radius 70 NM |
| High | 1,000 ft to 14,500 ft: Radius 40 NM. 14.5k to 18k ft: Radius 100 NM. 18k to 45k ft: Radius 130 NM. 45k to 60k ft: Radius 100 NM | 5,000 ft to 14,500 ft: Radius 70 NM. Rest unchanged. |
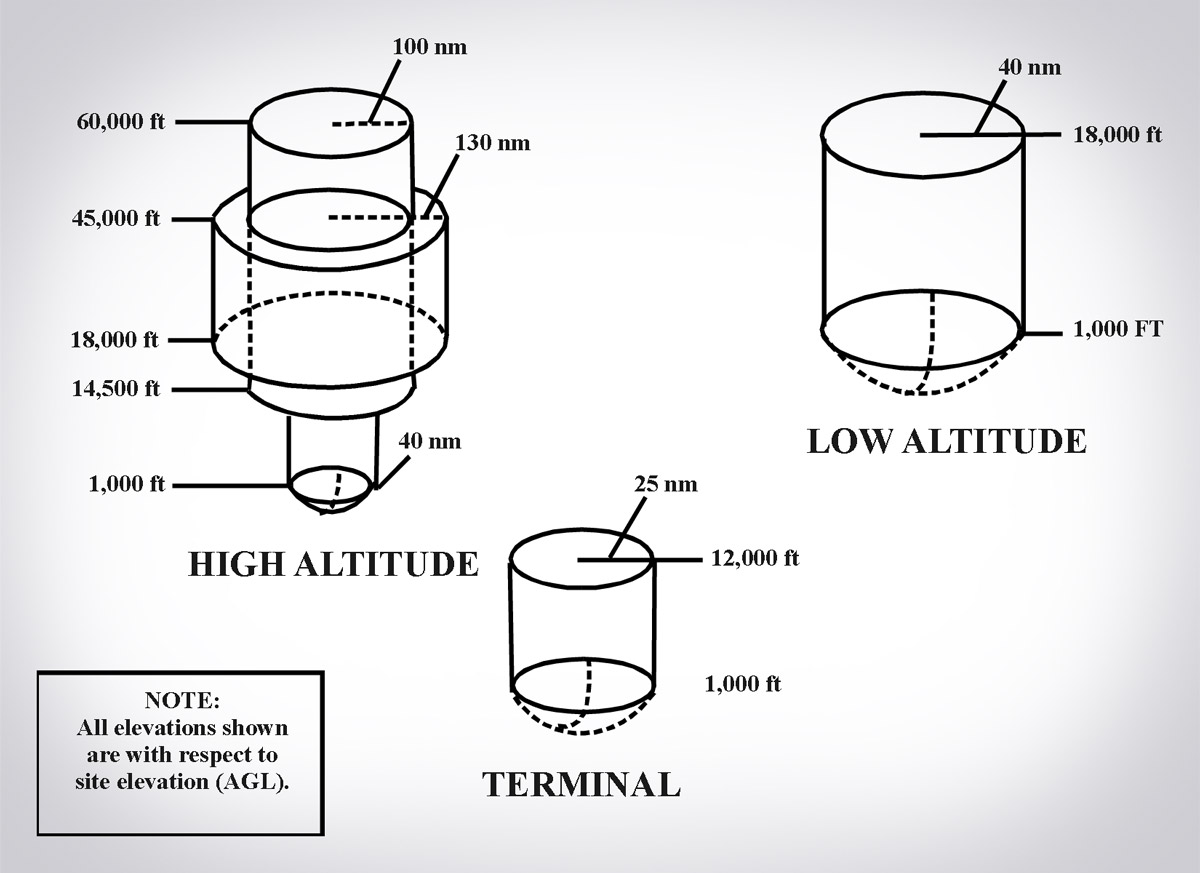
Limitations
- Cone of Confusion: When you’re directly over the VOR, the receiver has a hard time distinguishing which radial you’re on.
- Reverse sensing: In older HSIs, if you’ve accidentally tuned the opposite radial (e.g. you’re on the 180 radial, but tuned to the 360 radial), and are off course/trying to get back on, you need to fly away from the line deflection and not towards it.
- VORs requires line-of-sight between aircraft and the VOR transmitter. i.e. mountains will mess with the signal.
Receiver checks
Must be done every 30 calendar days. Log DEPS: date, error, place (location), and signature.
- VOT (VOR test facility) ±4°
- Repair Station ±4°
- VOR ground checkpoint ±4°
- VOR airborne checkpoint ±6°
- Dual VOR cross-check ±4°
- Above a prominent ground landmark on a selected radial at least 20 NM from a VOR, flying at a “reasonable low altitude” ±6°
RNAV - Area Navigation
Allows navigation on any desired path without the need to overfly ground-based facilities
Multiple types:
- GNSS-based (GPS is the US version)
- VOR/DME RNAV
- DME/DME RNAV
- Inertial Reference Unit / System
Most of the time, in the US, you’ll be using GPS-based RNAV.
In an approach, you can also get RNAV VNAV, which provides Vertical NAVigation guidance (using GPS?), and BARO-VNAV, which uses barometric altitude to provide vertical guidance.
Published RNAV routes are Q (above 18,000 MSL/FL180) and T (up to 18,000 MSL) routes. Designated RNAV 1, unless otherwise charted.
Note that, per AIM 1-2-3 (c), you can use an RNAV system instead of ground-based navigation for the following instances:
- Determining your position relative to/distance from a VOR, TACAN, NDB, compass locator, DME fix; or a named fix defined by a VOR radial, TACAN course, NDB bearing, or compass locator bearing intersecting a VOR or localizer course.
- Navigate to or from a VOR, TACAN, NDB, or compass locator.
- Hold over a VOR, TACAN, NDB, compass locator, or DME fix.
- Fly an arc based upon DME.
Or basically, for most en-route navigation, up to the final approach segment of an approach. You cannot use an RNAV system when the procedure specifically states that it is Not Available (NA). You also cannot use an RNAV system for “lateral navigation on localizer-based courses”, i.e. not for an ILS, Localizer, or Localizer back course. You can still use an RNAV system for identifying a waypoint defined by a VOR and localizer course intersection.
RNP - Required Navigation Performance
RNAV with navigation monitoring and alerting. It also is “a statement of navigation equipment and service performance”.
All RNAV approaches are RNP approaches.
- Most US RNP approaches are titled “RNAV (GPS)”
- US approaches with “RNAV (RNP)” in the title are “AR” (Authorization Required) approaches. You must have specific FAA approval for the crew, aircraft, and operation to fly those.
- In other countries, all RNP approaches may have “RNP” in the title, even those that do not require special authorization.
RNP approach minimas and equipment
- GLS DA minimas using GBAS (This is a GPS-based precision approach)
- LP MDA or LPV DA minimas require RNP via WAAS
- LNAV/VNAV DA achieved by VNAV-approved WAAS or BARO-VNAV systems
- LNAV MDA achieved by a basic, unaugmented IFR-approved GPS
GPS - Global Positioning System
The first GNSS (Global Navigation Satellite System). Created by the US. Minimum 24 satellites (currently a lot more), all at a half-synchronous orbit (2 orbits/day) of 10,900 NM. At least 5 are in view from at any given location on Earth.
Wikipedia has a good article on how GPS actually works.
Each satellite carries an atomic clock, and broadcasts their time and current position. The time difference allows the receiver to calculate the exact distance to the satellite, and with the position of the satellite, the receiver knows they’re somewhere on the surface of a sphere centered on the satellite with radius equal to the distance to the satellite. With a second satellite sphere, the receiver knows it’s somewhere on the circle formed by the intersection of those 2 satellites. With a third satellite sphere, the receiver can calculate its the 2D position (latitude and longitude). With a fourth satellite sphere, you can calculate the 3D position (latitude, longitude, and altitude). With a fifth satellite sphere, you can detect know if one of the other signals is faulty, and with a sixth sphere, you can eliminate the fault.
Fault detection and elimination is known as RAIM (Receiver Autonomous Integrity Monitoring). You can also use an altimeter to substitute a satellite input, so that you can detect a fault with only 4 satellites, and eliminate it with 5.
GPS CDI deflection shows horizontal distance from the centerline, contrast with a VOR CDI, which shows the amount of degrees off course you are.
GPS can substitute ADF (Automatic Direction Finder) and DME, except for ADF substitution on NDB approaches without a GPS overlay (“or GPS” in title).
Check GPS NOTAMs before flight, and use RAIM prediction if available.
GPS Augmentation Systems, or Differential GPS (DGPS) is a system that improves GPS accuracy by measuring errors received by reference stations at known locations and then broadcasting those errors to supported GPS receivers. There are a few things here for that:
SBAS - Satellite Based Augmentation System
WAAS (Wide Area Augmentation System) is the US system, EGNOS is the equivalent in Europe.
Ground stations (Wide-area Reference Stations and Wide-area Master Stations) measure GPS errors and produce correction signals. “These corrections are broadcasted back to the satellite segment from which they are bounced back to aircraft GPS WAAS receivers to improve accuracy, integrity and availability monitoring for GPS navigation.” This covers a wide area.
GBAS - Ground Based Augmentation System
- Formerly named Local Area Augmentation System (LAAS) in the US. Now replaced with the ICAO term “GBAS.”
- Errors are broadcasted via VHF to GBAS-enabled GPS receivers.
- GBAS is more accurate than WAAS but covers a much smaller geographical area.
- Allows for category I and above approaches to GLS DA minima.
Difference between RNAV, GNSS, GPS, PBN and RNP
- RNP is a specific statement of PBN for the flight segment and aircraft capability.
- RNP is also defined as RNAV + navigation monitoring and alerting functionality.
- Receiver Autonomous Integrity Monitoring (RAIM) or built-in monitoring in WAAS provide this capability.
- En route – RNP 2.0 (2 NM accuracy 95% of the flight time)
- Terminal & Departure – RNP 1.0 (1 NM accuracy 95% of the flight time)
- Final Approach – RNP 0.3 (0.3 NM accuracy 95% of flight time)
- Advanced RNP (A-RNP) - is a higher RNP standard mandatory for RNP AR, that require capability for: (AIM 1-2-2)
- Radius-to-Fix (RF) legs
- Scalable RNP (meaning RNP accuracy can change value), and
- Parallel offset flight path generation
Last updated: 2021-12-18 08:02:45 -0800
Left Turning Tendencies
Single-engine airplanes in particular are susceptible to left-turning-tendencies, especially at low airspeeds. You’re typically taught 4 of these:
- Torque (Newton’s 3rd law from the engine)
- P-Factor (Gravity)
- Spiraling Slipstream (Aerodynamics)
- Gyroscopic Precession
These combine to produce a left turning tendency, all because the propeller is turning clockwise (relative to the pilot).
Cessna Chick had an excellent article on left turning tendencies, but her domain seems to have slipped.
Standard disclaimer for my other flying notes: I’m not a CFI. Hell, as of this writing, I’m not even a private pilot. Don’t take this as flight instruction.
Torque
Pretty simple, Newton’s third law states that for every action, there’s an equal and opposite reaction to that. The engine of the airplane is causing the propeller to rotate, at a certain amount of torque. Newton’s third law states that there’s an equal amount of torque in the opposite direction. Because the aircraft is of much greater mass than the propeller, this is why the propeller rotates at a great rate, whereas the plane… essentially doesn’t, unless you’re at or near full power.
P-Factor
P (or Propeller) factor is, IMO misnamed. Essentially, the propeller blade that is going “down” has gravity to help it out, whereas the blade(s) that are moving horizontal or up don’t. This, fairly minimal extra force, helps the right side (because the propeller is spinning clockwise) to move more air than the left side. This extra force on the right side causes the plane to yaw towards the left.
Note that this is most noticeable at higher pitch angles.
Spiraling Slipstream
Now we turn towards trying to imagine the airflow. Because the propeller is turning, the wind is also turned by it (the propeller pulls the wind backwards and induces a rotation in the same direction as the propeller). This slipstream now rotates around the aircraft, until it hits a flat surface (typically explained as the rudder), which forces either a bank (wing or elevator), or a yaw (rudder).
Note that this really only happens at slow speeds, because at faster speeds, the wind is moving fast enough that it doesn’t hit the plane.
Gyroscopic Precession
Only really a thing in tailwheels, or while trying to change pitch angle.
Last updated: 2020-06-07 16:47:02 -0700
Flight Maneuvers
Basic flight maneuvers. Mostly notes from Chapter 4 of the Airplane Flying Handbook.
Standard disclaimer for my other flying notes: I’m not a CFI. Hell, as of this writing, I’m not even a private pilot. Don’t take this as flight instruction.
Stalls
Stalls occur when the angle of the airflow relative to the cord of the wing exceeds a certain “critical angle”. When this critical angle is reached, the lift generated by the wing drops to near-zero1.
Relatedly, stall horns are devices that detect how turbulent the airflow on a wing is, and warn the pilot if it’s too turbulent - and thus is in or approaching a stall.
Power On Stall
A power on stall (also called a departure stall) is the kind of stall you might encounter immediately after takeoff or a go around. For this, you’d be in a takeoff configuration. (flaps as specified, gear down, etc.) Though, the Airplane Flying Handbook also recommends practicing power on stalls in a clean configuration (flaps and gear retracted). Set power to maximum (hence the name).
Enter a climb from a lift-off speed. Here is where you’d apply the desired power setting. Raise the nose during the climb, enough to start reduction of airspeed. Maintain straight flight during this (it’s really easy to enter a turning stall when trying to enter a power on stall). Eventually, you should enter a stall.
At this point, you’re going to:
- Pitch down. This’ll increase your angle of attack.
- Keep the wings level with ailerons & rudder.
- Apply full power (it might not have been full anyway).
Once the stall is exited, return to the desired flightpath (climb or straight and level), and return to the appropriate power setting.
Power Off Stall
A power off stall is the type of stall you might encounter during a landing. For this reason, you start in a landing configuration (flaps on, gear down, carb heat applied, throttle to near-idle).
Using just the stick/yoke, you keep the plane level - essentially, you’re pulling up to drop airspeed. As you do this, the plane will slow down. It’s important to keep the plane flying straight (otherwise you get a turning stall). Eventually, you’ll be going too slow and enter a stall.
At this point, you’re going to do a three things in quick succession. All of which with the goal to increase the angle of attack.
- Nose down
- level wings
- Apply full power (power as needed). This might require some right rudder to counteract some left-turning tendencies.
- Once the flying speed is back up, level out and climb back to starting altitude. Keep in mind that you don’t want to have dropped too much, because this could have actually been a landing, and dropping into the terrain sounds like not a good time.
- In the climb, go back to a flying configuration - gear up, raise flaps, trim as needed.
Ground Reference Maneuvers
Ground Reference Maneuvers are necessary for all sorts of flying.
For these, you should enter at maneuvering speed, and never go above a 45° bank angle. Ground Reference Maneuvers should be established from the downwind position, and you should always check/clear the area with two 90° clearing turns prior to performing a GRM.
For the most part, these are all the same thing - keep multiple reference points in sight, make small corrections for the wind, etc.
Some things to keep in mind:
- Bank into the wind. That is, when in a crosswind that is blowing away from the point, you want a higher bank angle (because you need to compensate for the wind blowing you away from the point). Similarly, when the crosswind is blowing into the point you’re orbiting, bank less now that the wind is helping you in your turn.
- Similar idea as above, have a slightly higher bank angle in the downwind - the wind is blowing you tangent to the turn, so you’re going to be in this portion of the turn less than in the upwind part of the turn. You will have the steepest bank angle when you have a direct tailwind.
- In a low wing aircraft, the wing might conceal the object you’re supposed to be orbiting. This is fine, you should have other points you’re referencing anyway.
In a stall, the wing is still generating lift - this is why the plane doesn’t fall at 9.8 m/s^2 when in a stall - it’s just not enough to keep the plane from falling period.
Last updated: 2021-05-29 23:05:39 -0700
Minimum Required Equipment
FAR 91.205 lists the required equipment for all flights.
Note that the order of precedence goes MEL (Minimum Equipment List - an individualized list of minimum required equipment for a specific aircraft), MMEL (Master Minimum Equipment List - essentially an MEL, but for an entire type/range of types of aircraft), then KOEL (Kinds of Operations Equipment List), and then if that doesn’t exist, then following what’s in 91.205 (assuming you’re flying under Part 91).
VFR Day
- Airspeed indicator
- Altimeter
- Magnetic direction indicator (compass)
- Tachometer
- Oil pressure gauge for each engine using a pressure system
- Temperature gauge for each liquid cooled engine
- Oil temperature gauge for each air cooled engine
- Manifest pressure gauge for each altitude engine
- Fuel gauge indicating the quantity of fuel in each tank
- Landing gear position indicator, if retractable.
- If certified after 1996-03-11, red and white anticollision light system.
- If over water, and beyond glide distance: approved flotation gear, and at least one flare.
- Approved safety belt for everyone > 2
- If made after 1978-07-18, shoulder harness or restraint for each front seat.
- If made after 1986-12-12, shoulder harness or restraint for all seats.
- An ELT, as required for 91.207
Or, as a mnemonic (retrieved from Ask A CFI), TOMATOE A FLAMES:
- Tachometer (for each engine)
- Oil Pressure Gauge
- Magnetic Direction Indicator (magnetic compass)
- Airspeed Indicator
- Temperature Gauge for each liquid cooled engine
- Oil Temperature Gauge
- Emergency equipment (beyond power off gliding distance over water) pyrotechnic signaling device, flotation device
- Anti-collision Lights
- Fuel Gauge for each tank
- Landing gear position indicator
- Altimeter
- Manifold Pressure Gauge for each engine
- Emergency Locator Transmitter
- Safety Belts and Shoulder Harnesses
Source: FAR 91.205 (b)
VFR Night
Everything in VFR Day plus the following:
mnemonic:
- Fuses
- Landing light, if operated for hire
- Anti-collision light (beacon and/or strobes)
- Position Lights – Nav Lights (Red on the left, Green on the Right, White facing aft)
- Source of electricity (battery, generator, alternator)
Source: FAR 91.205 (c)
IFR
IFR Adds GRABCARD to the respective VFR Day or Night requirements (i.e. for IFR day, you need all the required equipment for VFR day, plus what follows. For IFR night, you need all the required equipment for VFR Day & Night, plus what follows.)
- Generator/Alternator
- Radios (Two-way comms + navigation equipment suitable for the route to be flown)
- Altimeter (sensitive & adjustable for barometric pressure)
- Ball (Slip-kid indicator)
- Clock (display hours, minutes, and seconds with a sweep-second pointer or digital presentation)
- Attitude Indicator
- Rate-of-Turn Indicator
- Direction gyroscope (heading indicator)
Source: FAR 91.205 (d)
Specific Equipment
ADS-B and Mode C transponder.
You need ADS-B out whenever you need a Mode C transponder (Mode C means altitude encoding, so squawk code + altitude).
You need a Mode C transponder under the following conditions:
- When operating in class A, B or C airspace.
- When operating above class B or C airspace (up to 10,000 feet MSL, at which point, due to the next item, you still need the transponder)
- When operating in class E airspace at or above 10,000 feet MSL (within CONUS), except when you are operating at or below 2,500 AGL
- Within 30 nm of class B airspace primary airport, below 10,000 feet MSL.
- Whenever you are flying into, within, or across the contiguous United States Air Defense Identification Zone (ADIZ).
There is also a case where you need ADS-B out, but not necessarily a transponder:
- When operating in class E airspace at or above 3,000 feet MSL over the gulf of Mexico from the US coastline out to 12 nm.
But you should be running the transponder & ADS-B out at all times.
VOR Accuracy Checks
There are several ways to check the accuracy of VOR equipment. Note that the VOR itself itself is only accurate to about 1°.
| Type | Required Accuracy |
|---|---|
| VOR Test Signal (VOT) | ±4° |
| Radio Repair Station Test Signal | ±4° |
| VOR Ground checkpoint | ±4° |
| VOR Airborne checkpoint | ±6° |
| Airborne over prominent landmark along centerline of established VOR airway (20+ NM from VOR) | ±6° |
| Checking a dual VOR system against each other | ±4° |
You can check a dual VOR system against each other in lieu of all other VOR check procedures.
When using a VOT, you tune the VOR to 108.0 MHz, and the OBS should read 0° (TO), and 180° (FROM).
A VOR check must be done within the preceding 30 days to operate an aircraft under IFR.
Logging
Regardless of how you check it, you must log the date, place, and bearing error for each VOR. You must also sign it. (91.171 (d))
e.g (from my own logs):
VOR check 66083
2021-12-17
VOR GND Check

R1: 049: No deviation, to
    229: No deviation, from
R2: 049: No deviation, to
    229: No deviation, from
(with my signature at the bottom).
Last updated: 2021-12-29 13:24:04 -0800
Noise Abatement
It’s loud, here’s the noise abatement procedures for a few of the airports I’ve flown out of.
I’m not a CFI. Hell, as of this writing, I’m not even a private pilot. Don’t take this as flight instruction.
Hawthorne Municipal - khhr
Available here, we have:
- Takeoff at Vy (best rate of climb). (Normal takeoff is Vx)
- Upwind to at least the end of the runway.
- Turn crosswind at 500 ft above field elevation OR by Hawthorne mall, whichever comes first. (Normal crosswind turn is at 800 ft above field)
- Fly downwind over El Segundo BLVD. This means that your downwind will be much closer to the field than it otherwise would be.
Note that this is voluntary - but you should still follow it because aviation is already hated by the general public.
Santa Monica - ksmo
Available here. This is:
- Takeoff runway 21, fly over the golf course (turn 10 degrees left at end of runway, then right to fly over the golf course).
- Don’t turn crosswind until after you fly over Lincoln.
- Turn base at/around I-405/When ATC tells you.
Also there are night procedure restrictions:
- Monday through Friday, no engine starts or takeoffs between 11 pm and 7 am the following day.
- Weekends, no engine starts or takeoffs between 11 pm and 8 am the following day.
- That is, Friday evening, no engine starts/takeoffs from 11 pm until 8 am the next day.
- Similarly, on Sunday evening, no engine starts/takeoffs from 11 pm until 7 am the next day.
Unlike Hawthorne, there’s an actual ordinance behind the Santa Monica noise abatements. Meaning that violating them is something you really don’t want to do.
Last updated: 2019-08-16 09:20:49 -0700
NOTAMs
NOtice To AirMen. Microaggression aside, NOTAMs are the way to distribute temporary (and not-so-temporary) notices about… just about anything in aviation.
There are 5 subtypes of NOTAMs:
- (D) NOTAMs
- “Information that requires wide dissemination via telecommunication, regarding enroute navigation aids, civil public-use airports listed in the Chart Supplement U.S., facilities, services, and procedures.” (Instrument Pilot Oral Exam Guide, ASA)
- These will have keywords contained in the first part of the text, which identifies what the NOTAM is specifically about. These include:
- “RWY, TWY, APRON, AD, OBST, NAV, COM, SVC,AIRSPACE, ODP, SID, STAR, CHART, DATA, IAP, VFP, ROUTE, SPECIAL, SECURITY, (U) or (O).”
- FDC NOTAMs
- “Flight information that is regulatory in nature including, but not limited to, changes to IFR charts, procedures, and airspace usage.” (Instrument Pilot Oral Exam Guide, ASA)
- Pointer NOTAMs
- “Issued by a flight service station to highlight or point out another NOTAM; Used to assist users in cross-referencing important information that may not be found under an airport or NAVAID identifier”. (Instrument Pilot Oral Exam Guide, ASA) Essentially, analog links.
- Military NOTAMs
- Fairly self-explanatory, NOTAMs related to the US military navigational aids and airports.
- SAA NOTAMs
- These note when Special Activity Airspace “will be active outside the published schedule[d] times and when required.” (Instrument Pilot Oral Exam Guide, ASA)
- Examples of Special Activity Airspace include:
- Special use airspace (Restricted, MOAS, warning, alert areas)
- Instrument & visual military training routes
- aerial refueling tracks & anchors.
- Source: Instrument Pilot Pilot Oral Exam Guide, ASA
Sources
- Hayes, Michael D.. Instrument Pilot Oral Exam Guide (Oral Exam Guide Series) Aviation Supplies & Academics, Inc.. Kindle Edition.
Last updated: 2021-11-10 21:11:31 -0800
Personal Minimums
The FAA has a personal minimums worksheet available. Here’s an adapted version of that.
Weather Categories are as follows:
| Category | Ceiling (feet AGL) | Visibility (Statute Miles) |
|---|---|---|
| VFR | > 3,000 | > 5 miles |
| MVFR | 1,000 to 3,000 | 3 to 5 miles |
| IFR | 500 to 999 | 1 to < 3 miles |
| LIFR | < 500 | < 1 mile |
| Weather Condition | Ceiling | Visibility |
|---|---|---|
| VFR | Pattern Work: TPA + 1000 feet MSL Cross Country: Cruise altitude + 2000 feet. IFR Cross Country: Not a factor |
Pattern Work: At least 7 SM. Cross Country: 7+ SM. IFR Cross Country: Not a factor. |
| MVFR | VFR Flight: No go. IFR Flight: At least 2,000 feet AGL |
VFR Flight: No go IFR Flight: Go. |
| IFR | Fly with a safety pilot. | Fly with a safety pilot. |
| LIFR | No go. | No go. |
| Wind Conditions | |
|---|---|
| Turbulence | Less than "Severe". If there's a turbulence PIREP from a jet, then cancel. |
| Surface wind speed (Gusts or Sustained) | Less than 15 knots |
| Crosswind component | Less than 10 knots crosswind component. |
Basically, I have very conservatives minimum at the moment. Which is fine, because I fly light aircraft for fun. I also am relatively inexperienced - at the time of this writing, I have just about 200 hours total time, which is in that danger zone of ~100 to ~500 hours where most GA accidents occur in.
Last updated: 2021-12-05 08:58:45 -0800
Spins
Spins are essentially what happens when only half the plane is stalling. Or rather, half the plane is stalling significantly more than the other half. Because half the plane has more lift than the other, this forces the plane into a bank, very quickly followed a pitch down. Obviously, this is dangerous.
Spins happen when a stall occurs, with a yaw on the plane (not coordinated flight).
Standard disclaimer for my other flying notes: I’m not a CFI. Hell, as of this writing, I’m not even a private pilot. Don’t take this as flight instruction.
Recovering from a Spin
Essentially, this is stopping the rotation, and unstalling the wing.
- Power to idle
- Ailerons neutral
- Full opposite rudder
- Push down (exit the stall)
- Neutral rudder after spin stops
- Return to level flight (return to level flight)
Demonstrating a Spin
Approach a spin similar to a power-off stall. This makes sense, because a spin will send you hurtling toward the ground, and it’s better to do that with minimum power applied.
As the plane approaches stall, smoothly apply full rudder in the direction o the desired spin rotation, while applying back pressure (pull up) on the elevator. The airplane should yaw in the direction of the rudder and enter the spin. Thus, entering the “Incipient” phase of the spin. At this point, spin recovery techniques should be initialized.
Phases
- Entry is pretty obvious
- Incipient is just after entry - the plane is spinning, but it’s not yet following a vertical flightpath
- Developed is when the plane is heading more-or-less straight down.
- Recovery is when the rotation ceases and the stall is exited. It may take a few turns to exit recovery phase, depending on the aircraft.
Last updated: 2019-06-03 21:27:24 -0700
Takeoffs and Landings
Taking off is optional. Landing is mandatory.
Going to describe the main styles of takeoffs and landings as taught in primary (private) training.
Takeoffs
Standard
A “standard” takeoff looks like this:
- Get on centerline of runway
- Apply throttle, ensure engine instruments are in green
- Release brakes, accelerating
- Watch for airspeed to increase (to become “alive”)
- If the airspeed doesn’t come alive, then abort the takeoff.
- At rotation speed (Vr), begin rotation. (or, you know, when the plane starts to take off)
- Climb out at Vy (or Vx, if noise abatement requires it). Note that Vy is usually a higher airspeed than Vx
- At 500 AGL, reduce flaps to 0° if they weren’t already at 0°.
Short Field
Usually as “short field with 200 ft obstacle”. This is where we get to practice STOL with a non-STOL airplane.
- Set flaps to 10°.
- Get on the centerline, as far to the end of the runway as possible (use all available runway)
- Hold brakes and apply full power. Release brakes.
- Watch for airspeed to come alive.
- Rotate at Vr
- Climb out at Vx.
- When at 200 AGL (over that 200 ft obstacle), pitch for Vy
- Reduce flaps to 0° when at 500 AGL.
Soft Field
E.G. a grass field or a sandbar. Or really, any field that’s not concrete or tarmac.
- Set flaps to 10°.
- As you take the runway, apply full back pressure on the elevator, do not come to a stop on the runway.
- Gradually apply full throttle.
- Keep nosewheel off the ground, but don’t tailstrike.
- Rotate at Vr
- Stay in ground effect until you’re at Vy
- Climb out at Vy
- Reduce flaps to 0° when at 500 AGL.
Landings
Short Field
The point of a short field landing is to get the plane down as early as possible (on your landing mark). Without floating or taking more space than necessary.
- Once you are on the runway:
- Reduce flaps to 0°
- Apply brakes as necessary (don’t destroy the brake pads if you don’t have to)
- Once flaps are at 0°, pull back on the elevator - use drag as much as possible to reduce speed.
Soft Field
The idea here is to essentially try to keep the plane from landing as much as possible - don’t want it to catch on a sandbar or clump of dirt and cause the plane to flip or something.
- Don’t idle the engine as you come in to land
- Instead, wait until you’ve touched the ground to idle the engine
- Keep the nosewheel off the ground as long as possible
- Role off the field without applying brakes too much.
Last updated: 2019-06-23 12:13:21 -0700
Weather
- Briefings covers receiving weather briefings. It could use a lot of fleshing out.
- Icing covers icing specifically.
All weather events are the result of unequal heating and cooling of the Earth’s surface and atmosphere.
Standard Values
Standard temperature and pressure at sea level is considered 15℃ and 29.92“ Hg (inches of Mercury). This is part of the “Standard Atmosphere”.
Atmospheric Pressure decreases approximately 1“ Hg per 1,000 ft.
Up to approximately 35,000 feet MSL, on average, the outside air temperature will decrease by 2 ℃ for every 1,000 feet gained. This is the standard lapse rate. This is obviously not true always - inversion layers are things after all - but it is very useful for calculating freezing levels and the like.
Humidity and Dewpoint
Relative humidity is the is the ratio of actual water vapor in a volume of air compared to the amount of water vapor that volume of air could hold at a particular temperature and pressure. With constant pressure, the total amount of water vapor a volume of air can hold depends on its temperature - warmer air can hold more total water. Or put another way: if you take a volume of air and only increase its temperature, the relative humidity will go down.
When the relative humidity is 100% - that is, the amount of water vapor in that air is the maximum it can hold - then we say the air volume is saturated.
The dewpoint is the temperature a volume of air (at constant pressure) must be cooled to to allow the water vapor to condense into dew. Dew is simply water condensed onto a surface. When the dewpoint is below 0 ℃, the dewpoint is sometimes called the frost point.
Given only the dewpoint and the current air temperature, you can calculate the relative humidity by dividing the air temperature (in celsius) by the dewpoint (in celsius).
For example, if the dewpoint is 10 ℃ and the air temperature is 20 ℃, then the relative humidity is 100%.
You can also use this (combined with the standard lapse rate) to calculate where you should expect clouds at. If the air is already saturated, then you can expect fog at or near the ground.
Note that a dry air mass is denser than a wet air mass. Meaning you should expect pressure to decrease when the humidity is high, and you should expect pressure to increase when the humidity is low. This is part of why some weather instruments indicate that lower pressures as rain and stormy conditions, even if it’s not actually raining.
Weather Systems
Pressure Systems
Flow of air in high pressure and low pressure systems:
| High Pressure | Low Pressure |
|---|---|
| Outward Flow | Inward Flow |
| Downward | Upward |
| Clockwise | Counterclockwise |
High pressure systems are characterized by descending air, which which tends to cause cloud dissipation and good weather. Low pressure systems are characterized by rising air, which tends to bring clouds, precipitation, and bad weather.
Fronts
4 types of fronts
- Cold Front
- Cold, dense, stable air replaces a warm mass. Typically moves faster than a warm front.
- As the front passes, expected weather can include towering cumulus or cumulonimbus, heavy rain accompanied by lightning, thunder and/or hail; tornadoes possible; during passage, poor visibility, winds variable and gusting; temperature/dew point and barometric pressure drop rapidly.
- Warm Front - Area when a warm air mass contacts and flows over a colder air mass.
- Occluded Front - When a fast-moving cold front “catches up” with a slow-moving warm front. Has two subtypes: cold front occlusion and warm front occlusion.
- Stationary Front - When the forces of two air masses are relatively equal, the boundary or front that separates them remains stationary and remains for a few days. Weather is mixture of both.
Flight Categories
There are 4 flight categories: LIFR, IFR, MVFR, and VFR. The category is defined as the lowest category that contains one of the ceiling or visibility (i.e. if ceiling is at 5,000 ft, but visibility is < 1 mile, then it’s still LIFR, despite the ceiling being VFR conditions).
| Category | Ceiling (feet AGL) | Visibility (Statute Miles) |
|---|---|---|
| VFR | > 3,000 | > 5 miles |
| MVFR | 1,000 to 3,000 | 3 to 5 miles |
| IFR | 500 to 999 | 1 to < 3 miles |
| LIFR | < 500 | < 1 mile |
Weather Forecast and Advisories
Airmets, sigmets, convective sigmets, PIREPs (Pilot reports), METARs, TAFs, etc.
TAFs
Terminal Aerodrome Forecast. Forecast for an area 5 statute miles around the forecast location (i.e. airport). Provides expected weather for the next day. Valid for 24 hours after issuance.
Airmets
Airmets are advisories of significant weather that may affect all aircraft, but particularly lighter aircraft - i.e. airlines are less concerned with these. They are valid for 6 hours from time of issue, and have the following subtypes:
- Airmet T (Tango): Moderate turbulence, sustained surface 30+ kts, and/or non-convective low-level wind shear.
- Airmet Z (Zulu): Moderate icing and provides freezing level heights.
- Airmet S (Sierra): Describes IFR conditions and/or mountain obscuration.
- Airmet G (Graphical): Found at aviationweather.gov
For example, the coastal fog on the west coast usually results in Airmet Sierras being issued.
Sigmets
Sigmets are more significant airmets and are potentially hazardous to all types of aircraft. For what I do, a relevant sigmet means you’re not flying today. They are valid for 4 hours from time of issue, and are issued when the following is expected:
- Severe icing not associated with thunderstorms
- Severe or extreme turbulence or clean air turbulence not associated with thunderstorms.
- Dust storms, sandstorms, and other non-thunderstorm phenomena lowering surface visibility below 3 miles.
For example, the ash spewed from an erupting volcano would cause a sigmet to be issued.
Convective Sigmets
Essentially Sigmets for thunderstorms.
Valid for 2 hours after issue, convective sigmets contain either an observation and a forecast, or only a forecast. All convective sigmets imply severe or greater turbulence, severe icing, and low level wind shear.
They are issued for any of the following:
- Severe thunderstorms, due to:
- Surface winds 50+ kts
- Surface hail greater than 3/4 inch in diameter.
- Tornadoes
- Embedded thunderstorms of any intensity level
- a line of thunderstorms at least 60 miles long with thunderstorms affecting at least 40% of its length
- Thunderstorms producing heavy or greater precipitation (VIP level 4) affecting at least 40% of an area of at least 3000 square miles.
Graphical Forecast for Aviation (GFA)
The GFA provides a graphical view of observations, forecasts, and warnings from 14 hours ago to 15 hours from now, from surface up to FL 480 (~48,000 ft MSL). Available in different layers (3,000 ft layers up to FL 180, then 6,000 ft layers from FL 180 to FL 480).
Can be viewed at aviationweather.gov/gfa.
Inflight Aviation Weather Advisories
AIRMET, SIGMET, Convective SIGMET, and center weather advisory are available as inflight weather advisories, to advise enroute aircraft of the development of potentially hazardous weather.
Center Weather Advisory
FAA Weather Services/Center Weather Advisory.
Basically, they are SIGMET (WS), Convective SIGMET (WST), and AIRMETs (WA) distributed through an ARTCC (center). They are valid for up to 2 hours, and include both existing conditions and conditions expected to occur in that 2 hour block. Will include a note at the end if these conditions are expected to last beyond the 2 hour block. These are not scheduled.
They are issued under the following conditions:
- When necessary to supplement an existing WS, WST, or WA for the purpose of refining or updating the location, movement, extent, or intensity of the weather event relevant to the ARTCC’s area of responsibility.
- When an inflight advisory has not yet been issued, but the observed or expected weather conditions meet WS, WST or WA criteria based on current pilot reports and reinforced by other sources of information concerning existing meteorological conditions.
- When observed, or developing weather conditions do not meet WS, WST or WA criteria but current pilot reports or other weather information sources indicate that an existing, or anticipated, meteorological phenomena will adversely affect the safe flow of air traffic within the ARTCC’s area of responsibility.
Aviation Weather Charts
Surface Analysis Chart, Ceiling and Visibility Analysis (CVA), Significant Weather Prognostic Chart, Short-Range Surface Prognostic Chart, Convective Outlook Chart, Constant Pressure Analysis Chart, Freezing Level Graphics.
Ceiling and Visibility Analysis (CVA)
aviationweather.gov/gfa, select CIG/VIS.
A real-time view of current ceiling and visibility conditions across CONUS. Gives a visual depiction of ceiling and visibility conditions (and therefore, flight category).
Significant Weather Prognostic Chart
Different charts depicting significant weather at different altitudes. Very useful for preflight planning, should be followed up with other, specific forecasts.
Surface
aviationweather.gov/progchart/sfc.
Depicts surface weather observations - pressure, highs/lows/ridges/troughs, locations and types of fronts, etc. Pressure is expressed in MSL, everything else is expressed as they occur at the surface point of observation (e.g. 0 AGL for the given location).
Low-Level
Forecast of significant weather at FL 240 and below. Updated 4 times per day, in either 12-hour or 24 hour prognostics.
Mid-Level
Mid-Level SIGWX chart. They only show the North Atlantic Ocean region.
Forecast depicting significant weather from 10,000 ft MSL (FL 100) to FL 450. Updated 4 times per day, shows forecast for the next 24 hours.
High-Level
High-Level SIGWX chart, Region A (Most of North America and South America)
Forecast depicting significant weather between FL 250 and FL 630 (and associated surface weather features). Each chart depicts the weather as expected at the valid time.
Convective Outlook Chart
Graphical and narrative convective outlooks for convective weather, both severe and non-severe weather. Specifies the following risks over at 8 day period:
- Marginal (MRGL)
- Slight (SLGT)
- Enhanced (ENH)
- moderate (MDT)
- High (HIGH)
Based on probability percentage, varying for time periods and how far out it is.
Constant Pressure Level Forecasts
weather.gov/jetstream/850mb, provides an 850 millibar constant pressure level chart
Computer model depicting select weather at a specified constant pressure level (e.g. 850 MB), along with altitudes (in meters). Provide an overview of weather patterns at specified times & pressure altitudes. Provide source for wind/temperature aloft forecasts. In general, pressure patterns cause/characterize much of the weather. Note that these charts show pressure near the depicted pressure level (i.e. for a general range of pressure, it’ll show lines of constant pressure there). In the weather.gov links, you’ll see the option to view other weather alongside these lines of constant pressure, which helps to understand what’s going on and what to expect in the air.
You can generally see the jet stream at 300 MB, 250 MB, and 200 MB.
Freezing Level Chart
Gives a visual depiction of where you can expect the freezing level to be at. Current and 3 hour forecast are updated hourly, the 6, 9, and 12 hour forecasts are updated every 3 hours. These are supplementary products meant to provide “enhanced situational awareness only” (as in, you should definitely cross-reference this with TAFs, METARs, AIRMETs, SIGMETs, and similar).
Last updated: 2024-03-05 16:16:47 -0800
Briefings
As simple as calling 1-800-WX-BRIEF.
There are 4 types of briefings: standard, abbreviated, outlook, and in-flight. In almost every case, when you call flight services, you’re going to ask for a standard brief.
Last updated: 2019-10-01 22:08:53 -0700
Icing
Icing is significantly dangerous to all aircraft, even those with FIKI (flight into known icing) systems. It can result in significant performance reductions even with just a little ice.
All ice requires the following conditions:
- Visible moisture (rain, being in a cloud)
- The aircraft surface temperature must be below freezing
Without either, there’s no way for ice to form.
There are a few types of icing:
- Structural Ice
- Ice that forms on the structure of the aircraft.
- Has the following subtypes:
- Clear Ice: Incredibly dangerous. Heavy, hard and difficult to see and remove. Water drops freeze slowly and form as smooth sheet of solid ice. Forms close to the freezing point by large supercooled drops of water.
- Rime Ice: Opaque, white, actually possible to see. Formed by small supercooled water droplets freezing quickly.
- Mixed, as the name implies, is clear and rime ice formed together.
- Instrument Ice
- Ice which forms over aircraft instruments and sensors, such as pitot/static.
- Induction Ice
- Ice blocking the air intake for the engine, very similar to…
- Intake Ice
- Ice blocking the intake for the engine
- Carburetor Ice
- Forms in the venturi of carbureted engines.
- Causes engine roughness and loss of power, as this prevents fuel from mixing with the air. Turn on carb heat to clear and prevent this.
Frost
Ice crystals caused by sublimation (water in the air freezing to the surface without transitioning to a liquid form) when both the temperature and dew point are below freezing.
Frost accumulates on the ground and should be swept off prior to flight.
If in doubt, just put the aircraft in a heated hanger until the frost melts off.
Last updated: 2021-11-13 22:33:55 -0800
Food
Food is good.
I follow a mostly vegetarian diet, but I do enjoy meat on occasion.
Last updated: 2019-03-27 12:33:27 -0700
Recipes
I’m not a great cook, but I try my best.
Recipes from other people
Vegetarian
Non-Vegetarian
Last updated: 2020-12-22 17:22:26 -0800
French Fries
Baked
Ingredients:
- 4-5 yukon gold potatoes. Washed, but not peeled.
- 2 tablespoons of canola oil
- Salt and Pepper to taste.
Instructions:
- Preheat oven to 425° fahrenheit (~220° C).
- Chop the potatoes into fries and place in to bowl.
- Drizzle 1 tablespoon of the canola oil on to the fries. Add a little salt and pepper. Mix together.
- Put aluminum foil on a cookie sheet, spray it with nonstick spray. Spread fries out on to the sheet.
- Drizzle remaining tablespoon of the canola oil on to the friends. Add more salt and pepper.
- Cook for 20 minutes.
Last updated: 2020-05-10 20:54:27 -0700
Grilled Cheese
Nom!
Ingredients
- 1 oz unsalted butter
- cheese (american singles, nom!)
- Bread
Steps
Put cheese between two slices of bread. Melt butter on small-ish pan over medium-low (favor low) heat. Once melted, put sandwich on pan Heat for 3-4 minutes Flip Heat for another 3-4 minutes.
Pull!
For extra deliciousness, enjoy the sandwich with chili.
Last updated: 2019-04-17 20:40:58 -0700
Instant Ramen
The secret to decent instant ramen is to not use the ultra-cheap maruchan/cup noodles brand ramen. At the very least, get the instant ramen that’s stocked in the asian aisle. This’ll run at ~$1/packet, or about 10x more expensive, but you get way higher quality ramen out of it. If you go to an asian market, you’ll be able to get even better instant ramen there.
The other trick is to use at most 2:1 proportions packet:flavoring ratio. Otherwise it’s way too salty. Even better is to avoid using that flavoring packet and create your own flavoring.
So, bare minimum, we got:
- Bring the liquid to a boil on the stove. At the most basic, this is water. If you’re feeling extra, use a broth. Bonus points for using home-made broth as that’s the cheapest.
- Once the liquid is boiling, add the ramen. 1 packet per person is a good serving size.
- Cook the ramen for 3 minutes. Drain the liquid from the ramen.
- Add seasoning. This can be as simple as the flavoring packet, or something even better.
- I’ve found pepper + italian seasoning to be pretty decent.
- Also a little bit of salt.
- Serve.
In addition to the above, you can also add some vegetables and other stuff to improve the ramen, such as:
- sauteed mushrooms
- seaweed
- sriracha
- green onions
And probably more, but this is all we’ve tried.
Last updated: 2019-06-26 19:29:53 -0700
Mac and Cheese
Really, this is cheesy pasta, because you don’t have to use macaroni.
This is infinitely better than box mac and cheese, and just as simple.
(By the way, for box mac and cheese, the best is Annie’s white cheddar shells).
Ingredients
Fairly simple
- Cheese (whatever you have is fine - it needs to be shredded before it goes in, or even better: grated.)
- Milk (any kind, even the vegan milks)
- Pasta (shells, rotini, though I guess any kind of pasta should be fine, I like having smaller noodles, though)
- Butter (4 oz or so)
Process
- Fill a medium-sized pot or saucepan with water, remembering to salt it enough to taste like seawater.
- Get it to a boil, then add the pasta.
- Boil the pasta for however long the packaging says.
- While this is going, prepare the rest of the ingredients.
- get the right amount of butter.
- shred or grate the cheese.
- get the milk out.
- While this is going, prepare the rest of the ingredients.
- Drain the pasta, put the butter in the same pan and get it to melt.
- Add the cheese and milk. Cheese first.
- I eyeball the milk - pouring for about half a second or a second is usually enough. You’re aiming for about 2 oz.
- Stir until everything comes together. There’s a decent chance there’s not enough heat left to melt the cheese entirely, that’s fine.
- Add the pasta back in and stir.
Enjoy.
Last updated: 2019-07-06 11:39:54 -0700
Pan Fried Tilapia
Guest Writer: Nicole Fronda
My favorite meal growing up! And it’s probably Rachel’s favorite recipe of mine.
Ingredients
- 2 filets of Tilapia (Although theoretically you could use fillets any fish you like. Your cook time may vary if you do!)
- Olive oil. 1-2 tablespoons should do.
- A dab of butter.
- Salt and Pepper to taste
- Flour
Assembly
Defrost the fish if needed. Season the fish with salt and pepper. Cover both sides of each filet in flour.
Heat up a large pan with the oil and butter. Place the filets in the pan. Let cook for 6 minutes or until golden brown on the side. Flip and cook for another 6 minutes or until golden brown on the outside and light and fluffy on the inside.
Serve
With any sides you like but I prefer steamed rice and veggies!
Last updated: 2020-05-10 12:27:52 -0700
Slow-Cooked Pinto Beans
Dried pinto beans are very nutritious and are significantly cheaper than canned beans. Here’s how to prepare them in a slow cooker:
3 parts water to 1 part beans. (e.g. 3 cups water for every cup of beans).
Combine in a slow cooker. Heat on low for 6-8 hours. Replenish the water if it gets too low.
Strain the beans into a container. It keeps reasonably well in the fridge.
Sources
Last updated: 2024-03-05 16:07:28 -0800
Roasted Cauliflower
Guest Writer: Nicole Fronda
I more or less follow this recipe described on FoodNetwork.
Ingredients
- 1 head of cauliflower
- Olive Oil
- Chopped Garlic. Even better is mince garlic.(When I’m without garlic, I use garlic salt as substitute, but that’s not nearly as good.)
- Some Thyme. 1 tablespoon is good for me.
- Some salt. Go easy if you use the garlic salt too.
- Some crushed black pepper.
- A dash of crushed red pepper.
Assembly
Chop the cauliflower. Then dump all the ingredients in a large plastic bag. Seal. Shake vigorously.
Release the ingredients from the plastic bag into a casserole dish. Bake in 450 degree F oven for about 20 minutes or until golden.
Serve
As a side or by itself!
Last updated: 2020-05-10 12:30:44 -0700
Roasted Potatoes
Ingredients
- Potatoes. Not baking kinds, you want “harder” potatoes. You want enough to fill a “serving” bowl.
- Olive Oil, about 2 to 4 oz.
- Salt
- Pepper
- Other seasoning, if you want
Process
Wash the potatoes. Of course.
You’ll need o bowl for mixing the oil and chopped potatoes, and a cookie sheet. Cover the cookie sheet in aluminum foil, and spray it with non-stick spray.
- Preheat oven to 450 F
- Pour the oil, and seasoning into the serving bowl, and mix them.
- Chop the potatoes into cubes. About a quarter to half an inch on each side or so is fine. You’ll figure it out as you make these.
- After every 2 potatoes, put them in the serving bowl, and mix them enough so that each cube is coated in the oil. Then put them on a cookie sheet. Potatoes should only be in a single layer.
Put the potatoes in the oven for 20 minutes or so. I set 3 timers at 18 minutes, 20 minutes, and 22 minutes. Check on the potatoes as each timer goes off (use the oven light, you don’t have to open the oven up). They will finish cooking after you pull them out, so if they look “done”, then it’s too late. They should look like they’re starting to finish.
Enjoy.
Last updated: 2019-03-29 20:09:55 -0700
Simple Soup
Soups are super easy. You can make a soup simply by tossing a bunch of vegetables into a pot and let them boil for 20 minutes. This is a simple vegetable (or beef) soup I like to make.
The only real way to screw up soup is to let it sit/cook for too long. Mushy soup isn’t good. I’ve learned that when I do make soup, I need to commit to finishing it by the next night, or else it’s not something I’m going to enjoy finishing.
Ingredients (Vegetarian)
- Beans (Pinto, Kidney, or Red) ~1lb
- Assorted vegetables, here’s what I enjoy:
- potatoes (use the smaller red/yellow potatoes, don’t use russets/baking potatoes. You want a “starchy” potato)
- carrots
- celery
- bell peppers
- radishes
- onions
- Vegetable broth (I use 2 16oz containers)
- Noodles/Pasta. Only do 1 package, here’s what I’ve used/liked
- Egg noodles are good
- shells (the smaller the better)
- rotini
- Seasoning to taste. I typically do pepper and italian seasoning.
Ingredients (Non-Vegetarian)
This is the same as the vegetarian, with the following replacements.
- Ground Beef (~1lb) instead of beans
- Beef Broth instead of vegetable broth
Process
You’re going to use medium heat for most of this, unless otherwise specified.
If you’re making the non-vegetarian variant:
- Season the meat, roll into balls. Cook these in the bottom of the pot with no liquid until they’re entirely brown on the outside.
- Pour in the first container of broth.
If you’re making the vegetarian variant:
- Pour in the beans + broth at the same time.
Regardless:
In order of density of the vegetables (denser vegetables take longer to cook), cut and add them to the pot.
Add seasoning as desired.
Cook, covered, for about 10 to 15 minutes, or until the vegetables are close to being banned.
Add the noodles, more seasoning, and the other broth container.
Cook, covered, for another 10 minutes or so.
Enjoy!
Last updated: 2019-03-27 20:16:49 -0700
Spanish Rice
this recipe is the easiest Spanish rice recipe I’ve ever made. It might not be terribly authentic, but it’s easy and it’s good.
Last updated: 2019-08-07 14:07:00 -0700
German
I’ve been trying to learn German via Duolingo for a bit.
Nouns/Gender
Bunch of nouns that have somehow still trip me up.
Articles are:
| Article | Der | Die | Das | | Gender | Masc. | Fem. | Neuter |
| English | German | Gender |
|---|---|---|
| ATM | Geldautomat | masc. |
| Bakery | Bäckerei | fem. |
| Bear | Bär | Masc. |
| bread | brot | neut. |
| Cat | Katze | Fem. |
| check | Rechnung | fem |
| Cheese | käse | masc. |
| church | Kirche | fem. |
| city | Stadt | fem. |
| coffee | Kaffee | masc. |
| coffee shop | Café | neut. |
| Dog | Hund | Masc. |
| egg | ei | neut. |
| Elephant | Elefant | Masc. |
| food | Essen | neut. |
| Hotel | Hotel | neut. |
| job/occupation | Beruf | masc. |
| library | Bibliothek | fem. |
| menu | Speisekarte | fem. |
| Market | Markt | Masc. |
| milk | Milch | fem. |
| mineral water | Mineralwasser | neut. |
| Mouse | Maus | Fem. |
| Movie Theater | Kino | neut. |
| Museum | Museum | neut. |
| Owl | Eule | Fem. |
| Park | Park | Masc. |
| pharmacy | Apotheke | fem. |
| pizza | Pizza | fem. |
| restaurant | Restaurant | neut. |
| salad | Salat | masc. |
| salt | Salz | neut. |
| sandwich | Sandwich | neut. |
| sausage | Wurst | fem. |
| schnitzel | Schnitzel | neut. |
| Subway station | U-bahnstation | fem. |
| supermarket | Supermarkt | Masc. |
| taxi stand | Taxistand | Masc. |
| tea | Tee | masc. |
| Train Station | Bahnhof | Masc. |
| University | Universität | Fem. |
| water | Wasser | neut. |
| Work | Arbeit | Fem. |
Countries/places
| English | German |
|---|---|
| America | Amerika |
| Austria | Österreich |
| Canada | Kanada |
| France | Frankreich |
| Germany | Deutschland |
| Munich | München |
| Vienna | Wien |
Jobs/Occupations
Jobs have different endings depending on if a man or woman holds it. Usually, the feminine version is the masculine version, with an “in” suffix. For example, Waiter is “Kellner”, while waitress is “Kellnerin”.
Grammar: Jobs are usually phrased as “They are $OCCUPATION”. For example, “Sie ist Kellnerin”. Which literally translates to “she is waiter”.
| English | Masc. | Fem. |
|---|---|---|
| Actor | Schauspieler | Schauspielerin |
| Chancellor | Kanzler | Kanzlerin |
| Doctor | Arzt | Ärztin |
| Teacher | Lehrer | Lehrerin |
| Professor | Professor | Professorin |
| Student | Student | Studentin |
| Waiter | Kellner | Kellnerin |
Friend, despite not being a job, also follows this.
| Friend | Fruend | Fruendin |
Games
| English | German | Gender |
|---|---|---|
| Chess | Schach | neut. |
| Piano | Klavier | neut. |
Adjectives
| English | German |
|---|---|
| beautiful | schön |
| cold (temperature) | kalt |
| delicious | lecker |
| elegant | elegant |
| exciting | aufregend |
| expensive | teuer |
| Hot (temperature) | heiß |
| Interesting | Interressant |
| Inexpensive | Billig |
| loud | laut |
| naturally / of course | natürlich |
| new | neu |
| nice | nett |
| old | alt |
| small | klein |
| smart | klug |
| stressful | stressig |
| tall (People), Big, large | groß |
| wonderful | wunderbar |
Location
| far away | weit weg | “weit” = far, “weg” = away | | here | hier | | nearby | in der Nähe | “in the vicinity” | | left | links | Also “On the left” or “to the left” | | over there | da drüben | | right | rechts | Also “On the right” or “to the right” |
Conjunctions
| also | auch | | but | aber | | from | aus | | or | oder |
Verbs
Verbs conjugate differently if you’re talking about yourself vs. someone else.
Second person drops the trailing vowel (if there), and appends “st”. Third person also drops the trailing vowel (if exists), but it appends “t”.
e.g. The second person form of “koche” is “kochst”, and its third-person form is “kocht”.
Grammar: When making a statement, put the subject first (“du schwimmst”). When making a question, put the verb first (“schwimmst du?”). When making a question, put modifiers after the subject (“schwimmst do oft?”). Modifiers still go before the object of the sentence (“du spielst gut Klavier”).
| English | First-person | | cook | koche | | meet | trifft | | paint | male | | play | spielt | | swim | schwimme |
Verb Modifiers
Modifiers go after the verb.
| always | immer | | never | nie | | often | oft | | sometimes | manchmal |
Phrases
| Prost | Cheers | | Bis Bald | See you soon | | wie gehts | how are you | | auf Wiedersehen | goodbye | | bis später | see you later | | es geht | I’m all right / I’m well | | es tut mir leid | I’m sorry | | tschüss | bye | | entschuldigung | excuse me |
| wie ist es in | what is it like in | | woher kommst du | where do you come from? |
Grammar Notes
Nouns are Capitalized in German
Questions are usually formed as “verb subject”. Statements are usually formed as “subject verb”. E.g. “kommst du” (“do you come…”) vs. “du kommst” (“you come…”)
Last updated: 2022-05-07 19:39:27 -0700
Hardware
Hardware-based projects
Inspiration
DIY Projects other people have done that inspire me.
Wearable Computer
Look like an 80s computer geek! Inspired by this project on adafruit, the idea is to build a much sleeker version of this. Potentially for use while cycling, flying, or otherwise as I think about it.
DIY Smartwatch
Imgur gallery describing the project, with a reddit post, which links to this Github repository.
DIY Ebook Reader
This person published a DIY ebook reader.
Automatic Fume Extractor
Been wanting to build my own, at it’s simplest, it’s a fan connected to an activated charcoal filter.
Last updated: 2023-09-27 19:21:50 -0700
3D Printing
I have a Prusa i3 mk3. It’s a really nice desktop 3d printer available as a kit. Having a 3d printer has been pretty great for all the little things you can do with it, despite not really having a big single “thing” to be the actual driver to get one. Ours doesn’t see all that much usage (we’ve been able to go a couple months between uses), but it’s really nice to have ready to use with little prep.
Using
Checklist for using it.
Preparing the Model
This assumes you already have a model you want to print. This uses the PrusaSlicer slicer.
- Insert SD card from printer into computer.
- Open and orient your model in PrusaSlicer.
- Does your model have overhangs or other parts that need support to print? If yes, add supports.
- Export the G-Code to the SD card.
- Eject the SD card and plug it back into the printer.
Using the Printer
- Wipe down the printer bed (the metal sheet you print on) with a paper towel and isopropyl alcohol.
- Turn on printer, select the model from the SD card (menu -> print from SD card -> select model)
- Watch the printer as it prints the first layer.
- If the filament is known to get caught on itself, watch/listen to the printer, if the filament starts to get tight, undo/give the printer some slack.
Replacing filament
There are official instructions… somewhere.
- Turn on printer.
- Turn on print-head heater.
- Wait ~5 minutes or so.
- Eject old filament.
- Cut ~45° angle into the new filament.
- Replace with new filament.
Last updated: 2020-01-14 13:46:16 -0800
Bicycle Trailer
This is a design for a cargo bicycle trailer, similar to the Bikes At Work trailer, but without the 7 month lead time. That said, if you’re looking for a cargo bike trailer, you really should just get a bikes at work trailer.
Instead of an aluminum trailer, this will be made out of wood. This is designed mostly for ease of construction, with not as much of a regard for weight. I’ll be attaching this to an electric bicycle, which’ll be more than powerful enough to pull what I put on this.
Note: As of this writing I haven’t built this yet.
Materials
This is constructed with 2x6 studs as the side runners, with a number of 2x4 studs as the inner supports, or ribs. The front end is also made out of a 2x6 stud, as are the wheel holders/cavities.
- 2x6 studs:
- 2x 8’ long stud (each side runner)
- 1x 27“ long stud (front end)
- 4x 5.5“ long studs (ends of the wheel cavities)
- 2x 22.5“ long studs (sides of the wheel cavities)
- 2x4 studs:
- 8x 24“ long studs (each rib)
- Other materials:
- 2x 16“ bicycle wheels
- 4x ball bearings (size?)
- 2x bicycle skewers
- TODO: Hardware to attach the trailer to the bicycle
- Sealant for the wood.
- Paint!
For the studs, you can get 3x 8’ 2x6 studs, plus 3x 8’ 2x4 studs, and that’ll get you the amount you need + enough for other projects.
Last updated: 2022-08-14 18:29:20 -0700
CO2 Monitor
I’m still noodling on this. Mostly I just want to play with an NDIR sensor.
I’d love a relatively cheap way to measure CO2 levels in my house. It’s been shown that even CO2 as “low” as 800 PPM affects cognition, and I’d like to be able to monitor this continuously. Never mind that this can be solved by just getting a single CO2 monitor and using that. I want to log this to a database I control, and see if I can integrate it with a home automation system. Because that’s the type of nerd I am.
This idea came about after I came across this project for a facemask with CO2 monitor, which uses an SCD-30 NDIR sensor to measure CO2 in parts per million. At ~$60/sensor, that’s quite affordable as far as NDIR sensors go.
NDIR sensors work by using infrared light to measure the amount of CO2 in a sample of air. CO2 is transparent to visible light, but it is opaque at certain infrared wavelengths. NDIR sensors basically shine an infrared light through a sample of air at a detector, and emits a value based on the brightness of the light as received by the detector. They’re decently sensitive (the one linked from adafruit is accurate to 400 ppm), and very accurate.
I want to integrate this with a raspberry pi and create an ad-hoc homekit accessory for it. The pi would simultaneously offer the current/most recent data to homekit, as well as upload the data to a database for other kinds of analysis.
I have done 0 research into the kind of database to upload this to.
As far as implementing homekit support, I’d likely use Apple’s ADK to create a one-off (or set of one-off) sensors. I could also an ESP32 or ESP8266 with esp-homekit instead of a raspberry pi. Which would result in a smaller package, so maybe! OTOH, I have an unused pi 3 just sitting around, and I don’t have any ESP hardware whatsoever.
Last updated: 2022-08-06 21:58:43 -0700
Coz-E
An electric Cozy Mark 4. Has it’s own build site.
Last updated: 2021-06-23 22:37:13 -0700
Miter Saw Station
This is heavily inspired by/a copy of I Like To Make Stuff’s Miter Saw Station (and somewhat including his improvements).
I haven’t yet cadded up his stop-block system, but I’ll add that once I get to it.
Note: As of this writing, I haven’t built this yet.
Materials
This is super simple. A couple tables made of 2x4 studs, and a center piece also made of 2x4 studs. The table surfaces and the dustbox are made of 0.5 inch plywood.
- 2x4 studs:
- 6x 45“ studs (side table main supports)
- 2x 36“ studs (saw side support)
- 4x 34.5“ studs (side table bottom cross supports)
- 3x 34“ studs (saw cross support)
- 6x 33“ studs (side table top cross supports)
- 0.5 inch plywood
- 2x 48“ x 36“ sheets (side table tops)
- 1x 37“ x 36“ sheet (saw table top)
- 1x 37“ x 28“ sheet (back of the saw box)
- 1x 37“ x 16“ sheet (top of the saw box)
- 2x 28“ x 15.5“ sheets (sides of the saw box)
I intend to make the front out of cardboard, because it’s simple to work with and I have some available.
In all, you can get away with the follow:
- 3x 4’x8’ sheet of 0.5 inch plywood
- 10x 8’ long 2x4 studs
Last updated: 2022-05-07 19:30:14 -0700
Phoebe
Phoebe is an ARRMA-RC Raider BLS rc car that I’ve spent the past 4 years off and on making semi-autonomous.
Motors
Phoebe came stock with an arrma-rc BLS ESC & Motor combination. This is a sensorless brushless motor, which is not ideal for a robot, and I’ve been on the hunt for a suitable sensored replacement.
From the specs, the motor is:
| Component | Measurement | Unit |
|---|---|---|
| Diameter | 35.8 | mm |
| Length | 54 | mm |
| Shaft Length | 13 | mm |
| Shaft Diameter | 3 | mm |
| Motor Speed | 4000 | kv |
| Poles | 2 |
The ESC supports 35A continuous, 50A peak, with either a 7S NiMh (8.4V), or 2S LiPo (7.4V).
Any replacement motor, to fit on the car, needs to match the physical dimensions. To keep a similar performance (I don’t care to replace the gearbox - I might as well buy a new platform if I do so), I also want it to have a similar speed as the stock motor.
Control System Mounts
Attaching to Phoebe
There are 4 screw holes - 2 on each side. They are symmetrical.
- It appears that the first 2 set are 24 mm from the back.
- The next set are 83 mm from the first
- Allow at least 5 mm vertical clearance from the screws to the bottom of the control system platform
- From the screw holes to the bottom of the chassis for Phoebe is 34 mm.
- m3 screws.
- The holes aren’t threaded - use nuts + lock washers on the other side to hold them in.
- The batteries for the electronics will likely be 16mm thick.
ESC
- The stock ESC is 54 mm long, 38 mm wide, and 21 mm tall.
- The (m3) screws are 46 mm apart (center to center)
- 17 mm from one edge
- 21 mm from the other (this one is the side with the cable leading to the switch)
- It should be mounted opposite the side the facing the micro USB port for the raspberry pi
PWM Servo Driver
Phoebe uses a SunFounder PCA9685 PWM Servo Driver to interface a raspberry pi 3 to the servo and ESC.
- It is 62 mm long, 26 mm wide.
- The (m3) screws are 19 mm apart (centers inset by 3.5), and are 56 mm apart.
Raspberry Pi 3 B+
- Mechanical drawings for a raspberry pi 3 b+
- Length: 85 mm
- Width: 56 mm
- Screws:
- m3 screws
- 49 mm width between screw holes.
- 58 mm length between screw holes
- Inset 3.5 mm from width of board.
- Trailing screws are inset 3.5mm from length of board.
- The micro USB/Power input is 8 mm wide, and the center is 10.6 mm from the edge of the board.
- Doing some math, the center of the power input is 4.6 mm from the nearest screw hole - the nearest edge of it starts 0.6 mm from that screw hole.
- It is ~1.5 mm tall. The hole in the side of the mount should allocate 15 mm width + 10 mm height for the cable.
- In other words, the hole for the mount should start just past the screw holes and continue for 15 mm. It should allow sufficient height plus/minus for the micro usb cable.
- The USB A ports extend approximately 2 mm beyond the length of the board.
Last updated: 2020-06-12 16:34:13 -0700
Soap Dispenser
⚠️ Warning! ⚠️ I haven’t built this, this was a project idea I came up with while working on something else, and wanted to write down my thoughts to get it out of my head.
While working on the epoxy dispenser for the coz-e, I also came across parts that could be used for a soap dispenser.
The basic idea is to combine a proximity contactless button, with a pump of some kind. Probably a peristaltic one because that has 0 chance of becoming gumming up the pump.
The code should be fairly simple, and could easily run on an ATTiny using only an interrupt, with something like this:
#include <Arduino.h>

const int interrupt_pin = 2; // Don't recall.
const int motor_controller_pin = A0; // or whatever.

void main() {
    attachInterrupt(interrupt_pin, dispense, RISING);
    attachInterrupt(interrupt_pin, stop_dispense, FALLING);

    sleep();

    for (;;) {}
}

void sleep() {
    sleep_enable();
    set_sleep_mode(SLEEP_MODE_PWR_DOWN);
    sleep_cpu();
}

void dispense() {
    sleep_disable();
    analogWrite(motor_controller_pin, 255);
    delay(1000);
}

void stop_dispense() {
    analogWrite(motor_controller_pin, 0);
    sleep();
}
(again, have not built this, and certainly haven’t tested this code).
This code is also a bit over-optimized for my use case, but it does allow me to build a long-lasting battery-powered version of this. With the big if being an assumption that the contactless button (i.e. IR sensor) is a low-power consumption device (which seems like it would be false).
Case
I’d like to 3d print a case, which would be a small thing designed with the following in mind:
- Fit on top of a large jug of soap.
- Provide mount points for the button, the pump, and the circuit board.
- Circuit board should have access to power, and otherwise be protected from the liquids.
- Button should be facing downward
- pump should have tubing that exists as close to the button as possible.
I’d also like to build a small base, which could hold the soap jug at a slight angle, so that as the soap gets used, it’ll start to gather at a single spot, instead of being in a shallow pool on the bottom. Which serves to try to use as much soap as possible before switching jugs.
Last updated: 2023-08-12 08:09:50 -0700
Home Automation
I currently use Apple’s HomeKit to manage my home automation devices. Which is fine, but I’ve been thinking of migrating away. In particular, I’m having trouble with the following:
- HomeKit-compatible devices have the Apple Tax. Almost as a rule, they’re more expensive than non-HomeKit-compatible devices. This should get better once Matter becomes more of a thing. But for the time being, this is an annoyance, and not really helped by the next point.
- Integrating non-HomeKit-compatible devices with HomeKit is a pain. You have to use something like HomeAssistant or HomeBridge to do that, both of which involve running your own hardware to manage.
- You can’t add arbitrary device types to HomeKit. For example, as of November 2022 (iOS 16.1), HomeKit has no concept of a pressure sensor. Which is fine, except now you’re limited by Apple adding these, and thus limited to Apple’s release schedule.
- Exporting data from homekit is extremely difficult and non-obvious. This is nominally a good thing because it makes it harder for third parties to do so. But it’s annoying for me because I’d like to more easily be able to export this data and save it off for my own analysis.
- Related to the above, but the only way to view a dashboard of homekit data is to use either Apple’s Home app, or a custom iOS (or iPadOS) app to do the same. macOS doesn’t even support HomeKit apps natively, let alone creating a dashboard viewable in a web browser.
That said, HomeKit generally just works, and is much more privacy-oriented than Google’s or Amazon’s home automation systems. Which is obviously a massive plus to me. My issues are definitely power-user features, specifically related to my desire to view sensor states (i.e. not just “is this plug on”, but also “how much power is this plug pulling?”), and also see historical trends.
I’m looking at replacing or augmenting my homekit usage with HomeAssistant. At the very least, I still want to keep using HomeKit for the Siri integration and a few other benefits, but I’m looking at changing from having HomeKit be the hub, to having HomeKit be more of a node to HomeAssistant’s hub. Which is currently easier said than done, as I have a lot of devices that are HomeKit-only. Meaning I’d have to somehow re-pair them with HomeAssistant. Thankfully, HomeAssistant does have documentation for making HomeKit devices available in HomeAssistant.
Last updated: 2022-10-29 09:13:31 -0700
Living
Orange Website on skills you can learn in an hour
Last updated: 2019-11-25 09:36:44 -0800
Addressing Climate Change
Personal actions you/I can take.
Rather hypocritical coming from someone who flies airplanes. Working on it, though!.
But seriously, I’m putting multiple hours a day towards reducing the impact of one of my main hobbies.
The biggest impact you can have on affecting climate change is advocating for climate-friendly policies at all levels of government. This is significantly easier on the local level than at higher levels, but is still something I struggle to do (talking with people? That’s terrifying).
As far as spending money (or not), the next best way is to basically not drive places. Ride a bike, walk, whatever. Ebikes, for example, are remarkably cheap nowadays. You can get an acceptable one for less than $500. This’ll still get you going up to 20 miles per hour, which is perfect for around-town errands. Need to carry stuff and/or people? Get a cargo bike. Most cargo bikes nowadays come with some kind of electric assist, and all of them are designed to have electric assist added to them.
If you own a home that has natural gas appliances, replace them with electric equivalents! More so than for climate, burning natural gas in the home has been found to be incredibly bad for your health - turns out “clean burning” natural gas just means it’s less dirty than coal. Natural gas still emits tons of carcinogens that you do not want to breath. You don’t need to go out and replace perfectly good natural gas appliances. But when they need to be replaced, instead of getting a new natural gas stove, get an induction stove. When your furnace needs to be replaced, get a heat pump. Heat pumps are so good right now, and they work down to really low temperatures. Even if you don’t need to replace your furnace, get a heat pump. Most thermostats nowadays will default to the heat pump, and use the gas furnace as an “emergency heat” if necessary.
Lastly, yeah. The big expenses. Replace your gas-powered vehicle with an electric vehicle. Install solar on your roof. Installing solar also has the benefit of encouraging your neighbors to do so. I guess it’s one of the modern “keeping up with the Jones’” things.
Installing something like a powerwall is probably not worth the expense. Unless your grid has otherwise been shown to be unreliable, it’s likely not going to be worth doing. It is cool, though.
Links
Last updated: 2022-08-06 22:23:26 -0700
Job Interviewing
Notes/Reminders on what to ask when interviewing for a job.
Recruiter Screens
Some are very iOS specific.
- Which particular team is this role for? What can you tell me about them?
- Does the team own the entire iOS app, or only a portion of it?
- How cohesive is the team?
- What’s the remote work policy?
- For COVID-19: Obviously, it’s fully remote, but what was it before the restrictions were put in place, and what can I expect it to look like after?
Technical Interviews
- What’s your tech stack look like?
- What are some practices you/the team wants to follow, but has difficulty doing so?
- Similarly, what are some practices you/the team does follow, but you wish you wouldn’t?
- How do you feel about third party frameworks?
- How do you spread knowledge amongst members of the team? How do you support this kind of professional growth?
- What’s your on-call rotation look like?
iOS-Specific technical questions
- How do you feel about storyboards? Nibs? Laying out in code? Autolayout/others?
- How far back in terms of versions do you typically support?
Testing & QA
-
What’s your testing strategy look like?
- How do you feel about TDD?
-
How do you handle testing network requests?
-
How do you handle testing that the UI is wired up correctly?
-
How do you feel about XCUITest? (Obviously iOS specific)
-
How do you feel about xUnit-style frameworks?
-
How do you feel about rspec-style frameworks?
-
How reliable is your CI? What all do you have CI doing for you? (Verifying tests is usually a given)
-
What’s the PR flow like for you all?
- How is the flow when a PR gets updated after being marked as approved?
-
How do you verify things work before deploying? What’s the workflow like after a PR gets merged?
Automation and Deployment
- What do your deployments look like? Are they automated, why/why not? How automated are they?
- How do you address bad deployments? How does rolling back look like?
General/Non-workflow Questions
- What do you like best about working at $YOUR_COMPANY?
- What frustrates you the most about it?
- (Or: what would you change if you could)
- If manager: How do you feel about your reports
- How do you feel about your manager? (Still valid when asking managers, you know. Unless you’re interviewing the CEO)
Last updated: 2020-04-30 11:22:49 -0700
Personal Finance
A lot of my views on personal finance come from Mr. Money Mustache.
Budgeting
I don’t practice anything formal like YNAB. I do keep track of my finances using ledger with ledger-autosync to automate syncing that, and I occasionally review the status of where I spend money to reduce expenses.
Overall, my system for spending follows this order:
- Rent & other debts (car payment, internet, phone, etc.)
- Food & other necessities (clothing, etc.)
- I prefer to spend on groceries vs. eating out. While the notion that a $5/day coffee habit keeps you poor is ridiculous, you generally end up with better food once you learn how to make it yourself. It’s better to reserve eating out as a special thing.
- Everything else.
In general, anything that falls under “everything else” is something I spend at least a day thinking about before I decide whether to get it or not. The more expensive it is, the longer I spend thinking on it.
For especially large purchases, I actually do set up budgeting. This works out as a using ledger’s virtual postings feature to place money in an account prefixed with “Budget” every time I get paid. That is, it’s envelope budgeting for a single large purchase.
Buying Used vs. New
I’m really bad at this. I should prefer used, but I often go for new just because it’s easier and faster. This is a habit I’m working on correcting.
Investing
Any money you invest, treat it as if it no longer exists. Especially for 401k or other retirement accounts that have a penalty if you access them before some age.
401k
Always contribute at least the minimum to get your company to max out their matching. For example, if your company does matching up to 4%, then at least put in that 4%.
- If your company offers both 401k and Roth 401k, then do a pre-tax contribution and invest the tax savings.
- If you don’t think you’ll invest the tax savings, then contribute to the post-tax 401k.
- On the other hand, if you’re currently in a high tax bracket (and have low expenses), then put the money in the pre-tax 401k.
- Because you should have low expenses, therefore being in a low tax bracket.
- Just set it, and check on it every year as the contribution limit changes, or your company changes their matching policy.
Index Funds
- Picking stocks is for fools, buy index funds.
- Betterment is what I use for my non-401k investments.
- The S&P 500 environmental and socially responsible index has outperformed the S&P 500 since it was launched.
Taxes
Last updated: 2022-10-28 20:26:11 -0700
Personal Growth
Notes/thoughts on personal growth/adulting.
- Think before you act. Almost every single thing I regret in my life (and, wow, there are many) are because I didn’t think before I acted.
- There is always time to think. If you ever ask yourself “should I do/not do X?”, the answer is usually “don’t”.
- It’s not about you. Growing up, I was incredibly self-centered. A lot of my journey through life has involved learning to not be as self-centered.
- Actions matter more than just about everything else.
- Saying you’ll do X matters way less than actually doing X.
- In some cases, it’s actively harmful to commit to doing X when you could’ve just done X.
Last updated: 2020-01-14 13:46:16 -0800
Renting Checklist
Things to check/verify when checking out a place to rent.
HVAC & Utilities
- Central or Wall AC
- Heating? What’s that like?
- Water Heater? How many apartments share it? Where is it?
- Water
- Verify all sinks, showers, and toilets work.
- Check how how they take and how long it takes sinks & showers to get hot.
- Verify shower pressure
- Verify no toilet backup
- Laundry
Garage
- Shared? Or are we the only ones with access?
- What’s it wired for? (220 V AC would be great for EV charging)
- Bays?
Kitchen
- Stove/Oven:
- Gas or Electric? (old-style spiral electric sucks and gas is superior only to that. Otherwise, prefer electric or even induction)
- Age?
- Do burners work?
- Smell?
- Verify that all cupboards are clean. Shine a light in them.
- Dishwasher
Bathrooms
- Verify fan works
- Check for mold
Electrical
- Outlets/room.
- These should all be grounded.
- Capacity. Can we run everything all at once?
Maintenance
- What’s their general policy on this?
- Who’s responsible?
- Do they have recommendations on who to call?
Previous/Current Tenants
- How long were they there?
- Why are they leaving?
- What has the interest been since it’s been listed?
- What have prospective tenants found concern with?
Neighborhood and Surrounding Area
- Check a crime heat map.
- How far is the nearest grocery store? Is it good? How far is the nearest decent grocery store?
- What is there to do near the place?
- Where are the nearest coffee shops?
- How’s the commute like to your jobs and other common places to go?
- How are the other people in the area? Mostly people renting or owning? Students? etc.
Overall
- “General care and upkeep: are old nails, window hardware painted over a million times? Did previous painters mask the light fixtures, or just paint over them? Indicates they use bargain handyfolk”
- “Potential weekend-wakers: church nearby, early gardeners outside, children, garage door under unit, streetcar/bus line, construction”
- Flooring
- Verify all locks work.
- Noise from neighbors: Above, Below, next door.
- Did you notice any bugs?
- History of rent increases.
- Where to store bikes.
- Does landlord visit often? What are there expectations/policies when visiting?
Last updated: 2024-03-05 16:11:10 -0800
Love in the Time of Coronavirus
Guest writer: Nicole Fronda
Elopement vs. Wedding
Rachel and I had been thinking of getting married for a while, but every time we would sit down to start planning a wedding, we’d get overwhelmed with thoughts of spending thousands of dollars, figuring out who to invite, who to please, etc. Finally we got it in our heads that eloping was the right move for us. And when 2020 rolled around, it seemed like the right time. Rachel was slotted to receive her private pilot’s license in the first quarter. I would finish my Master’s degree in the second quarter and (likely) start a PhD program in the third quarter. It was going to be a big year for us (the impending global pandemic notwithstanding).
After ringing in the New Year we settled on a few key items:
- Location: Santa Barbara Courthouse
- A gorgeous venue in a fun city
- Date: End of February
- Because my midterms would have completed by then and Rachel would have passed her pilot check ride
- Guests: Almost no one
- This was the best part. We asked our friend, Christine, and her boyfriend, Scott (also our photographer) to be our witnesses
- Attire: We winged it
- The photos turned out well!
- After ceremony activities: Also winged it
- Rachel booked a couple restaurants. We went wine tasting. Got ice cream. Hung out on the pier and the beach. Super chill.
A nice, simple to-do list.
Results
 We were graced with a rainbow over the courthouse. Good sign.
 Some pre-ceremony jitters.
 “Now join hands”
Screams internally
“Now join hands”
Screams internally
 Rachel: We did it!
Nicole: Now let’s go kiss under that tree!
Rachel: We did it!
Nicole: Now let’s go kiss under that tree!


 Not an Apple Watch commercial, we swear.


 And of course we had to take some pics at the top of the bell tower.


 Rachel: K now what.
Nicole: idk. Ice cream?
Rachel: K now what.
Nicole: idk. Ice cream?

 And some end of day cuddles with our ring bear :D

Last updated: 2020-03-14 14:15:45 -0700
macOS & iOS
Administering
LaunchD and LaunchAgents
launchd.info is an excellent resource for using launchd and creating launchagents.
Remotely shutting down
There’s essentially two ways to do this from a terminal: sudo shutdown -r now will reboot the machine, now. Apps don’t get the chance to stop this.
Alternatively, you can use applescript, with commands like:
osascript -e 'tell app "System Events" to shut down'will shutdown the machine.osascript -e 'tell app "System Events" to restart'will reboot the machine.
All of these can be halted by other apps, though.
See this stackoverflow answer for other examples.
View Hidden Files in Finder
In a finder or open-file window prompt (using the system control), use command+shift+. to toggle showing hidden files.
Audio Skipping Glitch
Sometimes, the audio will “skip” when using headphones. Restarting coreaudiod seems to fix it. If not, then restart the machine and that sometimes helps. This only happens to me after running UI tests in an iOS simulator, or when resetting an iOS simulator.
sudo killall -9 coreaudiod
Last updated: 2021-11-15 20:11:54 -0800
Applescript
Applescript is pretty terrible, but very useful for scripting mac apps. You could use javascript for this, as of 10.11, but there’s no documentation for using javascript to script OSX applications.
Opening Applications
This is simple, you send the activate command to it.
E.G.
tell application "QuickTime"
	activate
end tell
Concatenating strings
Use the & operator to concatenate strings. Unlike + as in almost all other languages.
"Something " & "something else" -> "Something something else"
Resizing and Moving Windows
Change the bounds property of the given window. Unlike with AppKit apps, this has the origin as the top-right.
e.g. to resize the top xcode window to 1920 x 1080 and place it in the top-right corner, use this script:
tell application "Xcode"
	set bounds of front window to {0, 0, 1920, 1080}
end tell
Last updated: 2020-12-25 23:37:21 -0800
Numbers
Spreadsheet program for iOS and macOS
Sheets
Renaming a Sheet
This is surprisingly non-obvious. You double-tap it to select the text, then you can edit it from there. I thought there would be something involving a long-press, but that only allows you to move the sheet around. Similarly, a single-tap brings up an edit menu that allows you to cut (remove and place in pasteboard), copy (place in pasteboard), duplicate, or delete the sheet.
Conditional Formatting
On mac, click the format button, go to the “cell” tab, then select conditional highlighting.
Last updated: 2021-11-15 20:11:54 -0800
Setting Up Macs
Setting up a mac from scratch, how I do it.
This is mostly used when setting up a work computer. I’ve been using migration assistant with great success for the past several personal computers.
System Settings
Open System Preferences.
Keyboard Settings
- Key Repeat: Fastest
- Delay Until Repeat: Shortest
In macOS Ventura and later, these options are under “Keyboard shortcuts”.
- Check “Use F1, F2, etc. keys as standard function keys” (Function Keys submenu)
- Click “Modifier Keys”, remap Caps Lock to escape on all keyboards. (Modifier Keys submenu)
Trackpad Settings
In “Trackpad”:
- enable “Tap to click”
- Select “More Gestures”, then enable “App Exposé”.
In “Accessibility”, scroll down to “Pointer Control”. Select “Trackpad Options…”, check “Enable dragging”, and in the dropdown next to it, select “three finger drag”.
Setting the Hostname
Open Sharing, set the hostname for the system there.
Sound
Open Sound, go to the Sound Effects tab, make sure “Play feedback when volume is changed” is checked.
Apps and Other Utilities
Go to the App Store, install xcode. Go wait for it to install.
Open Safari, go to brew.sh, and follow it’s instructions to install homebrew.
Once that’s done, run the following commands:
brew install --cask iterm2 rectangle alfred macdown
brew install rbenv node tig the_silver_searcher jq wget tree

# Set up rbenv
rbenv init 2>&1 | tail -1 >> ~/.zshrc

# Get the latest ruby.
LATEST_RUBY=$(rbenv install -l | sed -n '/^[[:space:]]*[0-9]\{1,\}\.[0-9]\{1,\}\.[0-9]\{1,\}[[:space:]]*$/ h;${g;p;}')
rbenv install ${LATEST_RUBY}
rbenv global ${LATEST_RUBY}
gem install bundler

# mdspell
npm i markdown-spellcheck -g # For spellchecking the knowledge repo.
These install iterm2 (terminal emulator), rectangle (keyboard-based window manager), alfred (quick launcher, amongst other responsibilities), and macdown (markdown editor)
They also install and set up rbenv (ruby environment), node, tig (git tree viewer), ag (Very fast file searcher), jq (json processor), wget (url downloader), tree (recursive directory listing command)
Rectangle
Download my rectangle config file.
Open Rectangle, go to Preferences, select the gear icon. Near the bottom-right, select “import”. Import the rectangle config you just downloaded.
Rust
This is an interactive script. Go to rustup.rs, and copy the command they give and run it.
Install mdbook-generate-summary with cargo install mdbook-generate-summary once you’re done.
Xcode
Open Xcode, open Settings. (cmd+,) Go to the ‘Text Editing’ section.
- Under the “Show” section, make sure “Code folding ribbon” is checked.
- Under the “While Editing” section, make sure both “Automatically trim trailing whitespace” and “Including whitespace-only lines” are checked.
Quick Snippets
Adding desc, qit, etc. to xcode.
Clone the [Quick Snippets repository], run install.sh, then restart xcode.
git clone https://github.com/younata/QuickSnippets
cd QuickSnippets
bash install.sh
cd -
Last updated: 2023-09-21 10:08:23 -0700
Math
Quick refreshers on math.
Matrices
Matrices are two dimensional arrays of numbers, e.g.
\[ \begin{bmatrix}1 & 2\\3 & 4\\5 & 6\end{bmatrix} \]
describes a 3 by 2 matrix.
A matrix is described by the number of rows, then the number of columns.
Matrix Multiplication
Matrix Multiplication is the process of multiplying two compatible matrices together. Unlike scalar multiplication, matrix multiplication is not commutative - that is, if a and b are matrices, \(a * b\) is not guaranteed to produce the same matrix that \(b * a\) produces.
In order to be compatible, the number of columns in matrix a must equal the number of rows in matrix b. This will produce a matrix that has the same number of rows as matrix a and the same number of columns as matrix b.
See this explanation until I write up a better one.
Note that this is also called the dot product.
Last updated: 2021-11-15 20:11:54 -0800
Intro to Calculus
Calculus is one of my favorite branches of mathematics, because it’s about manipulating functions.
Calculus is really a progression from earlier levels of continuous mathematics (as opposed to discrete mathematics) that starts in grade school.
First you learn about numbers (1, 2, 3…) and how to manipulate them (arithmetic). Later, you learn about functions and that they’re about manipulating arithmetic and expressions (algebra).
Calculus is about manipulating algebra and functions. Computing things like how fast a function is changing or how much a function has changed. Calculus is also about exploring where algebra starts to break down - e.g. finding the value of a function that is undefined at a given input.
Topics covered:
- [Limits]({{path_for Limits}}) Intros the Intro to Calculus and covers Limits, which is used to rigorously define all the rest of calculus.
Last updated: 2022-02-24 21:06:04 -0800
Derivatives
The derivative of a function is how quickly (or not) the output of a function changes as its input changes. Or, in another way, the derivative specifies the rate of change of a function.
For example, if you have a function, such as \(f(x) = 2x\), which models the the position of an object at a given time, \(x\), you can use the derivative to calculate the velocity of the object. Similarly, you can the use the derivative of a velocity function to calculate the acceleration. The derivative of acceleration is called the jerk.
The rest of this article will deal with 2-dimensional functions. Higher-dimensional functions will be another article.
Rigorously, the derivative of a function at a given point as the value of the slope of a line tangent to that function at that point. Using that definition, you can use limits to calculate the slope of a line tangent to the function \(f(x)\) at any given point:
\[ \frac{\mathrm{d}}{\mathrm{d}x} f(x) = \lim_{n \to 0} \frac{f(x + n) - f(x - n)}{2} \]
And we can use this for any point \(x\) we wish to calculate the slope of the line at that point. However, this is incredibly tedious to actually do so, and so it’s not used for anything beyond basic introduction to derivatives.
Instead of limits, we use a number of different rules for deriving the derivative.
Power Rule
3Blue1Brown video covering the power rule.
The easiest rule to examine is the power rule. This is the rule used for calculating the derivative of a function \(f(x) = x^n\). This rule is:
\[ \frac{\mathrm{d}}{\mathrm{d}x} x^n = n*x^{n - 1} \]
This even extends to functions like \(f(x) = sqrt(x)\), which can also be represented as \(f(x) = x^{\frac{1}{2}}\). Additionally, this works for inverse functions, such as \(f(x) = \frac{1}{x}\), which also can be represented as \(f(x) = x^{-1}\).
Sine and Cosine
3Blue1Brown video covering Sine and Cosine.
Next up is Sine and Cosine. The derivative of the Sine function is the Cosine function, and the derivative of the Cosine function is the negative Sine function. So, these function create a loop of derivatives.
\[ \frac{\mathrm{d}}{\mathrm{d}x} \sin{(x)} = \cos{(x)} \\ \frac{\mathrm{d}}{\mathrm{d}x} \cos{(x)} = -\sin{(x)} \\ \frac{\mathrm{d}}{\mathrm{d}x} -\sin{(x)} = -\cos{(x)} \\ \frac{\mathrm{d}}{\mathrm{d}x} -\cos{(x)} = \sin{(x)} \]
Exponentials and Logarithms
3Blue1Brown video on derivative of exponentials
Exponentials, or \(f(x) = n^x\), use the following rule:
\[ \frac{\mathrm{d}}{\mathrm{d}x} n^x = n^x * \ln{(x)} \\ \frac{\mathrm{d}}{\mathrm{d}x} e^x = e^x \\ \frac{\mathrm{d}}{\mathrm{d}x} \ln{(x)} = \frac{1}{x} \\ \frac{\mathrm{d}}{\mathrm{d}x} \log_n{(x)} = \frac{1}{x * \ln{(n)}} \]
The constant \(e\), known as Euler’s number, is a transcendental number. It deals a lot with exponential rates of change, is defined as the base of an exponential function with a derivative equal to itself.
The natural log, \(\ln{(x)}\), is the logarithm with base \(e\). Which is also part of why the derivative of logarithms with other bases include the natural logarithm in some way.
Derivatives of Composite Functions
3Blue1Brown video covering derivatives of composite functions.
Composite functions are functions with more than 1 operation. For example: \(f(x) = g(x) + h(x)\), or \(f(x) = g(x) * h(x)\), or \(f(x) = g(h(x))\), or any combination thereof.
Added functions
The derivative of a function of form \(f(x) = g(x) + h(x)\) is equal to the sum of the derivatives of its component parts. Or put another way:
\[ \frac{\mathrm{d}}{\mathrm{d}x} {g(x) + h(x)} = \frac{\mathrm{d}}{\mathrm{d}x} g(x) + \frac{\mathrm{d}}{\mathrm{d}x} h(x) \]
Which might be used like this:
\[ \frac{\mathrm{d}}{\mathrm{d}x} {3x^3 + \sin{(x)}} = 9x^2 + \cos{(x)} \]
Multiplied functions (Product Rule)
The derivative of a function of form \(f(x) = g(x) * h(x)\) follows the product rule, and it is defined as:
\[ \frac{\mathrm{d}}{\mathrm{d}x} {g(x) * h(x)} = \frac{\mathrm{d}}{\mathrm{d}x} g(x) * h(x) + \frac{\mathrm{d}}{\mathrm{d}x} h(x) * g(x) \]
Or, for the function \(f(x) = 3x^3 * \sin{(x)}\):
\[ \frac{\mathrm{d}}{\mathrm{d}x} {3x^3 * \sin{(x)}} = 9x^2 * \sin{(x)} + 3x^3 * \cos{(x)} \]
Composed functions
Finally, for composed functions, or functions of form \(f(x) = g(h(x))\), these follow the chain rule. Which is defined as:
\[ \frac{\mathrm{d}}{\mathrm{d}x} {g(h(x))} = \frac{\mathrm{d}}{\mathrm{d}x} g(h(x)) * \frac{\mathrm{d}}{\mathrm{d}x} h(x) \]
Or, for the function \(f(x) = sin(3x^3)\):
\[ \frac{\mathrm{d}}{\mathrm{d}x} {\sin{(3x^3)}} = 9x^2 * \cos{(3x^3)} \]
Last updated: 2022-05-08 19:50:27 -0700
Limits
Limits are about examining the value of functions at any given input. They are fundamental to calculus because they allow you to rigorously define both the integral and the derivative. They’re also useful on their own for being able to calculate what a value should be, despite not having the information of what the value actually is.
For simple functions (e.g. \( f(x) = x + 1 \)), figuring out the value of the function at any given input isn’t difficult. Simply evaluate the function. However, consider functions that are undefined at a some values. For example, consider \( f(x) = x + \frac{x - 1}{x - 1} \), which looks like the following:
Notice the hole at \( x = 1 \). This correctly indicates that \( f(1) \) is undefined - there’s a divide by zero error, meaning that we don’t know what the value actually is. This is where limits become useful. Limits are essentially asking “if we could evaluate this function for the desired value, what would it be?”. More rigorously, the limit of a function approaching a given value is what does the output of the function approach as the input approaches the given value. Limits are represented notationally as:
\[ \lim_{x \to 1} f(x) \]
Or, in words, “The limit of \(f(x)\), as x approaches 1”.
We can calculate this numerically by evaluating \(f(x)\) at different values very close to 1, but not exactly 1, and examining what it approaches.
You can also determine this algebraically. For example, we can simplify the example function as follows by simplifying the \( \frac{x - 1}{x - 1} \).
\[ f(x) = x + \frac{x - 1}{x - 1} f(x) = x + 1 \]
And then we can easily evaluate this simplified \( f(x) \) at \( x = 1 \), to verify that \( \lim_{x \to 1} x + \frac{x - 1}{x - 1} = 2 \).
Last updated: 2022-02-24 21:06:04 -0800
Meta
Notes detailing how this knowledge repository is set up, and any special tooling I’ve written for it.
Last updated: 2022-05-07 19:28:04 -0700
How This is Setup
This is setup using mdBook. It’s hosted as a repository on github. I set up a pipeline in concourse to build, check that things work, and then push new versions once things are set up.
TL;DR, check out these instructions at the bottom
Repository Layout
This is a simple mdbook, the actual content files is under src/. SUMMARY.md is missing, because I have tooling to automatically generate one automatically.
Pipeline
The pipeline1 is relatively simple:
- Check for new pushes to master
- Generate a SUMMARY.md for the book.
- Build the book (using this mdbook docker image)
- Test that the generated book isn’t broken (mostly verify the links work) using html-proofer, via this docker image.
- rsync the updated book to the server hosting the contents.
Server Setup
The server hosting this is a linode VPS. It gets deployed to/managed via an ansible playbook. The current setup is pretty bad/full of bad patterns, but needless to say that playbook manages setting up nginx, getting letsencrypt set up, and configuring nginx to serve the static files for this repository.
On Sol, the repository containing this playbook is located at ~/workspace/Apps.
Offline/Development Setup
For making changes and doing a local preview (or just simply running locally), the following setup is recommended/required:
- Rust/Cargo: Install rustup
- mdbook-generate-summary:
cargo install mdbook-generate-summarywill get you an out-of-date version. The CI uses a dockerimage for this, but that docker image is not yet set up for local usage. The “best” way to get an up-to-date version is to download the source, and runcargo install --path .. Which isn’t the best way to distribute software. 🤷🏻♀️ - mdbook:
cargo install mdbook
Running:
mdbook-generate-summary will build a SUMMARY.md file for you. This way, you don’t have to maintain one.
mdbook watch will build your sources, watch for any changes to the src/ directory, and serve up the book on localhost:3000.
I do this for my work repository, which I want to keep separate from my personal stuff.
Spellcheck
After noticing an embarrassing amount of spelling errors on this (one of the drawbacks to editing this mostly in vim), I spent time looking into how to spellcheck markdown files.
Regardless, I’ve used markdown-spellchecker (which I discovered via this article) to locally spellcheck this, using this command:
mdspell --ignore-acronyms --ignore-numbers --en-us "**/*.md"
Future Work
- On a per-section basis, add other lines to show up for all pages in that section (e.g. I want everything in my flying section to have the “This is for my own use and is not flight instruction” disclaimer).
- The main page should essentially have a list of what articles changed most recently. Essentially, an rss feed of just the titles of the 10 most articles that have changed.
Duplicating
Here’s what I did to stand up additional versions of this repository (e.g. a separate one for work, the coz-e build).
Machine Setup
mdBook requires rust to use, so we first install rust. This is done via rustup.
curl --proto '=https' --tlsv1.2 -sSf https://sh.rustup.rs | sh
Next, we install mdbook itself: cargo install mdbook.
Additionally, there’s a bunch of extra tooling I use. I won’t go through them in detail, but here’s the following commands to install everything:
cargo install mdbook-generate-summary mdbook-api mdbook-chapter-path mdbook-git-atom mdbook-section-validator
This is all that’s required to setup the machine.
You can optionally install the validation tooling (markdown-spellcheck, html-proofer) with the following commands:
npm i -g markdown-spellcheck
gem install html-proofer
Setting up the Repository
To set up the repository itself, you need to create a book.toml file, an initial src/README.md file, and (if not using mdbook-generate-summary) a src/SUMMARY.md file.
For reference, this repository’s book.toml file is:
[book]
title = "Rachel Brindle - Digital Garden"
authors = ["Rachel Brindle"]
description = "Rachel's Digital Garden"

[build]
preprocess = ["links", "index"]

[output.html]
curly-quotes = true
no-section-label = true
mathjax-support = true
additional-css = ["css/custom.css"]
additional-js = ["js/canvas-graph.js"]
git-repository-url = "https://github.com/younata/personal_knowledge/tree/main"
edit-url-template = "https://github.com/younata/personal_knowledge/edit/main/{path}"

[output.html.fold]
enable = true
level = 0

[output.api]

[preprocessor.section-validator]
hide_invalid = false
invalid_message = "🚨 Warning, this content is out of date and is included for historical reasons."

[preprocessor.chapter-path]
after = ["section-validator"]
strict = true

[preprocessor.git-atom]
after = ["chapter-path"]
base_url = "https://knowledge.rachelbrindle.com"
article_preview_lines = 10

[preprocessor.git-updated]
Building the Repository
If you want to view the repository locally, you can use mdbook build, and open book/index.html in your web browser. If you’re doing interactive work, then you can use mdbook watch.
Note that if you’re using mdbook-generate-summary, you should run that every time you create, delete, or move a page.
The pipeline definition looks like this:
resource_types:
- name: rsync-resource
  type: docker-image
  source:
    repository: mrsixw/concourse-rsync-resource
    tag: latest

resources:
  # Knowledge Wiki
  - name: knowledge_source
    type: git
    source:
      uri: https:/github.com/younata/personal_knowledge.git
      branch: master
  # Task info
  - name: tasks
    type: git
    source:
      uri: https://github.com/younata/concourse_tasks.git
      branch: master
  # Book Server
  - name: book_server
    type: rsync-resource
    source:
      server: {{book_server}}
      base_dir: /usr/local/var/www/knowledge/
      user: you
      disable_version_path: true
      private_key: {{BOOK_SERVER_PRIVATE_KEY}}

jobs:
  - name: build_knowledge
    plan:
      - aggregate:
        - get: knowledge_source
          trigger: true
        - get: tasks
      - task: spellcheck
        config:
          platform: linux
          image_resource:
            type: docker-image
            source:
              repository: tmaier/markdown-spellcheck
              tag: latest
          run:
            path: sh
            args:
            - -c
            - |
              #!/bin/bash
              cd knowledge_source
              mdspell --ignore-acronyms --ignore-numbers --en-us "**/*.md"
            dir: ""
          inputs:
          - name: knowledge_source
      - task: generate_summary
        config:
          platform: linux
          image_resource:
            type: docker-image
            source:
              repository: younata/mdbook-generate-summary
              tag: latest
          run:
            path: sh
            args:
            - -c
            - |
              #!/bin/bash
              cd knowledge_source
              mdbook-generate-summary src/ -v
              cp -r * ../generated/
            dir: ""
          inputs:
          - name: knowledge_source
          outputs:
          - name: generated
      - task: mdbook
        file: tasks/tasks/mdbook.yml
        input_mapping:
          code: generated
          concourse: tasks
        output_mapping:
          book: book
      - task: test
        file: tasks/tasks/html_proofer.yml
        input_mapping:
          code: book
          concourse: tasks
        params: {DOMAIN: "https://knowledge.rachelbrindle.com"}
      - put: book_server
        params: {sync_dir: book}
Last updated: 2022-08-14 18:46:38 -0700
Tooling
Some tools I wrote to help make my usage of this repo easier.
Backends
mdbook-api
mdbook-api is an mdbook backend I wrote to directly publish the markdown files (after post-processing), for use as consuming an api. While it’s still used, I have yet to get around to writing any usable client tooling for this.
Post-Processors
mdbook-chapter-path
mdbook-chapter-path is an mdbook postprocessor I wrote to better facilitate linking within this repository. This avoids the issue of breaking links whenever I reorganize the pages here. For example, when linking to the astronomy page, instead of writing [Astronomy](/astronomy/index.md), I can write [Astronomy]({ {#path_for astronomy} }) (note: spaces between the two { is deliberate to illustrate what the raw text is). This way, the mdbook-chapter-path will search for and insert the /astronomy/index.md text as the target for me. This even supports linking to anchor tags in the target document as well.
mdbook-git-atom
mdbook-git-atom is an mdbook postprocessor to automatically generate an atom feed from an mdbook repository, using the git log to note when posts were updated. I wrote this initially for the Coz-E build, which, due to the linear nature of the build, follows a more chronological style, but it’s also used here.
mdbook-section-validator
In an effort to avoid accidentally writing information that can become false in the future, I wrote mdbook-section-validator. This postprocessor examines a list of links and adds a warning message if all of those links are invalid (i.e. github tickets are all closed). This is currently only used in a couple places.
Because this is written as an mdbook postprocessor, it does mean that this check is only written when the repository is re-built.
Other Tooling
mdbook-generate-summary
mdbook-generate-summary is a tool I wrote to automatically generate a top-level SUMMARY.md from a directory structure. It’s not a plug-in for mdbook, as it’s supposed to be invoked prior to mdbook being invoked (because mdbook will throw an error if a SUMMARY.md file is not in the appropriate place).
⚠️ This is only valid while younata/mdbook-generate-summary#1 is open
It has some rough edges. For example, if you don’t give each directory a README.md file (with the name of the section), then the generated SUMMARY.md file will not be correctly organized. But, it works well enough for my use case, so long as I keep that limitation in mind.
Last-updated Annotations
This is simply a script that runs in CI which appends the date of the commit that last updated the file, which has the following contents:
#!/bin/bash

set -e

while IFS= read -r -d '' -u 9
do
    if [[ "${REPLY}" =~ ^.+\.md$ ]]; then
        LAST_MODIFY_DATE=`git --no-pager log -n 1 --pretty=format:%ci "${REPLY}"`
        LAST_HASH=`git --no-pager log -n 1 --pretty=format:%H "${REPLY}"`
        printf "\n\nLast updated: [${LAST_MODIFY_DATE}](https://github.com/younata/personal_knowledge/commit/${LAST_HASH})" >> "${REPLY}"
    fi
done 9< <( find src -type f -exec printf '%s\0' {} + )
Third-party Tooling
The third-party tooling used to enhance this.
Spellcheck
I use the markdown-spellcheck package to spellcheck all the markdown files.
HTML-Proofer
In CI, I use the html-proofer gem to validate the generated html of this project. The command looks like:
DOMAIN="https://knowledge.rachelbrindle.com"
FILE_IGNORES="./print.html,./404.html" # Ignore the 404 page and especially the print page. Print page is simply a all pages consolidated, and it's better to catch broken links as close to the original file as possible
URL_IGNORES: "/github.com\\/younata\\/personal_knowledge/" # Don't error if a link to a not-yet-there file is published.

/usr/local/bundle/bin/htmlproofer \
    --assume-extension \
    --check-img-http \
    --enforce-https \
    --only_4xx \
    --http-status-ignore "401,402,403,415" \
    --file-ignore "$FILE_IGNORES" \
    --url-ignore "$URL_IGNORES" \
    --internal-domains "$DOMAIN" "./book/html"
Which is why, if you view source, all of the links to http sites have the data-proofer-ignore attribute in their anchor tag.
Last updated: 2022-08-15 23:32:04 -0700
Software Engineering
I’m a software engineer by trade. Most of what I know is related to that.
Last updated: 2019-03-31 21:11:40 -0700
Apple Technologies
Last updated: 2020-06-07 16:24:37 -0700
ARKit
Introduced in iOS 11, and massively improved with basically each new major release (and a few minor releases) since then. Apple has been promoting ARKit heavily, much to the chagrin of developers, who haven’t really found a use case for it apart from the sherlock’d-in-iOS 12 “use ARKit as a ruler”.
As for actually using it, the easiest way is to place an ARView (requires iOS 13) in your view hierarchy, and tell it’s associated session to run with an ARConfiguration.
Be sure to update your info.plist with an appropriate string for NSCameraUsageDescription, e.g.:
<key>NSCameraUsageDescription</key>
<string>ARKit uses the camera</string>
Integrating with SceneKit
ARView, by default, integrates well with SceneKit, with it also hosting an SCNScene.
Rending UIViews in SceneKit
You can set a UIView as the contents of a SCNMaterialProperty (specifically, the diffuse material property of the node’s SCNMaterial. This isn’t supported all that well - the view needs to be the view for a UIViewController in order to work, and a number of things don’t work well if you do this. Perhaps in a later iOS version this will be better supported.
Placing objects relative to the camera
Placing something relative to the camera is done easily enough. Possibly in response to a tap on the view, you first get the transform for the camera is in the scene, and then multiply it by a matrix for where you want the object placed, as well as possibly rotating for whether the device is portrait or landscape. Something like this generates the transform:
guard let camera = self.arView.session.currentFrame?.camera else { return }

var translation = matrix_identity_float4x4
translation.columns.3.z = -1

let rotation = matrix_float4x4(SCNMatrix4MakeRotation(Float.pi/2, 0, 0, 1))

let objectTransform = matrix_multiply(camera.transform, matrix_multiply(translation, rotation))
You then use the objectTransform matrix as the simdWorldTransform of the SCNNode you’re adding to the scene (assuming SceneKit))
Demos
Made With ARKit is a blog featuring some of the really cool things people have done with ARKit. Sadly, it hasn’t seen an update since December 2017.
Last updated: 2020-09-05 08:08:21 -0700
Catalyst
The technology for running UIKit apps on Macs.
- Embedding Sparkle, a framework for handling updates to mac apps.
Last updated: 2021-05-08 13:33:10 -0700
Embedding Sparkle
Sparkle is the de-facto standard framework for updating mac apps. This documents what I did in May 2021 to use it in catalyst version of AstroGraph.
This github issue documents the current state of using Sparkle with Mac apps. Basically, because Sparkle relies heavily on AppKit, and there are large parts of AppKit that are closed off to catalyst apps, you can’t directly embed Sparkle in your mac app. One of the comments suggests embedding Sparkle in a plugin, then dynamically loading that plugin and running sparkle that way. There are speedbumps and other gotchas involved doing this, but it does work.
Create the bundle, and then set a principal class for it. In the main app, we’re going to dynamically load the bundle and principle class, call a single selector in the principal class, and that will handle everything else.
Loading the Plugin
So, to dynamically load the plugin, I added the following code to my AppDelegate:
func application(_ application: UIApplication, didFinishLaunchingWithOptions launchOptions: [UIApplication.LaunchOptionsKey: Any]?) -> Bool {
    // [...]
    if let pluginUrl = Bundle.main.builtInPlugInsURL?.appendingPathComponent("update.bundle"),
       let updateBundle: Bundle = Bundle(url: pluginUrl),
       updateBundle.load() {
        checkForUpdates()
    }
    // [...]
}

// [...]

@objc private func checkForUpdates() {
    if let pluginUrl = Bundle.main.builtInPlugInsURL?.appendingPathComponent("update.bundle"),
       let updateBundle: Bundle = Bundle(url: pluginUrl),
       let Updater: AnyClass = updateBundle.principalClass {
        let NSUpdater: NSObject.Type? = Updater as? NSObject.Type
        let selector = NSSelectorFromString("checkForUpdate")
        if NSUpdater?.responds(to: selector) == true {
            _ = NSUpdater?.perform(selector)
        }
    }
}
This does find the bundle twice, which isn’t ideal, but it’s not that expensive. I do this because I also added a keyboard shortcut to the app menu to check for updates.
Once you have the bundle loaded, and you call the checkForUpdate static function, then the App code is done. Let’s go look at how the bundle implements this code.
I am not that well versed in writing plugins, or really writing mac apps in general. I aim to improve that, but I’m really only basic at best when it comes to this.
Plugin Code
My plugin is very simple. I placed everything in 1 file, and it’s as follows:
import Sparkle

@objc class Updater: NSObject {
    @objc public class func checkForUpdate() {
        SUUpdater.shared().checkForUpdatesInBackground()
    }
}
That’s it.
You do need to configure sparkle, which is done by modifying the main app’s info.plist.
Modifying the info.plist
The main differences from an AppKit’s usage of Sparkle is that catalyst apps can’t display update notes. This is because Sparkle tries to embed and use the AppKit version of WKWebView (which is an NSView), but the plugin will only receive the UIKit version of WKWebView (which is a UIView). So, we set the SUShowReleaseNotes key to false in the main app’s info.plist. After that, we only have to add the SUFeedURL key and the SUPublicEDKey key, as described in the getting started documentation
	<key>SUFeedURL</key>
	<string>$APPCAST_URL</string>
	<key>SUPublicEDKey</key>
	<string>$PUBLIC_EDKEY</string>
	<key>SUShowReleaseNotes</key>
	<false/>
Last updated: 2021-05-08 13:33:10 -0700
Common Crashes
Common crashes and what they mean.
unrecognized selector sent to instance 0x8000000000000000
At first glance, the crash log will read like you tried to access an object that had already been deallocated. However, the giveaway is that 0x8000000000000000 address. This suspicious address tells you that you have a concurrent write bug. Somewhere, you have a race condition with multiple threads writing to the exact same address at the same time.
Last updated: 2020-06-07 16:24:37 -0700
Concurrency
Executing things concurrently and in parallel, using either Grand Central Dispatch or NSOperations
Grand Central Dispatch
The low-level (C) API to handle parallelism and concurrent operation. (Use Operation Queues whenever possible, though)
Executing in Parallel
DispatchQueue.concurrentPerform is a class-level func that takes the amount of iterations, and a block for the work to do. It blocks the calling thread and executes that block as much as possible. It works as an efficient parallel for-loop.
When possible, use a large amount of iteration, so as to use as much of the system as possible.
Concurrency Concerns
Use system trace in instruments to debug concurrency performance.
e.g. too many threads trying to acquire the same lock.
- Look using an unfair lock
os_unfair_lock, instead of something likeDispatchQueue.sync(which is a fair lock). unfair locks are subject to waiter starvation, whereas fair locks aren’t. - Look at lock prioritization, make sure that e.g. the main thread isn’t waiting on access to a resource locked by a lower priority thread.
How DispatchQueue.sync works
Given the following lines of code, what happens? What is printed?
let queue = DispatchQueue(label: "myLabel")

print("a")
queue.async { print("1") }
print("b")
queue.async { print("2") }
print("c")
queue.sync { print("3") }
print("d")
So, what happens is that the thread will execute, print a, enqueue the first operation to the queue, print b, enqueue the second operation to the queue, print c, enqueue a placeholder for the third operation and wait until the queue is drained.
Now, some async worker thread comes along and runs the first two operations. (1 and 2 are printed). Then, it transfers ownership of the queue to the calling thread and runs the third operation ( 3 is printed). Finally, the block caused by calling queue.sync is resolved and d is printed.
So, this is what’s printed:
a
b
c
1
2
3
d
Monitoring Events
Use DispatchSource.
Solving the readers-writers problem
The Readers-writers problem is a classic concurrency problem where where you want to allow as many threads as necessary to read a piece of memory, but to block them from reading while the memory is being mutated. Solving this with grand central dispatch is ridiculously easy. You create a concurrent dispatch queue (pass in attributes: .concurrent when you initialize it), and whenever you want to change the value, you use the .barrier work item flag to allow all other access to finish up, block new access to the variable, and finally write to the underlying piece of memory.
For example, this class will manage a piece of threadsafe memory in a performant manner.
import Foundation

class Threadsafe<T> {
    private var _value: T

    private let syncQueue = DispatchQueue(label: "com.rachelbrindle.threadsafe", attributes: .concurrent)

    var value: T {
        get {
            return syncQueue.sync {
                return self._value
            }
        }
        set {
            self.syncQueue.sync(flags: .barrier) {
                self._value = newValue
            }
        }
    }

    init(_ startValue: T) {
        self._value = startValue
    }
}
Operation and OperationQueue
The higher-level (Cocoa) API to handle arranging and executing work. Whenever possible, you should operate on this level, for testability reasons.
Operation
Subclassing
As the docs note, there are four things to override for your asynchronous swift subclass:
-start()isAsynchronousisExecutingisFinished
And that you must send KVO notifications for the 2 properties (usually isAsynchronous is hardcoded to be true, so sending KVO for that is a non-issue).
Sending KVO means sending -willChangeValue(forKey:), then changing the value, then sending -didChangeValue(forKey:), see the following sample implementation:
class MyAsyncOperation: Operation {
    override func start() {
        self.willChangeValue(forKey: "isExecuting")

        someAsyncWork {
            self.willChangeValue(forKey: "isExecuting")
            self._isExecuting = false
            self.didChangeValue(forKey: "isExecuting")

            self.willChangeValue(forKey: "isFinished")
            self._isFinished = true
            self.didChangeValue(forKey: "isFinished")
        }

        self._isExecuting = true
        self.didChangeValue(forKey: "isExecuting")
    }

    override var isAsynchronous: Bool { return true }

    private var _isExecuting: Bool = false
    override var isExecuting: Bool { return !self.isFinished && self._isExecuting }

    private var _isFinished: Bool = false
    override var isFinished: Bool { return self._isFinished }
}
Last updated: 2020-06-16 11:43:11 -0700
Core Data
Setting up
Apple’s documentation seems to be fine.
Persistent Store types are here, you’ll mostly be using NSSQLStoreType or NSInMemoryStoreType (for testing).
Concurrency
NSManagedObjectContext is the way to read/write objects to/from core data. Create a managed object context with a given concurrency type (either mainQueueConcurrencyType or privateQueueConcurrencyType), and only operate on it within blocks passed to perform(_:) or performAndWait(_:) calls. Be sure to only have one managed object context for your persistent store coordinator, or you’ll encounter strange crashes.
Additionally, keep in mind that NSManagedObject subclasses are not thread-safe (there are only a handful of properties/methods that are safe to access outside of a perform(_:) or performAndWait(_:) call). Instead of passing instances of NSManagedObject, pass around the object’s NSManagedObjectID (obtained from the managed object’s objectID property.
My preferred approach for accessing core data is to convert the NSManagedObject instance into another, thread-safe model object. This has the advantage of not leaking implementation details and concerns about my database layer to other layers of my app. Which, in addition to being good design, also means that I can switch out (or ignore) databases as makes sense for what I’m trying to do.
Storing Records
In my experience, using MyNSManagedObjectSubclass(managedObjectContext: context); context.insert(myCreatedObject) doesn’t work. Instead, use the older NSEntityDescription.insertNewObject(forEntityName:into:) to create and insert new objects.
Fetch Requests
Fetching by property with type URI
I ran into issues figuring this out. The approach you want is:
fetchRequest.predicate = NSPredicate("url.absoluteString = %@", urlToFetch.absoluteString)
Errors
Multiple NSEntityDescriptions claim an NSManagedObjectContext subclass
I encountered this in tests, where I was initiating up the Core Data stack from scratch with each test. Turns out that, because CoreData creates new classes when you bring up the context, you’ll end up seeing this warning with every new test.
The solution is to not create so many ManagedObjectModels - that is, instead of bringing up a new stack with each test, bring it up once, and then delete every object between run.
Last updated: 2020-06-07 16:24:37 -0700
Core Graphics
CGFloat
CGFloat is a word-size agnostic way to express a floating point number (on 32 bit devices, it’s a float. On 64 bit devices, it’s a double).
CGFloat.leastNormalMagnitude is effectively the same as FLT_MIN (or DBL_MIN, depending on the device). It is less than or equal to all positive “normal” numbers. Subnormal means that “they are represented with less precision than normal numbers”. Note that zeros and negative numbers are also less than CGFloat.leastNormalMagnitude.
Last updated: 2020-06-07 16:24:37 -0700
Core Image
CIKernel
Handling RAW Formats
You can read RAW formatted images by invoking either the init(imageURL:options:) or the init(imageData:options:) CIFilter initializers. You can then read the image by asking for the outputImage.
Note that, at least for iOS 13 beta 1, the simulator can’t read some (all? I only tried with Canon RAW format files) RAW images. However, using macOS allows this to work.
RAW Format Options
With the RAW format CIFilter initializers, you can optionally pass a dictionary of how to read the image. The documentation for those keys is here.
Filters
Fun with Filters
Color Control (Brightness, Contrast, Saturation)
The CIColorControls filter allows you to adjust the brightness, contrast, and saturation of an image. These are done with 3 different input parameters (in addition to the inputImage parameter), which are, respectively: inputBrightness (float, between -1 and +1, default is 0), inputContrast (float, default is 1), and inputSaturation (float, between 0 and 1, default is 1)
Histogram
You can generate a histogram of an image by using the CIAreaHistogram filter. You give it the image (inputImage), the region of interest (inputExtent), the number of buckets to create (inputCount), and a scaling factor (inputScale). That filter then produces an inputCount wide by 1 pixel high image, with each pixel representing the amount of pixels in the inputImage that fit in that particular bucket.
You can then pass the outputImage from that filter into a CIHistogramDisplayFilter filter. This takes an image as produced by CIAreaHistogram and computes a histogram image. The histogram image is the same width as the number of buckets given to your CIAreaHistogram filter, with the height being given as a parameter to the filter. The parameters to the filter are: inputImage, inputHeight (the height of the produced image. Float, between 1 and 200), inputHighLimit (float, between 0 and 1, default 1), and inputLowLimit (float, between 0 and 1, default 0).
You can combine these two filters like so, to produce a histogram image of the given input image:
func histogram(of image: CIImage, width: CGFloat, height: CGFloat) -> CIImage {
    let histogram = image.applyingFilter("CIAreaHistogram", parameters: ["inputExtent": image.extent, "inputCount": width, "inputScale": 1])
    return histogram.applyingFilter("CIHistogramDisplayFilter", parameters: ["inputHeight": height])
}
Last updated: 2020-06-07 16:24:37 -0700
Core Location
Core Location is the framework for getting location information.
Getting the User’s location
Before we begin, you need to first verify that location services are even enabled. This is done by calling the CLLocationManager.locationServicesEnabled() class method. This returns a boolean, if false then you don’t need to go further - tell the user to enable location services so they can use that particular piece of your app.
Next, is to check whether the user has already granted your app location permissions, this is done with the CLLocationManager.authorizationStatus() class method. This returns a CLAuthorizationStatus, where the various options boil down to:
notDetermined: The user has not been asked whether to grant your app location services.restricted: The system has denied your app location services (i.e. parental controls)denied: The user has denied permissions for your app (or they’re globally disabled in settings)authorizedAlways: The user has allowed permissions for your app to get location at any time.authorizedWhenInUse: The user has only authorized your app to get location when it is in the foreground.
If the response is restricted, then you should silently handle that because the user likely can’t go enable location services. If the user has denied permissions, then you might throw up some copy saying “hey, we need location services to do X, please go enable it in settings”.
For the rest, you’ll actually need to create a CLLocationManager and keep a reference to it. You also will need to assign something to be the locationManager’s delegate.
If the user hasn’t yet granted permissions, then you need to request the appropriate permission, using either CLLocationManager.requestWhenInUseAuthorization() (when in use) or CLLocationManager.requestAlwaysAuthorization. This will prompt the user to grant you permission. Once the user has interacted with that modal, the location manager’s will call it’s delegate’s locationManager(_:didChangeAuthorization:) method. If the user has granted, then proceed ahead. Otherwise, handle the error and display the appropriate copy. Note that all delegate methods can be called off the main thread, so you should go back to the main thread when you update your UI.
Be sure to configure the location manager with the your desired accuracy, by setting the desiredAccuracy property.
Once you have permission to get the user’s location, decide whether you need the user’s movement as they use the device, or just once.
If you need the user’s movement throughout your app session, then call startUpdatingLocation() on the location manager. Otherwise, call requestLocation() on the locationManager. If you do use startUpdatingLocation, remember to call stopUpdatingLocation when you’re done to save the user’s battery.
Either call will start up the GPS/location calculator and, assuming everything goes right, the location manager will eventually call locationManager(_:didUpdateLocations:) on it’s delegate. If things go wrong, then it’ll call locationManager(_:didFailWithError:) on it’s delegate.
This is a snippet I use which handles 90% of my location manager usages (getting the user’s current or most recent location) in a testable manner (the CLLocationManager is wrapped by a protocol, in test use a FakeLocationManager to simulate a CLLocationManager.):
import CoreLocation

enum LocationError: Error {
    case unavailable // location services disabled
    case unauthorized // location services denied
}

protocol LocationRetriever {
    func currentLocation(callback: @escaping (Result<CLLocation, LocationError>) -> Void)
}

protocol LocationManager: class {
    var delegate: CLLocationManagerDelegate? { get set }
    var desiredAccuracy: CLLocationAccuracy { get set }
    func locationServicesEnabled() -> Bool
    func authorizationStatus() -> CLAuthorizationStatus
    func requestWhenInUseAuthorization()
    func requestLocation()
}

extension CLLocationManager: LocationManager {
    func locationServicesEnabled() -> Bool { return CLLocationManager.locationServicesEnabled() }
    func authorizationStatus() -> CLAuthorizationStatus { return CLLocationManager.authorizationStatus() }
}

final class AppleLocationRetriever: NSObject, LocationRetriever {
    private let logger: Logger
    private let mainQueue: OperationQueue
    private let locationManager: LocationManager

    private var locationCallbacks: [(Result<CLLocation, LocationError>) -> Void] = []

    init(logger: Logger, mainQueue: OperationQueue, locationManager: LocationManager) {
        self.logger = logger
        self.mainQueue = mainQueue
        self.locationManager = locationManager
        super.init()

        self.locationManager.delegate = self
        self.desiredAccuracy = kCLLocationAccuracyNearestTenMeters
    }

    func currentLocation(callback: @escaping (Result<CLLocation, LocationError>) -> Void) {
        guard self.locationManager.locationServicesEnabled() else {
            return callback(.failure(.unavailable))
        }

        switch self.locationManager.authorizationStatus() {
        case .denied, .restricted:
            return callback(.failure(.unauthorized))
        case .notDetermined:
            self.locationCallbacks.append(callback)
            self.locationManager.requestWhenInUseAuthorization()
        case .authorizedWhenInUse, .authorizedAlways:
            self.locationCallbacks.append(callback)
            self.locationManager.requestLocation()
        @unknown default:
            break
        }

    }

    private func resolveLocationCallbacks(with value: Result<CLLocation, LocationError>) {
        let callbacks = self.locationCallbacks
        self.locationCallbacks = []

        self.mainQueue.addOperation {
            callbacks.forEach { $0(value) }
        }
    }
}

extension AppleLocationRetriever: CLLocationManagerDelegate {
    func locationManager(_ manager: CLLocationManager, didChangeAuthorization status: CLAuthorizationStatus) {
        switch status {
        case .denied, .restricted:
            return self.resolveLocationCallbacks(with: .failure(.unauthorized))
        case .notDetermined:
            self.logger.warning(message: "CLAuthorizationStatus updated with not determined. Wat?")
            return self.resolveLocationCallbacks(with: .failure(.unauthorized))
        case .authorizedWhenInUse, .authorizedAlways:
            locationManager.requestLocation()
        @unknown default:
            break
        }
    }

    func locationManager(_ manager: CLLocationManager, didUpdateLocations locations: [CLLocation]) {
        guard let location = locations.last else {
            self.logger.warning(message: "LocationManager(:didUpdateWithLocations:) was called with no locations")
            self.resolveLocationCallbacks(with: .failure(.unavailable))
            return
        }

        self.resolveLocationCallbacks(with: .success(location))
    }

    func locationManager(_ manager: CLLocationManager, didFailWithError error: Error) {
        self.logger.error(message: "Location manager failed to get location with error: \(error)")
        self.resolveLocationCallbacks(with: .failure(.unavailable))
    }
}
Permissions Strings
In addition to calling requestAlwaysAuthorization or requestWhenInUseAuthorization on your CLLocationManager, you also need to modify your app’s Info.plist file to include a string for NSLocationAlwaysUsageDescription (always) or NSLocationWhenInUseUsageDescription (when in use). This text is the localized string displayed to the user when they are prompted to grant location permissions.
Using a CLGeocoder
Using a CLGeocoder to convert between human-friendly location representations and latitude and longitude coordinates.
Don’t even use CLGeocoder for geocoding (string -> CLLocation), use MKLocalSearch for that.
Getting an address from a CLLocation
Also known as “reverse-geocoding”.
CLGeocoder has two methods for reserve geocoding:
reversGeocodeLocation(_:preferredLocale:completionHandler:)takes aCLLocationobject, an optionalLocaleargument (passnilto useLocale.current), and a callback. Note that this callback will be called off the main queue, so be sure to go back to the main queue before you update any UI as a result of the call.- Use the
preferredLocalecall when you want the location data returned in a format different from the user’s set locale. For example, if you have an American user looking at addresses in France, you might want to setpreferredLocaleto a french locale.
- Use the
reverseGeocodeLocation(_:completionHandler:). takes aCLLocationobject and a callback. This method is effectively the same as the newerreversGeocodeLocation(_:preferredLocale:completionHandler:)call whenpreferredLocaleis nil.
Either case, the completion handler is called off the main queue with either the list of placemarks or the error. The placemarks is a list of CLPlacemark objects, and the error is a type-erased CLError.
Despite the method signature, these arguments optional-ness is mutually exclusive - you will never have a case where both placemarks and error are non-nil, nor will you have a case where both of them are nil.
You should only send one reverse-geocode request at a time, you can check whether a geocoding is making a request via the isGeocoding property. You can also cancel an ongoing geocoding request by calling the cancelGeocode() method.
A snippet for handling reverse geocoding looks like this. Note that it assumes that you only ask for geocoding as soon as you actually need it. This is also untested.
import CoreLocation

enum GeocoderError {
    case canceled
    case noResult
    case partialResult
    case network
    case unknown
}

class ReverseGeocoder {
    let geocoder: CLGeocoder
    private var previousPlacemarks: [(CLLocation, [CLPlacemark])] = [] // not a dictionary because we want fuzzy matching of locations.

    func reverseGecode(_ location: CLLocation, callback: @escaping Result<[CLPlacemark], GeocoderError> -> Void) {
        if let placemarks = self.cachedPlacemarks(for: location) {
            callback(.success(placemarks))
        }

        self.geocoder.reverseGeocodeLocation(location) { (placemarks, error) in
            if let error = error as? CLError {
                let geocoderError: GeocoderError
                if let errorCode = CLError.Code(error.errorCode) {
                    switch errorCode {
                    case .network: geocoderError = .network
                    case .geocodeCanceled: geocoderError = .canceled
                    case .geocodeFoundNoResult: geocoderError = .noResult
                    case .geocodeFoundPartialResult: geocoderError = .partialResult
                    default: geocoderError = .unknown
                    }
                } else {
                    geocoderError = .unknown
                }
                request.callback(.failure(geocoderError))
            } else if let error = error {
                request.callback(.failure(.unknown))
            }
            if let placemarks = placemarks {
                self.previousPlacemarks.append((location, placemarks))
                request.callback(.success(placemarks))
            }
        }
    }

    private func cachedPlacemarks(for location: CLLocation) -> [CLPlacemark]? {
        let accuracy: CLLocationAccuracy = 1e-4 // https://knowledge.rachelbrindle.com/programming/location.html
        for (existingLocation, placemarks) in self.previousPlacemarks {
            if abs(location.coordinate.longitude - existingLocation.coordinate.longitude) < accuracy && abs(location.coordinate.latitude - existingLocation.coordinate.latitude) < accuracy {
                return placemarks
            }
        }
        return nil
    }
}
Last updated: 2020-06-07 16:24:37 -0700
Core Spotlight
Making app content searchable!
In general, you should prefer to batch update the index. However, keep in mind that the default() index doesn’t support batching - you’ll need to create your own.
Indexing
Add items with indexSearchableItems(:completionHandler:), and remove them with one of the deletion methods.
Opening an item that was searched for
Once you have your stuff in the index, you need to handle what happens when the user searches for and selects one of those items.
Doing this is the same codepath as continuing from a deeplink. Only, this time, the activity type will be CSSearchableItemActionType, with the item identifier (you should have picked one that actually refers to your item) as value for the CSSearchableItemActivityIdentifier key under the userInfo property. See Apple’s documentation on doing this.
Last updated: 2020-06-07 16:24:37 -0700
Fastlane
Fastlane is a set of ruby tooling to make mobile development suck a lot less. I use it to automate a lot of the shitty parts of iOS development.
Scan
Fastlane Scan essentially wraps xcodebuild | xcpretty, with additional properties.
Flags:
- the
-sflag specifies a scheme to use when building and running tests - the
-qflag allows you to specify the configuration to use when building the app. - the
-aflag allows you to specify a device to run the tests on - the
--only_testingallows you to specify a list of test bundles to run. It takes a comma-separated list of strings (e.g.fastlane scan --only_testing "foo,bar,baz")
Notarize
Fastlane Notarize handles the mac app notarization process. As of macOS Catalina, you need to notarize apps in order to not get a scary warning about how Apple can’t check the app for malicious code.
There’s a bit of setup here, especially for those, like me, who are unfamiliar with distributing mac apps. The release configuration needs to be signed with a developer ID (this can be generated from Fastlane Match with the developer_id type).
Once you have an App bundle built and correctly signed, you can call notarize with the path to the package, the build id of the package, and the username of the apple id to sign it with. Additionally, you need to create an application specific password for that apple id, and set that to the FASTLANE_APPLE_APPLICATION_SPECIFIC_PASSWORD environment variable. Do this even if you have the App Store Connect API key set up. For example, this is what you could have in your Fastfile: notarize(package: "$PACKAGE_PATH", bundle_id: "$BUNDLE_ID", username: "$APPLE_ID")
Hopefully, it should work! If you run into any issues, then you can set the print_log and verbose flags to true to get logs out. Also be sure to call fastlane with the --verbose flags. Yes, you need both for notarize. At this point, it’s not very well integrated with the rest of Fastlane
Last updated: 2021-12-11 11:36:24 -0800
FileSystem, FileManager, and FileTypes
Determining the type of a file
Adapted from this medium post
This uses the “universal” type indicators, introduced back in Mac OS X 10.4.
import MobileCoreServices // Only for iOS/Catalyst

extension URL {
    func isTypeOfFile(_ uttype: CFString) -> Bool {
        guard let uti = UTTypeCreatePreferredIdentifierForTag(kUTTagClassFilenameExtension, self.pathExtension as CFString, nil) else {
            return false
        }

        return UTTypeConformsTo(uti.takeRetainedValue(), uttype)
    }
}
Use as url.isTypeOfFile(kUTTypeImage)
Last updated: 2020-06-07 16:24:37 -0700
ImageCaptureCore
ImageCaptureCore is an api for allowing you to browse and control connected external cameras and (on macOS) scanners.
The API documentation is rather sparse, making it really easy to overlook some important parts in it.
ICDeviceBrowser
ICDeviceBrowser is the object you use to find any connected external cameras. Set the browser’s delegate first before you do anything (or else, start is a no-op). Also, don’t try to be smart about telling it to stop looking for devices. Per the documentation, when you call stop it’ll deallocate all unused devices. Better to keep it running until you’re out of the “need to talk to a camera” mode.
PTP Events
Picture Transfer Protocol is an ISO standard governing transferring images from digital cameras to computers and otherwise controlling them.
Note that, in iOS, you need to be running at least iOS 13.4 in order for PTP callbacks to actually happen.
You can directly send PTP events using ICCameraDevice.requestSendPTPCommand(_:outData:completion:). Constructing these events is a pain as there is very little documentation on how to do this. I mostly figured this out by referencing various open source usages of ImageCaptureCore (still less effort to re-implement them than it is to port them to iOS’s ImageCaptureCore).
- Integer values are in little-endian format. Meaning that the least significant byte is first (e.g. 0x1234 is stored as 0x34, 0x12)
Permissions
As of iOS 13.4 Beta 2, in order to make PTP requests, you need to specify a value for NSCameraUsageDescription in your app’s info.plist.
As of iOS 14, Apple added permission request APIs along the lines of CoreLocation’s permissions apis. These are on ICDeviceBrowser, and they are:
-contentsAuthorizationStatus()returns the current authorization status for getting saved photos from an external camera.-controlAuthorizationStatus()returns the current authorization status for using an external camera to take photos (or to otherwise control it).-requestContentsAuthorizationStatus(completion:)is used to request authorization to get saved photos/files from an external camera.-requestControlAuthorizationStatus(completion:)is used to request authorization to control an external camera.
Both of the requestAuthorizationStatus take a callback block, which will be called with the appropriate value for ICAuthorizationStatus.
As of Beta 6, if you attempt to request authorization status before the screen has started to render viewDidAppear, then the app seems to hang, for no apparent reason. I have yet to discern why that is.
Last updated: 2020-09-04 23:12:25 -0700
iOS Development
Preventing device sleep
Set the isIdleTimerDisabled property on the UIApplication object to true in order to prevent the device from going to sleep due to limited/no interaction. For obvious reasons, be careful with this api as it’ll prevent the device from going to sleep.
Last updated: 2021-05-29 23:05:39 -0700
Accessibility
Accessibility is making it usable to normal people. Everyone eventually ends up using the accessibility features in one form or another.
UIAccessibility
NSHipster has a great, if old, article on this.
See also the current list of accessibility traits, direct from the source.
Last updated: 2021-04-12 12:26:52 -0700
Animations
You can do either view-based animations, or layer based animations.
Layer-based animations are more customizable (you can do 3d effects), but are harder to work with as a result.
View-Based
As of iOS 10, the new preferred way to do view-based animations is to use the UIViewPropertyAnimator class.
Layer-Based
There are at least 3 ways to animate CALayer properties.
- Implicit animations.
- Implicit with
CATransaction - Explicit with
CAAnimation
Implicit Animations
Implicit animations are fairly magical - set desired property on the layer to what you want it to be, and CoreAnimation will figure out how to animate the layer to reflect that.
This has the downside of being far less configurable, as well as being less obvious that an animation is actually happening.
You can also group animations using CATransaction, which also allows you to specify things like duration and such. It appears that CATransaction need to be wrapped inside of UIView animations.
CATransaction works by wrapping implicit animations up, and allowing you to modify their properties
You can call CATransaction.setDisableActions() with true in order to disable animations.
For testing reasons, even if animations are disabled, you still need to spin the runloop in order for the completion block to be called. Just call RunLoop.main.run(until: Date(timeIntervalSinceNow: 1e-3)).
Explicit Animations
CAAnimation is a cruftier API for handling animations. Most of CA hasn’t really been updated for recent objective-C, or even swift happenings.
For the most part, you’re going to use CABasicAnimation, for which you can specify a keypath to animate.
Note that the delegate for a CAAnimation is retained by the animation object. That is, it’s a strong reference, not a weak one (as others are). Be careful with that.
This does provide the nice benefit of adding block-based end notifications, with the following bit of code:
class BlockAnimationDelegate: NSObject, CAAnimationDelegate {
    private let onComplete: (Bool) -> Void
    func animationDidStop(_ anim: CAAnimation, finished flag: Bool) {
        self.onComplete(flag)
    }

    init(onComplete: @escaping (Bool) -> Void) {
        self.onComplete = onComplete
        super.init()
    }
}

// [...]

let animation: CAAnimation // [...]
animation.delegate = BlockAnimationDelegate { finished in
    [...]
}
Maintaining Position Post-Animation
One of the things noted in the CAAnimation Documentation is that the layer’s data model is not updated as part of the animation. This means that, by default, once the animation finishes, it’ll immediately go back to it’s starting position.
Fixing this is interesting, you can tell the animation to stick around for a bit, but why?
as Ole notes, you should instead set the fromValue property, so that the animation knows where to animate from, instead of letting it figure that out from the data layer.
For example:
let originalState = layer.position.y
let desiredState = CGFloat(50)

layer.position.y = desiredState

let animation = CABasicAnimation(keyPath: "position.y")
animation.toValue = desiredState
animation.fromValue = desiredState
layer.add(animation, forKey: "position")
Last updated: 2020-06-07 16:24:37 -0700
UICollectionView
Supplementary views
Procuring a supplementary view is the responsibility of the collection view’s data source. However, actually init’ing one of those supplementary views (which must be subclasses of UICollectionReusableView) MUST be done by the collection view, via the dequeueReusableSupplemantyrView(ofKind:withReuseIdentifier:for:). It’s better to fatalError() than it is to return a UICollectionReusableView() - at least the error is easier to track when you fatalError().
If you decide you don’t want to show a view for that particular indexPath, instead have your layout object not create attributes for that view, OR create the view, and then set the isHidden property to 0, or set the alpha property to 0. Alternatively, if you have a UICollectionViewFlowLayout as the collection view’s layout, then have the appropriate method on the delegate (either collectionView(:layout:referenceSizeForHeaderInSection:) or collectionView(:layout:referenceSizeForFooterInSection:)) return CGSize.zero.
Either approach is valid and will work.
2-finger multiple selection
New in iOS 13, for both UICollectionView and UITableView.
See the apple documentation.
Last updated: 2020-06-07 16:24:37 -0700
Files App Integration
iOS 11 brought the Files app. Integrating with it is relatively simple. Writing a document provider (i.e. something like dropbox, or secure shellfish) is much more involved.
On-Device Integration
Mostly copied from what Big Nerd Ranch wrote. This is really two things you need to add to your info.plist:
- Set
UIFileSharingEnabled(Application supports iTunes file sharing) toYES - Set
LSSupportsOpeningDocumentsInPlace(Supports opening documents in place) toYES.
And that’s pretty much it.
Note that setting this will make ALL of the contents of $APP_ROOT/Documents visible to the files app, so any private files you kept there will also be visible. These should instead be moved to the Application Support folder.
Additional Links
- AppCoda lists some more things you can do, such as using a
UIDocumentBrowser - Little Bites of Cocoa has a bite on opening files from the files app
Last updated: 2020-06-07 16:24:37 -0700
Notifications
Local and Remote (push) Notifications, not NSNotifications.
This is going to describe the newer UserNotifications framework introduced in iOS 10, instead of the older UIKit-based way of doing notifications.
Content
UNNotificationContent provides read-only access to information shown to the user about a specific notification. For setting information (e.g. when preparing to send a local notification), you’d use the UNMutableNotificationContent class.
Actions
Either kind of notification can be an actionable notification.
Triggers
As of iOS 12, there are four kinds of notification: Calendar, Time, Location, and Push. The first 3 are used with local notifications, while the last is only used for push notifications.
- Calendar triggers for a specific date: “Today at 7 pm”, or “every day at 8 am”.
- Time triggers in a set time from now: In 30 seconds, or every 30 seconds.
- Location1 triggers when the user either exits or enters a specific region. You can set to send the notification for both entry and exit.
- Push is used to detect whether the notification you received is a push notification or not.
Types of Notifications
Local Notifications
Local Notifications are notifications generated entirely on the device. These would be things that appear when you enter or leave an area, at a certain time, etc.
The way to send a local notification is to create a UNNotificationRequest, with an identifier, content, and a trigger, then ask the current UNUserNotificationCenter to add(_:withCompletionHandler:) the request.
Remote Notifications
Also called Push Notifications. Push notifications are sent from some external server to your app.
As of iOS 7, you can also send “silent” or “content-available” notifications. These notifications do not present an alert to the user and instead wake up your app so that you can do something in response to the notification (usually update your content cache so when the user next opens the app they already have up to date information). See this apple documentation.
Sending Push Notifications
Push notifications need to be signed in order to be sent. There are two ways to do this: with a certificate pre-installed or with a jwt.
This script is a simple curl-based script for sending test notifications. It requires modifications for your specific key and such, and you should change the $curl variable to us what you got from running brew install curl-openssl.
This requires location permissions, but not always permissions. Apparently, this is due to the system handling the monitoring as opposed to the app. I’ve never tried this, though.
Last updated: 2020-06-07 16:24:37 -0700
Pointer Interactions
The new fancy hotness introduced in iPadOS 13.4.
this PSPDFKit blog post serves as a good introduction to some of the things you can do.
See Apple’s human interface guidelines page on pointers for a high level overview of the design elements.
Once you have your app optimized for pointer interactions, then set UIApplicationSupportsIndirectInputEvents to YES in your app’s info.plist file.
There are two ways to handle pointer interactions as of iOS 13.4: setting the isPointerInteractionEnabled property on UIButton to true, and by adding a UIPointerInteraction to any view.
UIButton
Life is easier for UIButton. Set isPointerInteractionEnabled to true, and, for any custom pointer styles, you can also set the button’s pointerStyleProvider property.
UIPointerInteraction
On non-button views, the way to do this is to add a UIPointerInteraction to your view. For the default behavior, you don’t even need to set a delegate on the pointer.
For custom interactions, implement the delegate.
Testing
Of course, you also need to verify that you’re doing the right thing. Here are some nimble matchers that verify pointer interactions.
Note that, for simplicity, a these matchers expect you to do the simplest thing for the expected behavior, and while it’s possible to go out of your way to reimplement the default behavior, that’s not the way you should do that, and so the test should fail.
// Default pointer interactions - use whatever the default behavior is.
func haveTheDefaultPointerInteraction() -> Predicate<UIView> {
    return Predicate { actual -> PredicateResult in
        let message = ExpectationMessage.expectedActualValueTo("have the default pointer interaction")
        guard let view = try actual.evaluate() else {
            return PredicateResult(status: .fail, message: message.appendedBeNilHint())
        }
        if view is UIButton {
            return PredicateResult(status: .doesNotMatch, message: message.appended(details: "set `isPointerInteractionEnabled` to true to support the default pointer interaction on buttons"))
        }
        let pointerInteractions = view.interactions.compactMap { $0 as? UIPointerInteraction }

        // there should be one and only one pointer interaction here.
        guard let interaction = pointerInteractions.first, pointerInteractions.count == 1 else {
            return PredicateResult(status: .doesNotMatch, message: message)
        }
        // I mean, sure, it's possible to test that the delegate's responses returns the expected default values.
        // But that's work I don't care to do, and, honestly, if you're going to THAT much effort just for the default behavior
        // Then you did something wrong and your test SHOULD fail.
        return PredicateResult(bool: interaction.delegate == nil, message: message)
    }
}

func haveTheDefaultPointerInteraction() -> Predicate<UIButton> {
    return Predicate { actual -> PredicateResult in
        let message = ExpectationMessage.expectedActualValueTo("have the default pointer interaction")
        guard let button = try actual.evaluate() else {
            return PredicateResult(status: .fail, message: message.appendedBeNilHint())
        }

        let pointerInteractions = button.interactions.compactMap { $0 as? UIPointerInteraction }

        // there should be one and only one pointer interaction here.
        guard pointerInteractions.count == 1 else { // isPointerInteractionEnabled will add it's own UIPointerInteraction. This is still distinct from you the developer adding your own pointer interaction.
            return PredicateResult(status: .doesNotMatch, message: message.appended(details: "On buttons, it's easier to set `isPointerInteractionEnabled` to true. Use that for the default pointer interaction."))
        }
        // I mean, sure, it's possible to test that the pointerStyleProvider's responses returns the expected default values.
        // But that's work I don't care to do, and, honestly, if you're going to THAT much effort just for the default behavior
        // Then you did something wrong and your test SHOULD fail.
        return PredicateResult(bool: button.isPointerInteractionEnabled == true && button.pointerStyleProvider == nil, message: message)
    }
}
Last updated: 2020-06-07 16:24:37 -0700
UIPopoverPresentationController
UIPopoverPresentationController is the new (as of iOS 8) way to do a popover. This replaces the older UIPopoverController, and should be used for anything recent.
Arrow Directions
If you only ever want to show your popover from a given direction, you can control this with the permittedArrowDirections property. According to the documentation, you can only do this when configuring, not after it’s been presented1. As the name suggests, this controls where the arrow on the popover shows, not where the popover is relative to the sourceRect/sourceView.
When the device rotates
You can also control where the popover comes from by updating the sourceRect/sourceView. This can be done after receiving viewWillTransition(to:with:) on the presenting view controller. Be sure to call view.layoutIfNeeded() on the presenting view controller before updating this, otherwise the sourceRect might be outdated2.
I haven’t tested this myself to see what happens if you do try to change that property after it’s been presented.
I’m unsure if you have to call layoutIfNeeded() if you use sourceView instead of sourceRect.
Last updated: 2020-06-07 16:24:37 -0700
UIScene
New in iOS 13, is scenes.
Can have each scene be entirely independent. Can have each scene be dedicated to a specific task.
This uses UIWindowScene and UISceneSession.
UIWindowScene goes between the UIScreen and UIWindow level.
Scenes contains UI, created by system on demand, destroyed by system when unused.
Going to adopt UIWindowSceneDelegate.
Basically, moving a lot of UIApplicationDelegate methods into UIWindowSceneDelgeate methods.
Last updated: 2020-06-07 16:24:37 -0700
UIScrollView
On iOS, a UITableView is a subclass of a UIScrollView. While I understand why this is the case (99% of the time, you want a scrolling tableview), I’ve been starting to think that the OSX/cocoa approach of having them be separate classes is actually a better approach. But, I can see that this might have made the implementation of UITableView much easier to just always assume it’s in a ScrollView.
Refresh Control
It used to be that you had to use a UITableViewController and it’s refreshControl property to get a pull to refresh behavior. This is no longer the case. As of iOS 10, you can set UIScrollView's refreshControl property to get a refresh control on any scrollview (and any subclass). Of course, on earlier versions of the OS, you can also add the refreshcontrol as a subview of the scrollview, and it’ll still work. This is a much more explicit way to do that.
Dismiss keyboard on scroll
The old (pre iOS 7) way of dismissing the keyboard when you scroll is to use UIScrollViewDelegate methods to be notified when the scrollview scrolled, and then call -resignFirstResponder from the scrollview.
The new way is to set the keyboardDismissMode property to either .onDrag on .interactive
Last updated: 2020-06-07 16:24:37 -0700
UISegmentedControl
UISegmentedControl’s are radio buttons.
There’s no way to animated changing the selected segment.
Last updated: 2020-06-07 16:24:37 -0700
Split Views
UISplitViewController is a really neat class that can do both the neat “on ipad, show the main/detail paradigm”, and showing the regular “navigation controller with main, then go to detail if you tap somewhere”.
On iPad, to get both the main and the detail to show up, set the preferredDisplayMode property to .allVisible.
You should also make sure you’re displaying a navigation controller in your detail, so you can include the UISplitView displayModeButtonItem there.
Last updated: 2020-06-07 16:24:37 -0700
StackViews
UIStackView, introduced in iOS 9, is an incredibly powerful class for managing layouts.
UIStackView manages showing either a horizontal or vertical stack of views, applying the autolayout constraints for you. It also takes care of correctly removing hidden views, so that they’re not only invisible, but they’re actually removed from the view hierarchy.
The 4 main properties for configuring stackviews are the axis (Vertical or Horizontal), distribution, alignment, and spacing.
The distribution property is a UIStackView.Distribution value, and controls how the views are laid out in the axis of the stackview. It can be any of the following:
fill: Fill available space, shrinking/expanding according to their compression resistance/hugging priority.fillEqually: Fill available space, resize all views to be the same size.fillProportionally: Fill available space, resize based on their intrinsic content size relative to the size of the axis (horizontal: width, vertical: height)equalSpacing: Fill the available space, adjust spacing so that each view is equal apart from each other.equalCentering: Fill available space, give each view equal center-to-center spacing while respecting thespacingproperty.
The alignment property is a UIStackView.Alignment value, and controls how the views are laid out perpendicular to the stackview’s axis. It can be any of the following:
fill: Resize the views so that they fill the available space.leading: Align leading (horizontal) or top (vertical) edges of the views.firstBaseline: (Horizontal only): Align the first baseline of the views.Center: Align the centers of each views together.trailing: Align the trailing (horizontal) or bottom (vertical) edges of the views.lastBaseline: (Horizontal only): Align the last baseline of the views.
The spacing property is a CGFloat and is used to specify the space between views in the given axis.
Last updated: 2020-06-07 16:24:37 -0700
Styling iOS Apps
Apple’s HIG on color for iOS apps.
New in iOS 13: Semantic Colors
UIAppearance
For multiple themes in an app, I like using a ThemeRepository paradigm. When I only care for a single theme, then that’s overkill, and I’ll use UIAppearance as much as I can.
Styling UINavigationBar
UINavigationBar.appearance().barTintColor = navColor
UINavigationBar.appearance().titleTextAttributes = [.foregroundColor: textColor]
UINavigationBar.appearance().tintColor = navButtonColor
Styling the Status Bar
Note: This is deprecated as of iOS 9.
UIApplication.shared.statusBarStyle = .lightContent
Last updated: 2020-12-22 17:22:26 -0800
UITableView
UITableView-specific things.
DiffableDataSource
New in iOS 13 is UITableViewDiffableDataSource. A generic class which does the heavy lifting of determining updates for a tableview. This class allows you to make edits to the tableView in a much more type-safe way. ALl that it requires is that your sections and row models be Hashable.
You initialize it by passing in a tableView and a way to create the tableView cells. Updates come in the form of “snapshots”. The simplest way is to just give it a snapshot of the entirely new data and let the class figure out what the diff is. It’s pretty cool.
Section Titles
Section titles are asserted by checking the headerView(forSection:). You can then check the textLabel.text properties to get the displayed text. Note that this needs the section header to be within the view in order to be non-nil. Otherwise you need to scroll to show that.
Actually setting this is done by implementing the tableView(_:titleForHeaderInSection:) method on the dataSource.
Table Header/Footer Views
The docs for tableHeaderView state that the width will be maintained by the tableview, but you set the height. Don’t set this view up for autolayout, as you’ll get weird width issues (translatesAutoresizingMaskIntoConstraints should be true, not false).
Sizing a tableview with autolayout is non-obvious, adding this snippet does the trick, do it every time the view lays out/will change size.
tableView.tableHeaderView.frame.size.height = tableView.tableHeaderView.systemLayoutSizeFitting(
    UIView.layoutFittingCompressedSize
).height
Scrolling under test
In order to scroll to a row, you invoke the scrollToRow(at:at:animated:) method. You also need the view to be within a visible window. This is also animated, so you’ll to wait a bit before you do the next assertion.
let window = UIWindow(frame: CGRect(x: 0, y: 0, width: 320, height: 480))
window.rootViewController = subject
window.makeKeyAndVisible()

let indexPath = IndexPath(row: 3, section: 1)

subject.tableView.scrollToRow(at: indexPath, at: .middle, animated: false)

expect(subject.tableView.indexPathsForVisibleRows).toEventually(contain(indexPath))
Context Menus
In iOS 13, we get context menus. These replaced the previous “listen to 3d touch events on the entire table view, and from there figure out which cell was pressed” stuff we had to do before (or at least, had to do in iOS 9 - when I last implemented that behavior).
The minimum delegate methods required to implement this behavior are:
-tableView(:contextMenuConfigurationForRowAt:point:)-tableView(:willPerformPreviewActionForMenuWith:animator:
-tableView(:contextMenuConfigurationForRowAt:point:) is used to set up the menu for that item (what happens when you long/force press on the tableView). It returns an optional UIContextMenuConfiguration, which is used to set up the view controller to show, and a UIMenu to show with it.
-tableView(:willPerformPreviewActionForMenuWith:animator: is then used to commit that.
For example, see this example from my rss reader:
extension ArticleListController: UITableViewDelegate {
    // ...
    public func tableView(_ tableView: UITableView, contextMenuConfigurationForRowAt indexPath: IndexPath,
                          point: CGPoint) -> UIContextMenuConfiguration? {
        guard ArticleListSection(rawValue: indexPath.section) == .articles else { return nil }

        let article = self.articleForIndexPath(indexPath)
        return UIContextMenuConfiguration(
            identifier: article.link as NSURL,
            previewProvider: { return self.articleViewController(article) },
            actionProvider: { elements in
                return UIMenu(title: article.title, image: nil, identifier: nil, options: [],
                              children: elements + self.menuActions(for: article))
        })
    }

    public func tableView(_ tableView: UITableView,
                          willPerformPreviewActionForMenuWith configuration: UIContextMenuConfiguration,
                          animator: UIContextMenuInteractionCommitAnimating) {
        guard let articleController = animator.previewViewController as? ArticleViewController else { return }
        animator.addCompletion {
            self.markRead(article: articleController.article, read: true)
            self.showArticleController(articleController, animated: true)
        }
    }
}
Last updated: 2020-06-07 16:24:37 -0700
View Controllers
UIViewController is one of the most-used APIs in iOS.
Lifecycle
A common interview question, if simple.
initawakeFromNib(if available)viewDidLoadviewWillAppearviewDidLayoutSubviews(And any subsequent times the view’s subviews are laid out)viewDidAppear
Ending:
viewWillDisappearviewDidDisappeardeinit/dealloc
Transitions
Adding custom transitions, specifically.
Theory
- Set the controller’s
modalPresentationStyleproperty to.custom. - Set the
transitioningDelegateon your view controller. Leaving it unset will use the default. - Have the
transitioningDelegate’sanimationController(forPresented:presenting:source:)andanimationController(forDismissed:)methods return an appropriateUIViewControllerAnimatedTransitioning.- This object needs to implement
transitionDuration(using:)andanimateTransition(using:). transitionDuration(using:)return the length of the animation.animateTransition(using:)actually does the animation.- You do not implement a
UIViewControllerContextTransitioning, this is passed in by the system.
- You do not implement a
- This object needs to implement
Example
Because these are all objective-c protocols, they need to be NSObject subclasses, so:
class PageCurlAnimatedTransitioning: NSObject, UIViewControllerAnimatedTransitioning {
	func transitionDuration(using context: UIViewControllerContextTransitioning?) -> TimeInteral {
	    return 0.25
	}

	func animateTransition(using context: UIViewControllerContextTransitioning) {
		guard let fromVC = context.viewController(forKey: .from),
			let toVC = context.viewController(forKey: .to),
			let snapshot = toVC.view.snapshotView(afterScreenUpdates: true) else {
				return
			}
		let containerView = context.containerView
		let startFrame = context.initialFrame(for: fromVC)
		let finalFrame = context.finalFrame(for: toVC)

		snapshot.frame = startFrame

		containerView.addSubview(toVC.view)
		containerView.addSubview(snapshot)
		toVC.view.isHidden = true

		UIView.animate(
			withDuration: self.transitionDuration(using: context),
			delay: 0,
			options: [.transitionCurlUp, .preferredFramesPerSecond60],
			animations: {
				snapshot.frame = finalFrame
		},
			completion: { _ in
				snapshot.removeFromSuperview()
				toVC.view.isHidden = false
		})
	}
}

class MyTransitioningDelegate: NSObject, UIViewControllerTransitioningDelegate {
    func animationController(forPresented presented: UIViewController, presenting: UIViewController, source: UIViewController) -> UIViewControllerAnimatedTransitioning? {
    	return PageCurlAnimatedTransitioning()
    }
}
And these would be used like so:
self.transitioner = MyTransitioningDelegate() // hold a strong reference to this.
let viewControllerToPresent = // ...
viewControllerToPresent.modalPresentationStyle = .custom
viewControllerToPresent.transitioningDelegate = self.transitioner
vc.present(viewControllerToPresent, animated: true, completion: nil)
Last updated: 2020-06-07 16:24:37 -0700
WKWebView
WKWebView is the view you should use to display web content inside of an app.
Delegates
WKWebView is somewhat unique in that it has two delegate methods and protocols - uiDelegate and navigationDelegate
WKNavigationDelegate
Implement a WKNavigationDelegate to respond to url navigations - starting a navigation, authentication issues, errors, etc.
Don’t open links.
Say, for example, you don’t want clicked links to be opened in the webview. You’d implement webView(_:decidePolicyFor:decisionHandler:) to detect if it’s a link, and then call the handler with .deny, like so:
func webView(_ webView: WKWebView, decidePolicyFor action: WKNavigationAction, decisionHandler: @escaping (WKNavigationActionPolicy) -> Void) {
    switch action.navigationType {
    case .linkActivated:
        decisionHandler(.cancel)
    default:
        decisionHandler(.allow)
    }
}
You might instead choose to open the link elsewhere.
WKUIDelegate
Implement a WKUIDelegate to respond to UI requests - javascript UI panels, upload panels, force touch.
Context Menus
In iOS 13, we got context menus. These replace the previous WKPreviewItem-based delegate methods, instead with 4 (currently undocumented) callbacks to implement:
-webView(:contextMenuConfigurationForElement:completionHandler:)-webView(:contextMenuDidEndForElement:)-webView(:contextMenuForElement:willCommitWithAnimator:)-webView(:contextMenuWillPresentForElement:)
If you do nothing, when you long/force-press on a link, the view will present an SFSafariViewController configured to show that link, along with a few items. When that view controller is committed, the user is taken out of your app and into the Safari app.
Otherwise, to intercept that behavior, you only need to implement -webView(:contextMenuConfigurationForElement:completionHandler:) and -webView(:contextMenuForElement:willCommitWithAnimator:).
-webView(:contextMenuConfigurationForElement:completionHandler:) is used to decide what to show to the user. If you call the callback with nil, then it defaults back to the default action previously mentioned. Otherwise, you can use the linkURL property on the given WKContextMenuElementInfo object to get the link, and then call the callback with a custom UIContextMenuConfiguration configured for whatever view controller you want.
-webView(:contextMenuForElement:willCommitWithAnimator:) is then used to commit that view controller into your stack. Be sure to present the view controller as part of a completion for the animator. Otherwise, your app gets stick in an infinite loop as it tries to present a view controller even when one is already being presented.
For example, if you wanted to present a SFSafariViewController, but keep the user in the app (that is, present that view controller in your UI), then you might implement these methods like:
extension MyViewController: WKUIDelegate {
    func webView(_ webView: WKWebView, contextMenuConfigurationForElement elementInfo: WKContextMenuElementInfo,
                        completionHandler: @escaping (UIContextMenuConfiguration?) -> Void) {
        guard let url = elementInfo.linkURL else {
            return completionHandler(nil)
        }

        let configuration = UIContextMenuConfiguration(
            identifier: url as NSURL,
            previewProvider: { return SFSafariViewController(url: url) },
            actionProvider: { elements in
                guard elements.isEmpty == false else { return nil }
                return UIMenu(title: "", image: nil, identifier: nil, options: [], children: elements)
            }
        )
        completionHandler(configuration)
    }

    func webView(_ webView: WKWebView, contextMenuForElement elementInfo: WKContextMenuElementInfo,
                        willCommitWithAnimator animator: UIContextMenuInteractionCommitAnimating) {
        guard let viewController = animator.previewViewController else { return }
        animator.addCompletion {
            self.present(viewController, animated: true, completion: nil)
        }
    }
}
Last updated: 2020-06-07 16:24:37 -0700
Layout
There are 2 system ways to do layout in iOS.
- Frame-based
- AutoLayout
Don’t use frame based layouts unless you have to. Especially when it comes to supporting multiple size classes and such, that’s way more effort than it’s worth.
In general, I prefer this for laying out code:
- Nibs w/ AutoLayout
- Code w/ AutoLayout
- Code w/ frames
AutoLayout
From NSLayoutConstraint’s api:
Each constraint is a linear equation with the following format:
item1.attribute1 = multiplier * item2.attribute2 + constant
Apple-Provided APIs
NSLayoutConstaintis the underlying api for specifying layout constraint. Everything else essentially gets converted to these when you use them.NSLayoutAnchor, introduced in iOS 9, is a factory class that makes it way nicer to specify layout constraints, without having to resort to visual format language.NSLayoutConstraintVisual Format Language, is used in a class constructor forNSLayoutConstraint.
Third Party Frameworks
- PureLayout provides a declarative interface for creating and installing layout constraints. It works as categories on NS/UIView and NSArray.
Last updated: 2020-06-07 16:24:37 -0700
Localizing
Using localized string and such.
Testing
Sometimes, there are differences in the different localized versions of your app, and you need to test that in a unit test.
Here’s a fairly hacky way to do that:
private var bundleKey: UInt8 = 0
func setBundleLanguage(_ language: String) {
    let path = Bundle.main.path(forResource: language, ofType: "lproj")
    objc_setAssociatedObject(Bundle.main, &bundleKey, path, .OBJC_ASSOCIATION_RETAIN_NONATOMIC)
    object_setClass(Bundle.main, AnyLanguageBundle.self)
}
Viewing Long Strings
Some languages (German is notorious for this) end up with much longer translations than others. This can cause undesirable ellipsing or clipping of text.
One way to check for this without actually setting the language to German (which you might not have localizations for/be able to read) is to modify the “Arguments Passed On Launch” for your target to include -NSDoubleLocalizedStrings YES.
Note that this isn’t always reliable, because apple, and it only applies to strings that go through NSLocalizedString
Plural Strings
This is mostly borrowed from the now-ancient objc.io article on String Localization.
Essentially, you set up a Localizable.stringsdict file with something like the following:
<?xml version="1.0" encoding="UTF-8"?>
<!DOCTYPE plist PUBLIC "-//Apple//DTD PLIST 1.0//EN" "http://www.apple.com/DTDs/PropertyList-1.0.dtd">
<plist version="1.0">
<dict>
	<key>Processing %d Exposure</key><!-- Name of the key as used by NSLocalizedString -->
	<dict>
		<key>NSStringLocalizedFormatKey</key>
		<string>Processing %#@IMAGE@</string><!-- The string to be replaced, with the %#@IMAGE@ defining `IMAGE` to be a variable. You can have multiple variables. -->
		<key>IMAGE</key><!-- For the image key -->
		<dict>
			<key>NSStringFormatSpecTypeKey</key>
			<string>NSStringPluralRuleType</string><!-- Handling plurals -->
			<key>NSStringFormatValueTypeKey</key>
			<string>d</string><!-- The printf-style (without leading %) key -->
			<key>one</key><!-- Singular -->
			<string>%d Exposure</string>
			<key>other</key><!-- Plural. Note that there are ways to specify 0, two, many, few, etc. -->
			<string>%d Exposures</string>
		</dict>
	</dict>
</dict>
</plist>
Last updated: 2020-06-07 16:24:37 -0700
Mac Development
For developing cocoa-based programs.
Last updated: 2021-05-29 23:05:39 -0700
Image Capture
The ImageCapture API is an old api on macOS for controlling a camera connected over USB.
Indigo has an implementation for canon cameras using that api.
Last updated: 2020-06-07 16:24:37 -0700
NSOutlineView and NSTreeController
View nested lists easily!
NSOutlineView is a subclass of NSTableView that provides a way to display hierarchical data. For example, file hierarchies (though, you’d actually use an NSBrowser object for a file hierarchy).
NSTreeController is a controller that works with NSOutlineView and NSBrowser to manage the data that they display.
In cocoa, controllers are super powerful because they allow you to bypass implementing a lot of the really boring delegate/datasource stuff that you’re forced to do in iOS.
Bindings
This is a much better explanation of how to set up bindings correctly than I’m currently able to do.
Delegate Methods
Tooltips
Implement outlineView(_:tooltipFor:rect:tableColumn:item:mouseLocation).
Last updated: 2020-06-07 16:24:37 -0700
NSWorkspace
Opening a URL
This is super simple, call NSWorkspace.open(:) with the url, and it’ll open in the user’s default browser.
Last updated: 2020-06-07 16:24:37 -0700
Network Link Conditioner
NSHipster describes how to install and use this.
This is a useful tool for seeing how your app works under different network settings.
A side effect of using Network Link Conditioner is that you can also identify when a test is mocking out the network by using a custom NSURLProtocol. Because those tests will also be affected by the network link conditioner. This is part of why if your unit test makes a network call, it’s not a unit test. Even touching the URL loading subsystem is making a network call.
By the way, NSHipster also has an excellent article on NSURLProtocol, because it is useful for mocking network requests for integration-style tests and the like.
Last updated: 2020-12-22 17:22:26 -0800
URLSession and URLRequest
Caching
URLCache
Apple provides a really nice built-in way to do caching, using URLCache. You can configure a URLSession object to use your specific cache via URLSessionConfiguration.urlCache.
Once configured, all requests through that session will use that cache, though it’s possible to override for specific requests, or for all requests from that session.
Note that URLSession.shared is configured to use URLCache.shared by default. This is transparent to the user (that is, there’s no easy way to determine whether or not the request actually used the network or returned cached data).
ETag and Manual Caching
Sometimes you want to manually cache responses. Because URLSession uses a cache by default, we have to tell our requests to not do that. There are a few ways to do that:
- Use a URLSession that isn’t backed by a cache (by creating one with the configuration’s
urlCacheproperty set to nil) - Use a URLSession with a cache policy that ignores the cache (set the configuration’s
requestCachePolicyto. reloadIgnoringLocalAndRemoteCacheData - Have all your
requestsindividually specify.reloadIgnoringLocalAndRemoteCacheDataas theircachePolicy
Once you have the caching behavior set, you need to implement manual caching yourself. I’m going to describe using ETag because that’s better (and what my nginx server did for me).
The ETag header is one way to determine whether or not a resource has changed from when it was last served. It’s essentially a hash of the resource information (as opposed to using something like Last-Modified for a time-based approach). You pair this with the If-None-Match request header to have the server calculate whether the data has changed (HTTP 200 response) or not (HTTP 304 response).
So, the algorithm for doing this is:
- Make initial request
- Record the value for the
ETag(orEtag) header in the response you send. - In subsequent requests to the same url, include the
If-None-Matchrequest header, with value set to whatever you received for thatEtagheader.- If you receive a 304:
- Use the older data you had (no cache update needed).
- If you receive a 200:
- Overwrite the etag you had with the newer etag header
- Use the new data you received in the body of the response.
- If you receive a 304:
Last updated: 2020-06-07 16:24:37 -0700
NSUserActivity
NSUserActivity is a class to facilitate deeplinking into your app. The original (public) purpose was for handoff, it’s now been adapted for facilitating search and siri integration.
Setting up activities
You create one with an appropriate activity type, set the title, enable other properties as it makes sense, then finally call becomeCurrent().
Note that if you assign a user activity instance to a UIViewController’s or UIResponder’s userActivity property, then you don’t need to worry about calling the becomeCurrent or resignCurrent methods - these are handled for you.
Activity Types
These are strings, usually in reverse-DNS style, that describe the domain and the particular type of activity - e.g. com.rachelbrindle.second_brain.read_chapter describes opening/reading a chapter for com.rachelbrindle.second_brain. The activity types your app supports MUST also be mentioned in the Info.plist file, see NSUserActivityTypes.
Handoff
Set the isEligibleForHandoff property to true.
Search
This allows spotlight to present more optimized results to the user, as well as allowing the user to search for an activity they were previously engaging in.
Set the isEligibleForSearch property to true. If you want to help search results for other users, you can set isEligibleForPublicIndexing to true.
Note that your app must maintain a strong reference to any activity objects used for search results. Also, don’t use this to index all the app’s contents, that’s what the much more power core spotlight apis are for.
Continuing from a deeplink
(This only covers handoff, search and siri might be different)
The simplest way to continue from a deeplink is to implement application(_:continue:restorationHandler:) on your app delegate. Optionally, if your app might take a while to set things up (e.g. need to retrieve data from the network), then implementing and having your app delegate respond to application(_:willContinueUserActivityWithType:) will provide a nicer user experience.
Last updated: 2020-06-07 16:24:37 -0700
Objective-C Metaprogramming
Getting the list of classes
Used to be that you’d use objc_getClassList, but that’s now deprecated in favor of objc_copyClassList. However, you can’t easily enumerate over that returned array in swift, so use the following code:
var count: UInt32 = 0
let classList = objc_copyClassList(&count)!
defer { free(UnsafeMutableRawPointer(classList)) }
let classes = UnsafeBufferPointer(start: classList, count: Int(count))
for cls in classes {
    print(String(cString: class_getName(cls)))
}
From the Apple Developer Forums.
Last updated: 2022-06-05 20:05:21 -0700
Sirikit
Siri Media Intents
Intents:
INPlayMediaIntent- “Play $SONG_NAME in my app”
INAddMediaIntent- “Add this to $PLAYLIST in my app”
INUpdateMediaAffinityIntent- “I like this song”
INSearchForMediaIntent- “Find $SEARCH_TERM in my app”
Look at INMediaSearch for full list of supported search terms.
Processing Media Intents
WWDC talks:
- Introducing Sirikit
- Making Great Sirikit experiences
- Design high quality Siri media interactions
Resolve, Confirm, Handle.
Resolve is where you identify the items.
- This is where you create the INMediaItems, return it in the IN*MediaItemResolutionResult.
- Must be implemented for Media intents.
- in watchOS: Use on-device cache if at all possible. Don’t bother confirming it. Handle is where the thing as actually handled.
- For play, you use “handle in app”. Don’t need to pass in a user activity for this case.
- handle in app calls
application(_:handle:completionHandler:)on theAppDelegate. - This is where you parse the IN*MediaIntent and handle it (e.g. re-find the song to play, and play item)
- handle in app calls
Test in Carplay (lol) or when wearing headphones.
in AppDelegate, implement application(_:handle:completionHandler:)
Always populate title, artist, and type in INMediaItem in the resolve method.
“Play my app” will have no media items. You can do what you want there, but don’t ask them what to play.
Playback can have repeat, shuffle, speed, and queue locations.
Errors: INPlayMediaMediaItemUnsupportedReason
Look at INMediaSortOrder for “new” or “best” or recommended items.
Searching by currently playing (INMediaReferenceCurrentlyPlaying). May also contain MPNowPlayingInfoPropertyExternalContentIdentifier from MPNowPlayingInfoCenter, which will be the INMediaSearchItem’s identifier property.
Can give siri the vocabulary of the catalog.
- Don’t include the entire catalog.
- Only the entities specific customer.
- Order it with most relevant info for the customer.
- Types available (amongst others):
- PlaylistTitle
- MusicArtistName
- AudiobookTitle
- AudiobookAuthor
- ShowTitle
- Look at global vocabulary support.
Last updated: 2021-09-30 17:59:42 -0700
StoreKit and In-App Purchase
This article made possible thanks to the Engineering Subscriptions session at WWDC 2018.
- Add an object conforming to
SKPaymentTransactionObserveras early in the app lifecycle as possible (i.e. inapplication(_:didFinishLaunchingWithOptions:)).
Verifying Receipts
There are two ways to do this: On device and server-side. I’m only going to cover server-side.
You upload the app store receipt to your server, and then have your server make a call to the app store to verify the receipt.
The receipt is stored on device at wherever Bundle.main.appStoreReceiptURL returns. You are supposed to verify that the file exists and upload the contents of that file to your server as a base-64 encoded string.
E.g.
if let receiptURL = Bundle.main.appStoreReceiptURL,
   FileManager.default.fileExists(atPath: receiptURL.path),
   let receiptData = try? Data(contentsOf: receiptURL) {
    let base64Data = receiptData.base64EncodedString()
    // upload base64Data to your server.
}
Once the receipt data is on your server, you then make a call to the /verifyReceipt endpoint on the appstore - either https://sandbox.itunes.apple.com/verifyReceipt (sandbox/testing), or https://buy.itunes.apple.com/verifyReceipt (production). According to the documentation, try production first, then try sandbox if you get back a 21007 response code (this is NOT the http status code, but the status key in the returned json). This call is supposed to have the at least two keys: receipt-data is the base64 encoded string that was just uploaded, and password, is a shared password set up in app store connect. You can also send exclude-old-transactions with true to exclude older transactions (per the documentation).
Once you get a response back with non-zero status, check the receipt.in_app field (jq syntax), this is an array of json objects for the in app purchases. You can use this to double check that the transaction id and product id’s match.
If you have a subscription, you should store the expires_date and original_transaction_id fields on those in_app objects. These are used to verify the user is still subscribed and to also renew transactions.
Once you’ve validated this server-side, you should call finishTransaction(:) with that transaction on the SKPaymentQueue.
Renewing a subscription
When checking the receipt, if you have already stored the original_transaction_id, then you should filter the in_app list to find the object with the latest expires_date for each original_transaction_id. If the date is in the past, then the user is not subscribed. Now, update the stored expires_date with that latest expires_date.
You can also poll the app store for new transactions. To do this, you save the latest version of the base64 receipt data, and then make a new call to /verifyReceipt on the app store. This will return with any new transactions that have occurred. This is when you would specify exclude-old-transactions as true.
You can also get notified when a subscription lapses but renews later (i.e. billing error) by using Server-To-Server Notifications. You set up an endpoint for the app store to make a post request, which has the same latest_transaction_info field that /verifyReceipt will include.
Other Notes
- Make subscription available before account creation.
- This gives a better user experience and results in a higher conversion.
- Rely on
original_transaction_idto associate multiple accounts. - You can point the customer to edit their billing information and manage subscriptions with the following urls:
- Editing billing information:
https://apps.apple.com/account/billing - Manage subscriptions:
https://apps.apple.com/account/subscriptions
- Editing billing information:
Last updated: 2020-12-22 16:44:36 -0800
Testing UIKit
It is possible to unit test UIKit components. It’s annoying and in a lot of places undocumented. However, in my experience, it is significantly faster and more reliable to test UI from what xcode describes as a unit test perspective vs. using XCUITest.
As far as this document is concerned, a unit-testing perspective means that the tests run in the same process the code being tested runs in. For example, in a UI Testing Bundle, there are 2 separate processes running: The app itself is running in one process, and the tests are running in a second process. They communicate via IPC.
-
Most APIs work fine without being in a window hierarchy.
- The main exception here is the
UIViewControllerpresentation APIs, such as: - Additionally, most of the standard ViewController containers also need to be inside of window hierarchies, such as:
- The main exception here is the
-
A lot of views work just fine when they are size 0. Views that don’t work fine include:
UITableView(if you access thevisibleCellsand related apis)UICollectionView(if you access thevisibleCellsand related apis)
Last updated: 2021-11-14 22:08:54 -0800
UI Testing
XCUITest, introduced in iOS 9, is a technology for automating acceptance tests. It works by running your app in a separate process from the test, with the test communicating to the app using a form of IPC (Inter-Process-Communication). Elements are identified via accessibility IDs/values.
A pretty decent introduction/reminder of what all is involved.
Predicates
You can fetch a group of elements matching a predicate by calling element(matching:) on any XCUIElementQuery. Most objects in XCUITest are XCUIElementQuery’s.
Anything that conforms to XCUIElementAttribute can be queried as part of one of these queries.
Queries
- Finding text on a Cell
Honestly, I had more luck withapp.tables.cells.element(boundBy: 0).firstMatch.staticText[LABEL_ACCESSIBILITY_ID].
Dismissing a popover
Popover are dismissed by tapping… basically anywhere outside the popover. There’s a specific element to tap that’ll do this:
XCUIApplication().otherElements["PopoverDismissRegion"].tap()
Last updated: 2021-11-14 22:08:54 -0800
Continuous Integration
I have a lot of thoughts on CI/CD.
My preferred CI system is concourse. Notes on that are here.
Last updated: 2021-05-29 23:05:39 -0700
Concourse
My preferred CI. Almost primarily for fly execute.
The fly CLI
Using fly execute
You can run a one-off job in concourse using the execute subcommand. You need to provide it with the task to run, and inputs for the task (as specified by the task yaml).
At the simplest, you could write a task that reads:
---
platform: linux

image_resource:
  type: docker-image
  source:
    repository: alpine
    tag: latest

run:
  path: /bin/sh
  args:
    - -c
    - echo "hello world"
Save it to disk, and use it via fly execute -c $SAVED_TASK_FILENAME. This’ll run the task in your concourse environment.
Of course, this type of example is only really useful for showing that this is possible. You can also pass any input to (and receive any output from) fly execute that a normal job in a pipeline would take. I commonly use this to verify that code works in CI without having to make WIP commits for CI to pick up on and test. I’ve also used it to hand off testing to a machine that’s dedicated to testing (instead of bogging down my development machine, send a build off to CI to run and wait for the results).
To pass in additional inputs to fly execute, you can use -i flags to the command, with $INPUT=$PATH for all listed $INPUTs to the task. For example, the cargo task, as listed in my concourse_tasks repository, has 2 inputs: The list of concourse tasks (which, relevant to this task, contains the cargo.sh script that is specified in the task’s run.path variable), and the code to operate on. To use this task on a bit of rust code, I’d run the command fly execute -c path/to/concourse_tasks/cargo.yml -i concourse=path/to/concourse_tasks -i code=path/to/code.
To simplify this process, I’ve written a shell script to handle this:
#!/usr/bin/zsh
# Save file as `fly-run_task`

set -e

if [ $# -ne 2 ];
    echo "Usage: $0 task_name"
    echo "task_name should be the suffix-less name of the concourse task to run"
    exit 1
fi

TASK_NAME="$1"

CONCOURSE_TASKS_DIR=# path to my concourse_tasks checkout on disk

TASK_PATH="${CONCOURSE_TASKS_DIR}/tasks/${TASK_NAME}.yml"

if [ ! -f "${TASK_PATH}" ]; then
    echo "Error: ${TASK_PATH} is not a file.""
    echo "Usage: $0 task_name"
    echo "task_name should be the suffix-less name of the concourse task to run"
    exit 1
fi

fly execute -c "${TASK_PATH}" -i concourse="${CONCOURSE_TASKS_DIR}/tasks/" -i code=.
Examining a build container
fly gives you shell access to a build container via the unfortunately named hijack, intercept or i subcommands.
There are several ways to do this:
- If you know the pipeline/job Id, and can guess which build type to examine, you can run
fly intercept -j $JOB_ID, which will check for containers with that job id, and if there’s any confusion about the exact container, it’ll prompt you to pick a container. - You can get the list of containers via the
containersorcssubcommands (fly cs). This’ll output table of available containers. Find the container you want, and pass the handle UUID tofly interceptwith the--handle=(e.g.fly intercept --handle=12345678-90ab-cdef-1234-567890abcdef). - From the table
fly csgives you, you can also pass in the build id for the container you want (fly intercept -b $BUILD_ID). This is less accurate than the handle UUID, so for any confusion, it’ll prompt you for the exact container.
Operating
Concourse on Linode
Some notes on running Concourse from a linode box:
- You can run the
webcommand and theworkercommand on the same machine. The web machine can be on a 1GB ram linode, it doesn’t take that much resources. - While doable on the 1GB ram plan, you should really run the workers on at least the 2GB ram plans. This is more for storage than anything else.
- Using a linode is a better plan long term over getting a NUC so long as you stay under the 16 GB plan. Depending on your usage, the other benefits (not having to care about hardware issues) might even extend this to that.
As with the other services I maintain, the setup is managed inside of an ansible playbook.
Issues
I discovered the hard way that using the 1GB “nanode” plan was not a good plan. The disk very quickly filled up, in addition to everything being slow as molasses. Once I migrated the machine to the 2GB plan, I ran into issues with the volume space not being resized (concourse creates a worker volume logical volume with $TOTAL_DISK_SPACE - 10GB of space), then further issues with the system thinking that a volumes which were deleted in fact weren’t, etc.
Worker.beacon.forward-conn.failed-to-dial
See this issue
Remove $CONCOURSE_WORK_DIR/garden-properties.json before each time a worker starts.
Unable to resolve host error
I ran in to this issue when “upgrading” the host my concourse installation used from ubuntu 19.10 to 20.04. (Linode recommends you “upgrade” by creating a new instance at the desired OS, and copying over the necessary files - I just set everything up again because it was faster/easier to do it that way).
Sometimes, firewall or dns rules interfere with your workers. I resolved this by doing two things:
- Specifying the
CONCOURSE_GARDEN_DNS_SERVERvariable to a specific dns server (I use 1.1.1.1 so I don’t have to rely on Google). - If that doesn’t work, then it’s usually a firewall rule. If you use
fly intercepton any of the offending gets, and you can’t ping ANY IPs, then it’s usually an overly restrictive firewall rule. You can adjust these withufwon ubuntu (oriptableselsewhere).
Resizing the Worker Volume
See this issue.
# On a machine with fly
fly -t $TARGET land-worker -w $WORKER_NAME

# On the worker
sudo systemctl stop concourse_worker

# Back to fly
fly -t $TARGET prune-worker -w $WORKER_NAME

# Back to the worker
sudo umount -f /opt/concourse/work_dir/volumes
sudo sync
sudo losetup -d /dev/loop0
sudo rm -rf /opt/concourse/work_dir/volumes.img
sudo reboot
Pruning the worker (which really only needs to happen before the reboot) tells concourse to ignore any volumes that may or may not exist. Invoking land-worker may or may not actually do things.
Darwin Worker
I wrote something on this a few years back. Which is, of course, out of date (at least, in regard to houdini).
Here’s my current launchagent (~/Library/LaunchAgents/com.rachelbrindle.concourse.worker.plist):
<?xml version="1.0" encoding="UTF-8"?>
<!DOCTYPE plist PUBLIC "-//Apple//DTD PLIST 1.0//EN" "http://www.apple.com/DTDs/PropertyList-1.0.dtd">
<plist version="1.0">
<dict>
    <key>AbandonProcessGroup</key>
    <true/>
    <key>KeepAlive</key>
    <true/>
    <key>Label</key>
    <string>com.rachelbrindle.concourse.worker</string>
    <key>Nice</key>
    <integer>0</integer>
    <key>ProgramArguments</key>
    <array>
    <string>/Users/you/concourse/worker.sh</string>
    </array>
    <key>RunAtLoad</key>
    <true/>
    <key>StandardErrorPath</key>
    <string>/usr/local/var/log/concourse_darwin_worker.log</string>
</dict>
</plist>
And the corresponding worker.sh:
#!/bin/sh -l

cd /Users/you/concourse
/usr/local/bin/concourse worker \
    --work-dir /Users/you/concourse/darwin_work_dir \
    --tsa-host $CONCOURSE_HOST:2222 \
    --tsa-public-key /Users/you/concourse/keys/web/tsa_host_key.pub \
    --tsa-worker-private-key /Users/you/concourse/keys/worker/worker_key
Last updated: 2021-12-14 22:03:47 -0800
Docker
Docker is cool.
Dockerfiles
FROM is needed at the top of the Dockerfile, this specifies the image you’re building on.
RUN will run a shell command at image-build-time. Use these sparingly, to reduce the amount of layers created.
Pushing
Need to tag the image in your dockerhub username
e.g. docker build -t younata/my-image .
Need to login: docker login
And push: docker push younata/my-image:latest
Last updated: 2019-04-14 15:34:07 -0700
Java
Java is terrible.
Jackson
Jackson is a java library for (de)serializing json.
If you create a JsonDeserializer subclass that is an inner class of another class (like below), you need to mark that inner class as static, or else you’ll get a $CLASS has no default (no arg) constructor error.
public class Foo {
    public static class FooDeserializer extends JsonDeserializer<Foo> {
        @Override
        public Foo deserialize(JsonParser parser, DeserializationContext ctx) throws IOException {
            return null;
        }
    }
}
Last updated: 2019-08-06 11:06:40 -0700
Jupyter
Setting up a single-user jupyter notebook server.
- Create and activate a virtualenv on the server:
python3 -m venv jupyter && . jupyter/bin/activate - Install jupyter.
pip3 install jupyter - Setup for creating a public server.
jupyter notebook --generate-config - Set the password for the notebook:
jupyter notebook --generate-config - Modify the port to be something specific. Put all the configuration in the
~/.jupyter/jupyter_notebook_config.jsonfile. In~/.jupyter/jupyter_notebook_config.json:"port": 9999 - Setup nginx to forward to that port:
server { listen 80; server_name $SERVER_NAME; location '/.well-known/' { default_type "text/plain"; root /usr/local/var/www/letsencrypt; } location / { return 301 https://$server_name$request_uri; } } server { listen 443 ssl; server_name $SERVER_NAME; ssl on; ssl_certificate /etc/letsencrypt/live/$SERVER_NAME/fullchain.pem; ssl_certificate_key /etc/letsencrypt/live/$SERVER_NAME/privkey.pem; ssl_session_timeout 5m; ssl_dhparam /usr/local/etc/nginx/dhparam.pem; add_header Strict-Transport-Security "max-age=31536000; includeSubdomains;"; location / { proxy_set_header X-Real-IP $remote_addr; proxy_set_header Host $http_host; proxy_pass http://$HOST_IP:$HOST_PORT; proxy_redirect http:// https://; } location ~ /api/kernels/ { proxy_pass http://$HOST_IP:$HOST_PORT; proxy_set_header Host $host; # websocket support proxy_http_version 1.1; proxy_set_header Upgrade "websocket"; proxy_set_header Connection "Upgrade"; proxy_read_timeout 86400; } location ~ /terminals/ { proxy_pass http://$HOST_IP:$HOST_PORT; proxy_set_header Host $host; # websocket support proxy_http_version 1.1; proxy_set_header Upgrade "websocket"; proxy_set_header Connection "Upgrade"; proxy_read_timeout 86400; } } - Setup letsencrypt:
domains = $SERVER_NAME rsa-key-size = 4096 server = https://acme-v01.api.letsencrypt.org/directory email = $EMAIL text = True authenticator = webroot webroot-path = /usr/local/var/www/letsencrypt - Configure DNS to direct
$SERVER_NAMEto your machine. - Restart nginx
- Run certbot
sudo certbot certonly -c /path/to/letsencrypt/config - Set it up to automatically run.
OSX
On OSX, we’re going to set this up as a LaunchAgent, so in ~/Library/LaunchAgents, add:
<?xml version="1.0" encoding="UTF-8"?>
<!DOCTYPE plist PUBLIC "-//Apple//DTD PLIST 1.0//EN" "http://www.apple.com/DTDs/PropertyList-1.0.dtd">
<plist version="1.0">
  <dict>
    <key>Label</key>
    <string>com.younata.jupyter</string>
    <key>RunAtLoad</key>
    <true/>
    <key>KeepAlive</key>
    <false/>
    <key>ProgramArguments</key>
    <array>
        <string>/path/to/virtualenv/bin/jupyter</string>
        <string>notebook</string>
        <string>--config=$HOME/.jupyter/jupyter_notebook_config.json</string>
    </array>
    <key>WorkingDirectory</key>
    <string>$HOME</string>
  </dict>
</plist>
Note that $HOME should be expanded to your home directory, not included in the plist.
Last updated: 2023-08-12 08:09:50 -0700
Location
Encoded as latitude/longitude. I look forward to the day when humans can specify planet and have that actually have meaning in most people’s everyday lives.
This stackoverflow answer describes an excellent way to describe what decimal degrees signifies (on Earth), reproduced:
| Digit | Accuracy Denoted | Explanation |
|---|---|---|
| Sign | Indicates which part of the globe we’re on | |
| Hundreds | Using longitude, not latitude | |
| Tens | 1000 km | Useful for indicating continent or ocean |
| Ones | 111 km | Large state/Country |
| 0.1 (Tenth) | 11.1 km | Distinguishing cities |
| 0.01 (Hundredth) | 1.1 km | Distinguishing villages |
| 0.001 (Thousandth) | 110 m | Large agricultural field or institutional campus |
| 0.0001 (Ten-Thousandth, 1e-4) | 11 m | A parcel of land. It is comparable to the typical accuracy of an uncorrected GPS unit with no interference. |
| Fifth-Decimal (1e-5) | 1.1 m | Distinguishing trees from each other. Accuracy to this level with commercial GPS units can only be achieved with differential correction. |
| Sixth-Decimal (1e-6) | 0.11 m | you can use this for laying out structures in detail, for designing landscapes, building roads. It should be more than good enough for tracking movements of glaciers and rivers. This can be achieved by taking painstaking measures with GPS, such as differentially corrected GPS. |
| Seventh-Decimal (1e-7) | 11 mm | this is good for much surveying and is near the limit of what GPS-based techniques can achieve. |
| Eight-Decimal (1e-8) | 1.1 mm | Charting motions of tectonic plates and movements of volcanoes. Permanent, corrected, constantly-running GPS base stations might be able to achieve this level of accuracy. |
| Ninth-Decimal (1e-9) | 11 microns | For almost any conceivable application with earth positions, this is overkill and will be more precise than the accuracy of any surveying device. |
| 10+ Decimal (1e-10) | Indicates that a computer/calculator used without regard for the fact that this level of detail is meaningless. |
Last updated: 2019-12-30 17:13:52 -0800
Methodologies and Practices
About the schools of thought around how to better develop software.
This is near and dear to me, as I spent the first several years of my career at the consulting arm of Pivotal - Pivotal Labs. Where we worked with clients to try to help them get better at writing software. I definitely drunk the kool-aid in a way that’s still affecting me today.
Extreme Programming
The basic idea behind Extreme Programming (usually abbreviated as XP) is to take the good parts of older software engineering practices and take them to “extreme” levels. For example, from wikipedia: Code reviews are good, why not do them all the time? i.e. pair programming.
Pivotal came up with a variant of Extreme Programming they called the “Scaled Agile Framework”. Despite the corporate name, it’s fairly good and something I’m comfortable with.
Links/Resources
- Extreme Programming Explained is the primary/default resource on XP.
- The Art of Agile Development. A bit dated, though.
- Matt Parker’s book on Pivotal’s practices.
- Extreme Programming Pocket Guide is “basically the Cliff’s Notes/Spark Notes for the 1st edition of [Extreme Programming Explained] - which is far more dev-centric than the 2nd which has a lot more Product Owner stuff in it. [It] is a good way to introduce a lot of the HOW and justify it in terms of the values.”
Last updated: 2021-04-12 12:26:52 -0700
Infrastructure Monitoring
This thread on orange website is one of the actually useful threads I’ve read there.
Last updated: 2019-11-12 10:08:23 -0800
Python

I have a special place in my heart for python. One of the first programming languages I learned, and I still use it for a bunch of small-but-more-complex-than-a-shell-script programs.
Python has many issues, of course. The very free-form, whitespace-based syntax makes refactoring very difficult. The dynamic type system makes it much harder for me to reason about a program - to the point where all programs I write use type annotations to mitigate the issue. The syntax of the language makes it hard to write an rspec-like testing framework (it’s possible, but you have to use lots of with boilerplate).
Inline Execution from the Command Line
You can call python with the -c argument to execute an inline script in the command line, e.g.
python -c 'print("hello")'
Last updated: 2021-11-14 12:47:40 -0800
Ruby
Really nice, convenient, and powerful programming language.
Sinatra
Lightweight DSL for creating simple webapps.
Static files
Sinatra serves up static files from the ./public directory. This can be changed with: set :public_filder, File.dirname(__FILE__) + '/static'.
Note that the public name is not included in the URL - e.g. the file at ./public/foo/bar would be at http://server/foo/bar.
Rendering stuff
When inside of a URL pattern, you can render an erb with:
get '/' do
    erb :index # Renders and returns the .erb file at views/index.erb
end
rspec
rspec is the original BDD testing framework.
Asserting json
Turns out, that if you do something like expect(JSON.parse '{"foo": "bar"}').to eq({"foo": "bar"}), you’ll get a really confusing failure, something like expected to equal {:foo => "bar}", got {"foo" => "bar"}. Which is really confusing, until you remember that ruby automatically converts string keys to symbols in hashes. However, the json module doesn’t do this unless you tell it to. So, the correct way to do this is to add symbolize_names: true to your call, like so:
expect(JSON.parse('{"foo": "bar"}', symbolize_names: true)).to eq({"foo": "bar"})
which passes as it should.
Last updated: 2020-06-12 16:34:13 -0700
Rust
Rust is a language that I’ve been in love with for ages.
It’s also one of the most frustrating languages I’ve ever used. This is both because it has a very steep learning curve, and I’ve never written enough rust to actually be good at it.
It also has the best documentation of any language.
Swift/iOS Interop
Follow this article
Add the iOS architectures to rustup, as well as the tools for building universal iOS binaries (cargo-lipo) and C headers from rust (cbindgen).
rustup target add aarch64-apple-ios armv7-apple-ios armv7s-apple-ios x86_64-apple-ios i386-apple-ios
cargo install cargo-lipo
cargo install cbindgen
Serializing json in rust.
Follow this guide using serde.
Essentially:
Add to Cargo.toml’s [Dependencies] section:
serde = { version = "1.0", features = ["derive"] }
serde_json = "1.0"
Make your struct derive Serialize, and pass it to serde_json::to_string()
#[derive(Serialize)]
struct Thing {
    x: i32
}

fn main() {
    let thing = Thing { a: 1 }
    println!("{}", serde_json::to_string(&thing).unwrap());
}
Rust on an AVR microcontroller
Source-ish: Rust on Arduino.
You can also use this to abstract for pretty much any AVR microcontroller. I have enough bare microcontrollers to last me a lifetime.
🚨 Warning, this content is out of date and is included for historical reasons.
There’s a bug in the rust compiler right now and you can’t use a rust toolchain after 2021-01-07. To mitigate this, add the following to your project’s Cargo.toml:
[toolchain]
channel = "nightly-2021-01-07"
components = ["rust-src"]
Also check out avr-rust/ruduino for a library that provides reusable components for an arduino uno/atmega 328p.
Links
- Too Many Lists - a learn rust thing that’s really well written and actually fun.
- structopt is a way to do typed command line arguments.
- Rust cookbook.
- Command Line Apps in Rust is a small book that serves as a great intro to CLI apps in rust.
- Rust Koans offers a humorous explanation at some of the language paradigms.
- Rust Cheatsheet.
- Rust by example
Last updated: 2023-08-07 13:26:13 -0700
SOLID
Per wikipedia, SOLID is an acronym for 5 design principles in object-oriented-programming. These principles are:
- Single Responsibility
- Open-Closed
- Liskov Substitution
- Interface segregation
- Dependency Inversion
Single Responsibility
A class/interface should have one and only one responsibility.
Open-Closed
Classes should be open for extension, but closed for modification.
Liskov Substitution
AKA Design by contract.
All objects that conform to a given interface should be treated as interchangeable.
Interface segregation
It’s better to have 20 different interfaces/protocols, than 1 god interface/protocol.
Dependency Inversion
Depend upon interfaces, not a specific concrete implementation.
Last updated: 2019-09-18 13:23:41 -0700
Swift
Last updated: 2019-04-09 20:45:03 -0700
ABI Stability in libraries
AKA the @frozen attribute.
Per Swift Evolution 260, you can enable “library evolution mode” (with the -enable-library-evolution command-line argument), which will make it a non-ABI-breaking change to modify fields in a struct or add new enum cases. (These are “resilient” types).
Also, on a per-type basis, you can specify structs and enums to be @frozen, which means that the stored instance properties of a struct will not be changed (added, removed, reordered), nor will the cases of an enum change (add, remove, reorder). @frozen only really applies if library evolution is enabled, and is assumed to be the default if not (however, libraries compiled without library evolution mode enabled are not ABI-stable).
Last updated: 2019-09-06 14:16:04 -0700
Availability Attribute
The @available attribute. Not the #available attribute.
The @available attribute is used to denote the availability of a given class/struct or method.
In the simplest form, we can use it to denote that a component is available starting at a given OS version:
@available(iOS 15, *)
class MyClass {} // MyClass is only available on iOS 15 and above.
If you try to use MyClass in an app targeting iOS 14 or lower, you’ll get a compiler error, and get asked to wrap the section that uses it in a #available check.
You can specify other platforms and versions as well, the following are available:
iOSiOSApplicationExtensionmacOSmacOSApplicationExtensionmacCatalystmacCatalystApplicationExtensionwatchOSwatchOSApplicationExtensiontvOStvOSApplicationExtensionswift(e.g. specifying the version of swift this component requires)
Deprecating & Obsoleting
You can mark a component as deprecated by specifying the deprecated argument (which takes an optional version number). Similarly, you can also specify when it was obsoleted by specifying the obsoleted argument (which also takes an optional version number). Using a deprecated component will trigger a compiler warning when targeting the version the component was deprecated on (or all, if you specified deprecated: *), while using an obsoleted component will trigger a compiler error when targeting the version the component was obsoleted on.
@available(iOS, deprecated: 13, obsoleted: 14)
class MyDeprecatedAndObsoletedComponent {}

@available(*, deprecated)
class MyDeprecatedComponent {}
Message and Replacement
You can also have the compiler present a custom message as the error, and even provide a nice fix-it button if you have simply renamed it.. Use the message argument to provide a message, and a renamed argument for a new component to replace it with.
@available(*, obsoleted, renamed: "MyNewComponent")
struct MyOldComponent {}
@available(*, obsoleted, message: "Use MyNewComponent with some other component.")
struct MyOldComponent {}
Last updated: 2021-12-05 09:18:21 -0800
Creating Command Line Utilities in Swift
Parsing Arguments
Use the Swift Argument Parser library from Apple. This will take care of actually parsing command line arguments, and it offers a nice DSL for creating a type-safe way to handle the arguments.
Last updated: 2020-12-22 16:43:46 -0800
Async/Await
Async/Await, Tasks, Actors and Sendable in Swift.
Last updated: 2023-08-12 08:20:24 -0700
Testing Async/Await Code
There’s enough differences between testing code using Swift Concurrency (async/await) and testing more traditional, callback-based asynchronous code. This page intends to document some of what I’ve learned.
Make Fakes Threadsafe
Because Swift Concurrency will run your code concurrently, you are at much higher risk of running into concurrent access problems. Especially if you use something like Nimble’s toEventually behavior. Which you almost have to use if you want to be able to test the in progress state of concurrent code.
I’ve found that, where possible, making fakes be Actors is the best way to handle this. Actors implicitly conform to Sendable, and they handle concurrent access by only allowing one thread of work to access it at a time. However, you can also make fakes threadsafe by using tools like locks. If you don’t do this, then you’ll run into annoying common and hard to diagnose test crashes.
Pre-resolve Concurrent Fakes
One of the assumptions in Swift Concurrency is that threads will never be blocked. Which was a problem because my preferred approach for testing asynchronous code essentially blocks the running thread of work until the test resolves it (and sometimes the test only ever tests the in-progress state, so doesn’t need to resolve). This end up resulting in incredibly high test flakiness until I realized it’s better to pre-resolve concurrent functions - or, basically, treat them like they’re synchronous functions.
For example, consider this given bit of code:
protocol SomeDependencyProtocol {
    func method(_ callback: @escaping (Int) -> Void)
}

struct SubjectUnderTest {
    let dependency: SomeDependencyProtocol

    func perform(_ callback: @escaping (String) -> Void) {
        dependency.method {
            callback(String(describing: $0))
        }
    }
}

// Sample Fake Implementation.
// For brevity, ignoring thread-safety concerns.
final class FakeSomeDependencyProtocol {
    private(set) var methodCalls = [(Int) -> Void]()
    func method(_ callback: @escaping (Int) -> Void) {
        methodCalls.append(callback)
    }
}
Traditionally, I would test it almost in an Act Arrange Assert matter.
var subject: SubjectUnderTest!
var dependency: FakeSomeDependencyProtocol!

describe("perform(_:)") {
    var result: String? = nil
    beforeEach {
        result = nil

        subject.perform {
            result = $0
        }
    }

    // ...

    describe("when the dependency returns") {
        beforeEach {
            dependency.methodCalls.last?(1)
        }

        it("calls the callback with the stringified value") {
            expect(result).to(equal("1"))
        }
    }
}
Instead, I learned that it’s significantly more reliable to pre-resolve the async dependencies, like so, like so:
protocol SomeDependencyProtocol {
    func method() async -> Int
}

struct SubjectUnderTest {
    let dependency: SomeDependencyProtocol

    func perform() async -> String {
        String(describing: await dependency.method())
    }
}

// Sample Fake Implementation.
actor FakeSomeDependencyProtocol {
    var methodStub = 0
    func setMethodStub(_ stub: Int) {
        methodStub = stub
    }
    func method() async -> Int {
        methodStub
    }
}
With a test, using justBeforeEach to allow the same structure as before:
var subject: SubjectUnderTest!
var dependency: FakeSomeDependencyProtocol!

describe("perform(_:)") {
    var task: Task<String, Never>?
    justBeforeEach {
        task = Task { [subject] in await subject!.perform() }
    }

    afterEach {
        task?.cancel()
        task = nil
    }

    // ...

    describe("when the dependency returns") {
        beforeEach {
            await dependency.setMethodStub(1)
        }

        it("returns the stringified value") {
            await expect { await task!.value }.to(equal("1"))
        }
    }
}
For the unfamiliar, in Quick, using justBeforeEach means the passed-in closure will run after the other beforeEach closures in a test. So, in this example, the await dependency.setMethodStub(1) line will run before the task = Task { ... } line.
Last updated: 2023-08-12 08:20:24 -0700
Dependency Injection
The 5th letter of SOLID refers to the usage of Dependency Injection. Or providing an instance with all of the things it needs to do its job - instead of having that instance having to reach out to other things for methods/functions.
DI is great. It’s what enables you to follow the rest of SOLID. It greatly eases tests (instead of using a real thing, you can use a test double), and it cleans up your code.
This page is meant to be an examination of DI strategies in Swift that I’m aware of.
I’m familiar with and have used Blindside (which is Objective-C, but the same principles apply), Swinject, Swift-dependencies, as well as various proprietary approaches.
Liskov Substitution, but for Packages
One App architecture opinion I strongly hold is that no third-party dependencies should be made integral to your app. For example, if you build your app on Core Data, and weave it throughout the app, you will have a very hard time if you ever decide to switch ORMs (even if it’s to, say, Swift Data, which uses Core Data under the hood), let alone databases. This is essentially Liskov Substitution, but applied to Packages.
This same principle applies to my opinions of DI frameworks. In my opinion, the best way to do DI is to have functions or initializers take in protocols for what they use, and elsewhere, use a DI framework to create instances use those initializers.
For example:
protocol AProtocol { ... }
protocol BProtocol { ... }

struct AStruct: AProtocol {
    let b: BProtocol
    init(b: BProtocol) { self.b = b }
}

// elsewhere

final class DependencyProvider {
    func a() -> AProtocol {
        AStruct(b: b())
    }

    func b() -> BProtocol { ... }
}
In my own projects, the DependencyProvider is actually a custom async-aware fork of Swinject.
Handling Makers
Sometimes, an instance needs to be able to make another instance. For example, needing to make the view model for the next view in a hierarchy. These should be injected as closures that take any dynamic dependencies. In other words, the Factory pattern.
For example:
import SwiftUI

protocol ViewModel {
    associatedtype View: SwiftUI.View
    var view: Self.View { get }
}

protocol AViewModelProtocol: ViewModel {
    associatedtype BViewModel: ViewModel
    var bViewModelFactory: (String) -> BViewModel { get }

    func bView(_ arg: String) -> BViewModel.View
}

final class AViewModel<BViewModel: ViewModel>: ViewModel, AViewModelProtocol {
    let bViewModelFactory: (String) -> BViewModel

    init(bViewModelFactory: @escaping (String) -> BViewModel) {
        self.bViewModelFactory = bViewModelFactory
    }

    var view: some View { AView(viewModel: self) }

    func bView(_ arg: String) -> BViewModel.View {
        bViewModelFactory(arg).view
    }
}

struct AView<ViewModel: AViewModelProtocol>: View {
    @State var viewModel: ViewModel
    var body: some View {
        VStack {
            NavigationLink("Hello") {
                viewModel.bView("hello")
            }
            NavigationLink("Goodbye") {
                viewModel.bView("goodbye")
            }
        }
    }
}
This is, admittedly, a lot of boilerplate just to deal with the generics.
You might think it might be worth it to wrap the (String) -> BViewModel closure syntax in a type. But, really, you’re only saving a small amount of characters, in exchange for the boilerplate of creating yet another type to essentially shuffle a closure around. If Swift had Objective-C’s frankly horrific closure syntax, then creating a separate type to wrap that would be worth it. But thankfully, Swift has relatively sane closure syntax.
Last updated: 2024-03-05 16:59:13 -0800
Nimble
A better way to handle test assertions.
Compare: expect(foo).to(equal(bar)) to XCTAssertEqual(foo, bar). The first is much more clear in the intent.
Nimble is comprised of two forms: The expectation, and the matchers. The expectation is the expect([...]).to part of the library. It handles getting the value to assert against, getting the file and line the assertion happened on, negating the assertion matchers (expect to equal, expect to not equal), and asynchronous expectations. The matchers are a set of functions that assert on the passed-in value and determine whether the value matches and passes information about why or why not.
Writing your own matcher
First of all, test them.
Last updated: 2020-01-02 15:16:17 -0800
Swift and Objective-C
NS_REFINED_FOR_SWIFT
NS_REFINED_FOR_SWIFT is a macro that helps you write “swifty” API for objective-c code.
In the header file, you tag the method declaration with this macro, and in a swift extension, you write a swift implementation that uses it. This method prepends two underscores (myMethod:whatever: -> __myMethod(_: whatever:)) to most methods, though in the case of initializers, it appends to the first argument label.
NS_SWIFT_NAME
NS_SWIFT_NAME is a macro that lets you specify the swift name for an objective-c method.
In the header file, you tag the method declaration with this macro, giving it the swift method name as it’s argument, e.g.: -setFoo:(Foo *)foo NS_SWIFT_NAME(set(foo:));
Last updated: 2019-07-17 22:25:51 -0700
Patterns and Pattern Matching
Last Update: Swift 5
Pattern refers to “the structure of a single value or composite value”. Here are the list of patterns
Wildcard Pattern (Underscore)
This is what _ means. It matches and ignores any value.
for _ in 1...3 {
    // do something three times
}
Identifier Pattern
This is the basic assignment pattern. let someValue = 42 is an example, someValue is an identifier pattern that matches the value 42 of type Int.
Value-Binding Pattern
Value-Binding is something on top fo identifier, it’s one of the first cases of pattern matching you might find, e.g.
let someTuple = (4, 5) // Tuple Pattern
switch someTuple {
    case let (x, y): // Binds x and y to the elements of someTuple
        // do something with x and y
        break
}
Tuple Pattern
Refers to “a comma-separated list of zero or more patterns, enclosed in parentheses.” Note that parentheses around a single element are effectively ignored.
The following are valid example of Tuple Patterns:
let aTuple = (1, 2)
let (a, b) = (3, 4)
let (a) = 2 // Not a Tuple Pattern
Enumeration Case Pattern (Enum)
It matches the case of an existing enum type. They appear in switch case labels, as well as if, while, guard, and for-in statements.
Using this enum:
enum AnEnum {
    case foo
    case bar
    case baz
}

let myEnum = AnEnum.bar
switch statement:
switch myEnum {
    case .foo:
        // do something
        break
    case .bar:
        break
    default:
        break
}
if statement:
if case .foo = myEnum {
    // do something.
}
while statement:
while case .bar = myEnum {
    // do something
}
guard statement:
guard case .baz = myEnum else {
    return
}
Optional Pattern
This matches optional values. Uses the ? syntax sugar to match things.
e.g.
let someOptional: Int? = 32

// Matches using enumeration case.
if case .some(let x) = someOptional {
    // do something with x
}

// Matches using the optional pattern.
if case let x? = someOptional {
    // do semithng with x
}
This also works with for-in, and switch statements:
for-in:
let arrayOfOptionals: [Int?] = [1, nil, 3, nil, 5]
for case let number? in arrayOfOptionalInts {
    print("\(number)")
}
// prints "1", "3", "5"
switch:
let someOptional: Int? = 32

switch someOptional {
    case 32?:
        // something.
        break
    default:
        // something else.
}
Type-Casting Patterns
This is the is and as patterns. is is used as a conditional (if foo is Int), or in switch statement case labels (case foo is Int: // do something with foo as an Int). as is used to change type to a related one, as needed (foo as String).
Expression Pattern
This represents the value of an expression. These appear only in switch statement case labels.
e.g.:
let point = (1, 2)
switch point {
case (0, 0):
    break
case (-2...2, -2...2):
    break
default:
    break
}
You can also overload the ~= operator to provide a custom expression matching behavior.
func ~= (pattern: String, value: Int) -> Bool {
    return pattern == "\(value)"
}

switch 3 {
case "3":
    print("This actually matches")
default:
    break
}
Last updated: 2019-07-06 11:39:54 -0700
Sequence and Array
Reminding myself to think outside the map, reduce, and filter boxes.
allSatisfy(_:)
allSatisfy(_:) works like python’s all. Returns true if each and every item in the array passes the given block.
contains(_:) and contains(where:)
contains(_:) is available only if the Element conforms to Equatable. This effectively is the same as calling contains { $0 == element }, though I imagine the implementation is slightly more optimized than that.
contains(where:) works like python’s `any. It takes in a block, and returns true if that block returns true for least one item in the receiving array or sequence.
Last updated: 2019-08-06 11:36:19 -0700
SwiftUI
SwiftUI is the new UI hotness from WWDC 2019.
Last updated: 2019-06-12 08:27:47 -0700
Vapor
Vapor is one of two swift web frameworks to have gained traction (the other is Kitura). Both have their rough edges and reasons to use or not use them. I have slightly more experience with Vapor. Though Kitura feels more native-swift.
Specify the http status error
To the best of my knowledge, there are two easy ways to return a custom http status error: throw an AbortError, or return a Response. (The other way is to create your own type that conforms to ResponseDecodable, and have it set the http status in encode(status:headers:for:))
AbortError
AbortError is a protocol, which means you have to create your own instance of it in order to return one. Simple enough, but still annoying. Your custom implementation needs to have 3 properties: status, reason, and identifier. As the name indicates, you throw your error from the request handler.
Return a Response
From your asynchronous request handler, you can chain on .encode(status:for:) to set the status. (The second parameter is the request object your request handler was called with).
Testability
I haven’t gotten around to writing a microframework to do this, but here’s my Application extension I add to every vapor project I do:
import Vapor

@testable import App

extension Application {
    static func testable() throws -> Application {
        var config = Config.default()
        var services = Services.default()
        var env = Environment.testing
        try App.configure(&config, &env, &services)
        let app = try Application(config: config, environment: env, services: services)
        try App.boot(app)

        return app
    }

    func sendRequest<Body>(to path: String, method: HTTPMethod, headers: HTTPHeaders = .init(), body: Body?) throws -> Response where Body: Content {
        let httpRequest = HTTPRequest(method: method, url: URL(string: path)!, headers: headers)
        let wrappedRequest = Request(http: httpRequest, using: self)
        if let body = body {
            try wrappedRequest.content.encode(body)
        }
        let responder = try make(Responder.self)

        return try responder.respond(to: wrappedRequest).wait()
    }
}
This is used as:
let subject = try Application.testable()

let response = try subject.sendRequest(to: "/my/path", method: .PUT, body: Optional<String>.none)
Last updated: 2021-05-13 15:18:56 -0700
Testing
Theory behind testing. For practical information, look in each language’s pages.
If you’re not practicing TDD, your code is wrong. If your code happens to work without tests, then you’re practicing voodoo programming1, and that’s worse than not having tests at all.
What is TDD? At it’s simplest, it’s test-first. That is, write down what you expect the code to do, then write the code to get the test to pass.
Why test
Why even test? Surely just manually running the code is enough to see that it works, right?
No. Tests provide automated and repeatable use cases for the code. Without them, to get the same quality of code, you need to write down exactly how to verify the code, and then follow that procedure each time the code (or one of it’s dependencies) changes. Compounding that with the other parts of the code, this eventually presents a mountain of work to do just to even verify small changes.
With automated, repeatable tests, the only difference is that the verification procedure is written in code. This allows your computer to follow those steps, which it can do in orders of magnitude less time than you can, with much higher attention to detail than you can continuously give it. Additionally, it allows you to more tightly control all the inputs and outputs, so you know precisely what caused a bit of code to go wrong.
Additionally, anyone else who works with you now has a simple script they can run to verify that your changes work, instead of having to look up and follow your documentation to try to figure out what you did to test it. This can even be generalized into an external environment that automatically runs the test script to determine whether or not your changes are good - something which is called continuous integration
Why TDD
So, testing has it’s values, sure. Why test first? Why is that so much better than writing tests after the implementation code is written?
- It forces you to write down, in code, what you expect the implementation to do. Writing this down will also force you to write down branches of the code as it moves through.
- This bypasses the whole “yeah, we ran out of time to write tests” issue - always write tests, even when something like a time crunch makes it painful.
- It’s much more scientific.
TDD essentially applies the scientific method to programming.- You take the observation (what the code should do)
- You take the hypothesis (what the code is now)
- You write down tests to verify the hypothesis against the observation
- You continuously run those tests against, modifying the hypothesis until it matches the observation.
- It’s more relaxing.
Once you’re in the mindset of “the code is done when the tests pass”, this becomes more like a game to get the tests to pass.
Tools
For iOS, I’m a big fan of Quick and Nimble. As of May 2022, I even took over maintainership of the projects.
This generalizes to me being a big fan of rspec-based testing frameworks. I find that this better allows me to express the branching behavior of tests, as well as makes it more obvious the different effects a given action (method or function) can have.
Videos
Bryan Lile’s TATFT lightning talk expresses a lot of the same philosophy that I do.
Programming without knowing/understanding what the code you’re writing actually does.
Last updated: 2023-08-12 08:09:50 -0700
Web Development
Web Technologies. HTML, markdown, css, maybe some javascript.
css
macOS & iOS Dark Mode
You can configure for light or dark mode via the prefers-color-scheme media query.
See this mdn page.
html
table
Used to represent tabular data, the <table> element can display a 2 dimensional table of data.
Permitted elements are, in order:
<caption>(0 or 1)<colgroup>(0 or more)<thead>(0 or 1)- Either of:
<tbody>(0 or more)<tr>(1 or more)
<tfoot>(0 or 1)
caption
The <caption> is used to provide a title or caption for a table. It should always be the first child of a <table>. Styling and physical position can be adjusted using the CSS caption-side and text-align properties.
colgroup
The <colgroup> element allows you to define columns inside of a table. You can then place <col> elements inside to define those specific column groups. It should appear after <caption>, but before other child elements of the <table>.
markdown
See this cheatsheet.
Remember that you can still inline html inside markdown, as markdown, generally, is compiled down to html anyway.
svg
Paths
Specifically, what you can put in the d attribute of a path.
Last updated: 2021-11-15 20:21:35 -0800
XCode
Swift/objc/apple products IDE.
Can’t open a new editor pane?
I lost an afternoon before I saw this stackoverflow answer suggesting I accidentally enabled focus mode.
Last updated: 2019-12-18 13:03:37 -0800
Speedrunning
Completing a game in as little time as possible.
Actually engaging in speedrunning is not really for me. But watching other people speedrun games is entertaining.
Games Done Quick
GDQ is what got me in to speedrunning. As of early 2020, they engage in 3 events every years - Awesome Games Done Quick is a weeklong event held in January and supports the Prevent Cancer Foundation. Summer Games Done Quick is weeklong event held in June/July and supports Doctors Without Borders. Finally, GDQx is held weekend event at twitchcon and supports various charities.
Calendars
Horaru.org is a neat site that translates the GDQ schedules into ical formats, so that you can subscribe in your own calendar program.
Last updated: 2021-11-15 20:11:54 -0800
Tesla
I have a Model 3.
Keyfob
The optional keyfob is an extra $150, because of course it is. It’s actually kind of nice because you can use it to remotely lock/unlock the car without using your phone (I don’t trust the “lock when walking away” to lock soon enough). Don’t expect it to be great for valet - the Tesla keyfobs are odd enough that key cards are easier for a valet.
Summon with the Keyfob
As of 2019.7.11, you can use the keyfob with summon. It requires “Requires Continuous Press” in the summon settings to be off, but once that’s a thing, you press on the “roof” button of the car until the emergency lights and such turn on, then you press on the frunk (forward) or trunk (backward) button to move the car. Press on the roof button again to stop.
Drafting
Aerodynamics is awesome. When drafting behind a vehicle, there are at two zones where the air currents help you out: The zone immediately behind the leading vehicle, which gives the most drafting advantage - at the expense of being incredibly dangerous. This then drops off quickly into a very turbulent and aerodynamically harmful zone - to the point where it’s better to not draft than be in that turbulent zone. Afterwards, there’s another zone where you get pretty decent performance. This zone, once found, is the area where you can balance safety (you’re safely behind the leading vehicle) and efficiency. With the autopilot feature, you can then let the car keep you in that zone of maximum efficiency.
Methodology
The goal here is to use autopilot at specific follow distances to find a local efficiency maxima. This works best on a very long stretch of mostly straight, same-grade (so… flat) road. If the leading vehicle maintains the same speed throughout this, then it’s even better (ideally, they’d also stay in the same position in the lane, but that’s a bit to hopeful).
Essentially, set follow distance to 7 (the max), pull up the energy monitor, set it to show the consumption rate (so you can view the current efficiency), and follow the vehicle for 5 miles. After 5 miles, note the energy usage for that and repeat with a lowered follow distance. Eventually, you’ll reach a follow distance where the energy usage not only increased, but it increased dramatically (I’ve seen jumps from 180 Wh/mi to 220 Wh/mi). This means that you’re in the turbulent zone. Once you have that, set the follow distance to whichever had the highest efficiency/lowest energy usage.
Note that the particular follow distances depend greatly on the type of leading vehicle, and the speed they’re traveling. In general, the faster the leading vehicle is, the more elongated each zone is.
Data/Previous Results
| Leading Vehicle Kind | Speed (mph) | Follow Distance |
|---|---|---|
| Semi (w/ Trailer) | 60 | 5 |
Last updated: 2019-08-27 11:25:25 -0700
To Don’t
The opposite of a ToDo list.
This is mostly lists of projects I am interested in starting, but I know I will be a complete waste of time if I ever start it. These definitely could work with a team of people, but for a solo project, these aren’t worth it.
- Web Browser. Something maybe like Midori was a number of years ago (I last used it ~2010). Frankly, outside of basic stuff you can build on top of
WKWebView, browsers aren’t worth it. There’s an (unfortunate) reason that there are really only 3 browsers out there. - Email client. I actually built one ages ago when I was still in high school. Learned how to use POP and SMTP from that. But with more modern requirements, email clients aren’t worth my time.
Last updated: 2023-08-12 07:56:41 -0700
Unix Tooling & System Administration
Doing things in the shell and managing systems.
This covers the following command line tools:
agis like a combination offindandgrep. It allows you to use regexes to search in or for files in a file tree.- AirCrack is a wifi-sampling (and, if you have the right and enough information, allows you to break into wifi networks) program, but can be used for other, really cool things.
ffmpegallows you to manipulate video and audio files from the command line. It’s very full featured, especially considering it’s a command line program.gitcovers some of the less-used (for me, as someone who usesgitalmost entirely from the command line) git commands.jqis a tool for manipulated json data, providing anxpath-esque syntax for doing so.pandocallows converting between different document types. (markdown to latex, markdown to pdf, etc.)youtube-dlis a neat program for downloading from and querying various video hosting sites. Including the namesake youtube.- Lastly, shell is a list of recipes for doing various things in the common shell scripting languages. Whether or not you should write shell scripts that are that complex is not at all covered (You probably shouldn’t).
On the System Administration side, this section covers:
- Backups covers backing up different systems and how to do that.
- Linode discusses how I use Linode, the cloud hosting provider I use.
- SystemD has some information for setting up and using systemd services.
- ZNC covers a little bit of setting up and using the IRC bouncer, znc.
Network Monitoring
bandwhichis a network monitor tool written in rust. It displays current network utilization by process, connection and remote IP/hostname.
Last updated: 2021-12-11 11:36:24 -0800
The Silver Searcher
Install on OSX using brew, with brew install the_silver_searcher.
A code-specific searching tool similar to ack, but faster. ag.
By default, you can use it to search for a given pattern in all files under a directory tree.
You can modify it with -g to search for files with names matching the given pattern (similar to find | grep, but much faster). ag -g '.+swift' returns all files ending in “swift”.
You can modify it with -G to search for pattern in all files with names matching a pattern. ag -G '.+swift' Foo searches for the pattern ‘Foo’ only in files ending in “swift”.
You can specify the -l flag to only output the names/paths of files that contain the matching pattern. ag -l foo will only print the names of files containing the text “foo”.
Last updated: 2021-11-15 20:11:54 -0800
aircrack-ng
Wifi-sampling program.
Amazing stackexchange on using aircrack to find a lost kindle.
Last updated: 2021-11-15 20:11:54 -0800
Backups
Backing up your computer. Do it.
For Macs, use time machine. For Linux, use rsync configured with cron to automate this. For iOS devices, use iCloud backup. This should be an option for the Mac, but it isn’t, and that’s silly. The only windows box I have is an xbox, and backing up my game saves is part of why I pay for xbox live.
Basically, you have two options: Have your computers be ephemeral, where you don’t care if they die. Or back them up. Keep in mind the only way to really keep your computers ephemeral is to have an automated way to set them back up to their current state. But then that way needs to be backed up. So you’ll need at least one machine backed up. Additionally, you need to backup all your important data (photos, etc.) anyway.
Local Backup
For every computer you backup, get an extra drive that is at least as good as the drive in the computer (i.e. same capacity or greater, same drive technology or better). Back each computer up to their own backup drive. The idea is that when the main drive dies, you will immediately replace it with the backup drive (and then rush out and get a new backup drive). However, if you easily can’t replace the drive the computer uses (like… all Apple laptops), then you really only need the backup drive to be at least the same capacity as the main drive.
For desktops, keep the backup drive plugged in all the time, but make sure to only ever use it for backups. For laptops, plug in the backup drive at least once a day (or whenever you plug it in to charge. Whichever is more often).
On a linux desktop, set up a crontab entry for root to backup your main drive to, something like:
0 5 * * * rsync -vax --delete --ignore-errors / /mnt/backup_drive/
Where /mnt/backup_drive is the path to your mounted backup drive. This’ll back up your main drive (and only that drive) every day at 5 am.
Backing up Xbox Game Saves
Per this thread (note: requires login), you can apparently back up xbox game saves by plugging in an external drive to the USB port, and go to Settings -> System -> Kinect & Devices -> Storage. Only just learned this while writing this article, so I haven’t tried it myself.
Cloud Backup
Backing up to the cloud is an “in addition to local backups” thing. It’s very tempting to make it your only backup, and, honestly, it’s ok to do that. Obviously not ideal, but a small monthly cost is much easier to stomach than large-ish one-time expenses. Additionally, cloud backup is much more convenient to setup, and it entirely solves the “my house burned down” from a data-protection standpoint. The downsides with cloud backups that it’s much slower to restore, you have to keep paying for it, and you have to worry about cloud issues (keeping your account paid and in good standing, keeping your account secure, company staying around, etc.). Still, it’s 100% worth it to have cloud backup.
I use backblaze (note: Referral link) for my Macs. It’s $6 per month per computer, which is a really good price. For the Linode instances I use, I pay the extra for Linode’s backup system (and then these are also set up to be ephemeral anyway in case that fails).
Testing Your Backups
Your backups are worthless if they don’t actually work. The only way you know they work is if you test them. In addition to verifying the logs that data was actually backed up, you should be able to boot directly from the backup. By booting to the backup disk, and by verifying it has the correct data, you’ve tested your backup.
For Macs, go into Time Machine and verify that it has been backing up. Time machine backups are not bootable, so this is how you verify that it’s bootable.
For Cloud Backup, you can use their web interface to view your files and download them. For testing, you should be able to download a full archive of your system onto an external drive. I don’t do that. I pick a random recently-updated set of files, as well as some much older set of files and verify I can pull those down.
Do this at least once every year. Preferably every 6 months. Set a calendar reminder.
Sources
This is formed from a combination of the advice from the following:
- Jeff Geerling write a blog post on his backup plan
- Jamie Zawinski has a very good page on setting up backups
Last updated: 2021-12-14 22:06:34 -0800
ffmpeg
ffmpeg is a CLI programming for editing and manipulating videos.
Resizing Video Frame Size
From this stackoverflow question, resizing the video frame size is an easy and fast way to reduce video file size. I’ve found it especially useful for reducing file size of screencasts from my phone.
ffmpeg -i input.mkv -vf "scale=iw/2:ih/2" half_the_frame_size.mkv will reduce a 2x retina-sized video down to non-retina size.
ffmpeg -i input.mkv -vf "scale=iw/3:ih/3" a_third_the_frame_size.mkv will reduce a 3x retina-sized video down to non-retina size.
Creating a video from images
This is awesome. From this stackoverflow question, it’s more-or-less a combination of the -framerate $X and -r $Y to get what you want. You can also use -vf fps=$X to specify the fps of the video.
Creating a gif from a video
This post from giphy engineering describes how to do that. It’s essentially:
ffmpeg -i $INPUT_VIDEO -filter_complex "[0:v] fps=30,split [a][b];[a] palettegen=stats_mode=single [p];[b][p] paletteuse=new=1" $OUTPUT.gif
Last updated: 2021-11-15 20:11:54 -0800
Git
Decentralized version control system.
Searching for when a given string was introduced
When you want to find out which commit first referenced a given string:
git log -S <string to search for> --source --all
See this stackoverflow answer.
Reverting commits without creating a new one
This is useful when you want to revert a set of commits, but also when you want to change them before committing again.
git revert -n <commit hashes to revert>
Deleting multiple local branches
git branch -d $BRANCH_NAME will delete a local branch IFF it’s been merged with the upstream branch (or remote). If you pass in --force, then it’ll delete it regardless. git branch -D $BRANCH_NAME is a shorthand for git branch -d --force $BRANCH_NAME.
git branch -D prefix* doesn’t work (git won’t do the name completion for you). Instead, something like this will work:
git branch | grep "$PREFIX_STRING" | xargs git branch -D
Rebasing a branch onto another one.
Say you branch off my_work from develop. But you later find out you need to merge it into master. How do you merge only the commits from my_work into master without including other commits from develop?
As with most things in software, stackoverflow has the answer.
git checkout my_work
git rebase --onto master develop my_work
That is, you rebase onto the target branch, from the original branch point, with the branch you want to move.
Submodules
Submodule are a neat, basic way to manage dependencies.
Adding one is easy
git submodule add SUBMODULE_URL
When you’re not the one who added it, the command to pull down the submodules is less obvious.
git submodule update --init --recursive
Removing a submodule
Removing a submodule is less obvious, and, as of git 1.8.5, involves a 3-part process:
git submodule deinit -f -- $MODULE
rm -rf .git/modules/$MODULE
git rm -f $MODULE
Thanks to this stackoverflow answer
Generating and Applying Patches
Patch files are files (duh) describing changes between one version to another. They can be easily created by piping git diff $SOURCE_COMMIT $TARGET_COMMIT to a file. Or, for changes from HEAD to whatever’s being worked on, a simple git diff.
Once you have the patch, you can then apply it with git apply $PATH_TO_FILE, so, for example:
git diff > change.patch
git co .
git apply change.patch
Which is a less elegant version of git stash.
Stop tracking changes to a file
Use git rm --cached on the file(s), and add them to the ignore patterns.
Last updated: 2021-11-15 20:11:54 -0800
jq
The tutorial will cover most use cases.
Color the json input: curl $JSON_PRODUCING_URL | jq.
Get first item in a list: echo $JSON_LIST | jq '.[0]'
Get specific item from a list: echo $JSON_LIST | jq '.[].foo'
You can even convert that to other json objects: echo $JSON_LIST | jq '.[] | {foo: .bar.foo, baz: .bar.baz}'. Don’t forget to use ' so that the | character gets sent to jq and isn’t interpreted by the shell.
Output raw string: jq -r
Last updated: 2021-11-15 20:11:54 -0800
Linode
Referral Link. If you sign up using that link, you’ll receive a $100, 60-day credit once you’ve added a valid payment method to your account. Non-referral link.
A really nice host of linux-based machines that I use to host many sites (including this one!). This have a number of different offerings, though I only use them for their VPSs (the “Shared CPU” compute offering). As of this writing, I have 2 different VPSs set up: a “nanode” instance ($5/month), and a 2 GB “linode” instance ($10/month). The nanode plan essentially runs nginx configured for a bunch of different roots (this site, the coz-e site, and others). The linode instance exists solely to run my CI, running both a Concourse web instance, as well as a single Linux worker.
These are all managed through an Ansible playbook I wrote (with initial setup being covered by a small shell script. This script does the bare minimum to create and configure an instance enough to have Ansible work correctly).
Last updated: 2021-12-14 22:03:47 -0800
Pandoc
pandoc is a utility for converting documents to another.
Creating Slide Shows
Last updated: 2021-11-15 20:11:54 -0800
Shell
Bash shell, Z Shell, etc.
Basic Math
From this stackoverflow answer, to add two numbers and set the result to another, you use $(()) syntax, e.g.
BAZ=$(($FOO + $BAR))

# Incrementing a number
A=$(($A + 1))
Conditionals
spaces around the square brackets are important.
You can reverse conditionals with !:
if [ ! -d "some_directory" ]; then
    echo "'./some_directory' does not exist!"
fi
Numbers
use the -eq (equal), -gt (greater than), -ge (greater than or equal), -lt (less than), -le (less than or equal) operators (amongst others) to compare numbers.
if [ 3 -eq 3 ]; then
    echo "3 is equal to 3"
fi
String
use = and != for string equality
if [ "$MY_STRING_VARIABLE" = "bar" ]; then
    echo "MY_STRING_VARIABLE is bar"
fi

if [ "$MY_STRING_VARIABLE" != "bar" ]; then
    echo "MY_STRING_VARIABLE is not bar"
fi
You can also compare whether they are lexicographically greater than or less than (e.g. “aaaa” is lexicographically less than “aaab”) another string with the \< and \> operators.
if [ "$MY_STRING_VARIABLE" \< "bar" ]; then
    echo "MY_STRING_VARIABLE lexicographically greater than bar"
fi

if [ "$MY_STRING_VARIABLE" \> "bar" ]; then
    echo "MY_STRING_VARIABLE lexicographically lesser than bar"
fi
Regex Matching
Use the =~ operator with a string as the left hand operand and the pattern as the right hand operand.
if [ "$MY_STRING_VARIABLE" =~ '.*' ]; then
    echo "It better have matched, that was wildcard everything."
fi
File/Directories
You can check if a file exists with -f.
if [ -f "some_file" ]; then
    echo "file at './some_directory' exists and is not a directory!"
fi
You can test that a directory exists with -d, e.g.:
if [ -d "some_directory" ]; then
    echo "directory at './some_directory' exists!"
fi
Iterate over Files in a Tree
You can iterate over all files in a tree with:
while IFS= read -r -d '' -u 9
do
    [Do something with "$REPLY"]
done 9< <( find . -type f -exec printf '%s\0' {} + )
(Thanks stackexchange)
Number of Arguments
The number of arguments is represented as $#
if [ $# == 1 ]; then
    echo "There was only one argument passed to $0: $1"
fi
Checking if a command exists
You can check whether a command exists by checking if command -v ${COMMAND_TO_CHECK} >/dev/null 2>/dev/null returns 0 (it exists) or non-zero (does not exist)
if [ ! command -v my_special_script >/dev/null 2>&1 ]; then
    echo "my_special_script not found"
fi
Checking if a string is a number
You can use the -eq operator to verify if something is a number: if ! [ "${some_number}" -eq "${some_number}"] 2>/dev/null; then "${some_number} is not a number"; fi
You can similarly use the -ge to determine if something is a positive number.
Traps
You can use the trap command to run code when the shell script exits (or any signal occurs), like so:
function on_end {
    echo "woohoo"
}

trap on_end exit
which will print “woohoo” to stdout when the script exits.
Last updated: 2021-11-15 20:11:54 -0800
SystemD
Service files
This is a pretty basic resource on service files
Retrieving logs
Use the journalctl command, e.g.
journalctl -x myservice.service
Last updated: 2021-12-11 11:36:24 -0800
Vim
Setting Syntax Language
Vim does a decent enough job of guess the language based on the file extension, but when it gets it wrong you can set it manually:
:set syntax=html
Last updated: 2023-09-21 10:08:23 -0700
youtube-dl
youtube-dl is a python program for downloading videos from youtube and other sites.
Video Formats
To get a list of video formats to download, pass the -F flag, this returns an ascii table of available formats. It looks like so:
$ youtube-dl -F https://www.youtube.com/watch\?v\=9pBmNcv0Mlw
[youtube] 9pBmNcv0Mlw: Downloading webpage
[youtube] 9pBmNcv0Mlw: Downloading video info webpage
[info] Available formats for 9pBmNcv0Mlw:
format code  extension  resolution note
249          webm       audio only DASH audio   82k , opus @ 50k, 118.66MiB
250          webm       audio only DASH audio   97k , opus @ 70k, 151.06MiB
171          webm       audio only DASH audio  138k , vorbis@128k, 251.62MiB
140          m4a        audio only DASH audio  148k , m4a_dash container, mp4a.40.2@128k, 297.95MiB
251          webm       audio only DASH audio  161k , opus @160k, 293.26MiB
160          mp4        256x144    144p  137k , avc1.4d400c, 30fps, video only, 159.66MiB
278          webm       256x144    144p  228k , webm container, vp9, 30fps, video only, 263.76MiB
242          webm       426x240    240p  229k , vp9, 30fps, video only, 304.18MiB
133          mp4        426x240    240p  233k , avc1.4d4015, 30fps, video only, 229.71MiB
243          webm       640x360    360p  408k , vp9, 30fps, video only, 510.55MiB
134          mp4        640x360    360p  528k , avc1.4d401e, 30fps, video only, 406.49MiB
244          webm       854x480    480p  735k , vp9, 30fps, video only, 743.27MiB
135          mp4        854x480    480p  969k , avc1.4d401f, 30fps, video only, 606.68MiB
247          webm       1280x720   720p 1511k , vp9, 30fps, video only, 2.20GiB
302          webm       1280x720   720p60 1752k , vp9, 60fps, video only, 1.82GiB
136          mp4        1280x720   720p 2244k , avc1.4d401f, 30fps, video only, 2.12GiB
298          mp4        1280x720   720p60 2515k , avc1.4d4020, 60fps, video only, 1.11GiB
248          webm       1920x1080  1080p 2658k , vp9, 30fps, video only, 3.95GiB
137          mp4        1920x1080  1080p 3138k , avc1.640028, 30fps, video only, 3.46GiB
299          mp4        1920x1080  1080p60 3941k , avc1.64002a, 60fps, video only, 3.69GiB
303          webm       1920x1080  1080p60 4417k , vp9, 60fps, video only, 6.10GiB
18           mp4        640x360    medium , avc1.42001E, mp4a.40.2@ 96k, 1.17GiB
43           webm       640x360    medium , vp8.0, vorbis@128k, 1.80GiB
22           mp4        1280x720   hd720 , avc1.64001F, mp4a.40.2@192k (best)
The format code (first column in the list) is the code you pass along with the -f flag to download a specific format.
E.g. downloading the above 1280x720 format is:
youtube-dl -f 22 https://www.youtube.com/watch\?v\=9pBmNcv0Mlw
Last updated: 2021-11-15 20:11:54 -0800
ZNC
ZNC is an irc bouncer. It essentially is a proxy between your client and the actual networks you want to connect to, and allows you to appear to be connected to a network without actually being connected.
SSL/LetsEncrypt
The ZNC wiki has a really useful page on setting this up.
Essentially, the gist here is two things: After renewing an ssl cert, you need to concat the privkey.pem and fullkey.pem files into one file that znc knows about.
cat /etc/letsencrypt/live/$MY_DOMAIN/{privkey,cert,chain}.pem > ~/.znc/znc.pem
Also, znc will auto-reload this key file as each client connects, so there’s no command to tell znc to look for this new file.
Last updated: 2021-11-15 20:11:54 -0800